
Summary of Contents for Lehner Versand 5567869
- Page 1 GEBRAUCHSANLEITUNG Elektrischer Hemdenbügler & -trockner Artikelnummer: 5567869 LESEN SIE DIESE GEBRAUCHSANLEITUNG VOR VERWENDUNG DES GERÄTS AUFMERKSAM DURCH. 1 / 7...
-
Page 2: Wichtige Sicherheitshinweise
A. Wichtige Sicherheitshinweise 1. Halten Sie das Gerät immer von Wasser und Feuer fern. Stellen Sie das Gerät auf einen harten, ebenen Untergrund mit guter Luftzirkulation. 2. Verwenden Sie zur Reinigung der Oberfläche des Geräts ein weiches Tuch. Waschen Sie das Gerät niemals. 3. - Page 3 16. Energiesparend, zusammenlegbar und einfach zu transportieren. 17. Das Gerät besitzt ein Heizelement. 18. Geräuscharmes Gerät mit Überhitzungsschutz für eine verbesserte Qualität ohne Lärmbelästigung. 19. Hohe Temperaturen für ein schnelles Trocknen von Kleidungsstücken. D.Schaltkreis E. Produktaufbau 3 / 7...
- Page 4 F. Bestandteile Bestandteil Anzahl Motor 1 Set Basis 1 Stk. Luftauslasselement 1 Stk. Haltestange 2 Stk. Verbindungsstück 1 Stk. Klemmen 4 Stk. Querstange 1 Stk. Luftkissen 1 Stk. G. Zusammensetzen 20. Setzen Sie den Motor auf die Basis. 4 / 7...
- Page 5 21. Öffnen Sie den Reissverschluss des Luftkissens und setzen Sie es auf den Motor. Installieren Sie das Luftauslasselement auf dem Motor. Setzen Sie die beiden Haltestangen mit dem Verbindungsstück zusammen. Setzen Sie die Querstange mit den Klemmen auf die Haltestange und schliessen Sie den Reissverschluss des Luftkissens.
- Page 6 H. Auseinandernehmen 24. Folgen Sie den Schritten zur Zusammensetzung des Geräts in umgekehrter Reihenfolge, um das Gerät auseinanderzunehmen. Verwendung 25. Stecken Sie den Netzstecker in die Steckdose. 26. Stellen Sie den Timer auf „ON“. Das Gerät setzt sich in Betrieb und die Leuchtanzeige leuchtet.
- Page 7 J. Tipps Achten Sie darauf, dass das Hemd ohne Falten auf dem Luftkissen angebracht ist. Ziehen Sie es wenn nötig zurecht. K. Problembehebung Nr. Problem Ursache 1. Das Kleidungsstück ist sehr dick. Zu lange 2. Das Kleidungsstück wurde vor dem Trocknungszeit Trocknen nicht geschleudert.
- Page 8 MODE D’EMPLOI Séchage/repassage électrique Numéro d’article: 5567869 LIRE ATTENTIVEMENT LE MODE D’EMPLOI AVANT UTILISATION. 1 / 7...
- Page 9 A. Consignes de sécurité importantes 1. Toujours tenir l’appareil à distance de l’eau et le feu. Placer l’appareil sur une surface plate et solide et dans une zone présentant une bonne circulation de l’air. 2. Ne pas laver l’appareil. Utiliser seulement un chiffon doux pour essuyer la surface.
- Page 10 D.Circuit de commutation E.Structure du produit 3 / 7...
- Page 11 F.Composants Nom de la pièce Quantité Unité moteur 1 set Base fixe 1 pièce Elément de ventilation 1 pièce Tige de maintien 2 pièces Connecteur 1 pièce Pinces 4 pièces Barre fixe 1 pièce Coussin d’air 1 pièce G. Assemblage 20.
- Page 12 21. Ouvrir le zip du coussin d’air et le placer sur le moteur. Installer l’élément de ventilation à l’intérieur sur le moteur. 22. Installer les deux tiges de maintien avec le connecteur et placer la barre fixe au-dessus avec les pinces. Puis fermer le zip du coussin d’air.
- Page 13 H.Démontage 24. Pour démonter la machine, suivre les instructions d’assemblage en sens inverse. I.Consignes d’utilisation 25. Brancher la prise. 26. Tourner le bouton sur ON jusqu’à que la machine démarre, le témoin lumineux s’éclaire. 27. Tourner le bouton pour régler le minuteur. J.CONSEILS Bien ajuster la chemise sur le coussin d’air une fois le coussin gonflé.
- Page 14 K.Résolution de problèmes No. Problème Raison possible 1. Le vêtement est très épais. Temps séchage 2. Le vêtement n’a pas été essoré. trop long 3. Le zip est peut-être mal fermé et de l’air (>180minutes) s’échappe du coussin d’air. 1. L’entrée ou la sortie d’air est bloquée ou La machine s’arrête recouverte par un vêtement ou quelque soudainement...
- Page 15 INSTRUCTION MANUAL Electric Iron Dryer Item Number: 5567869 SHIRTS & PANTS & SHOES BEFORE OPERATION THIS PRODUCT, PLEASE READ THE INSTRUCTIONS CAREFULLY. 1 / 9...
- Page 16 A. Important Safeguard Please always keep away from water and fire; place the appliance on the hard and flat floor and good air circulation area; The appliance can use soft cloth to wipe the surface only, never allow to wash; Please hang on the cloth after dehydration;...
- Page 17 C. Features Energy saving, foldable and easy to carry. The appliance has heating wire element. Low noise fan and overheating protection; to improve the quality and avoid to disturb the life; High temperature to dry the clothes in a short time. D.
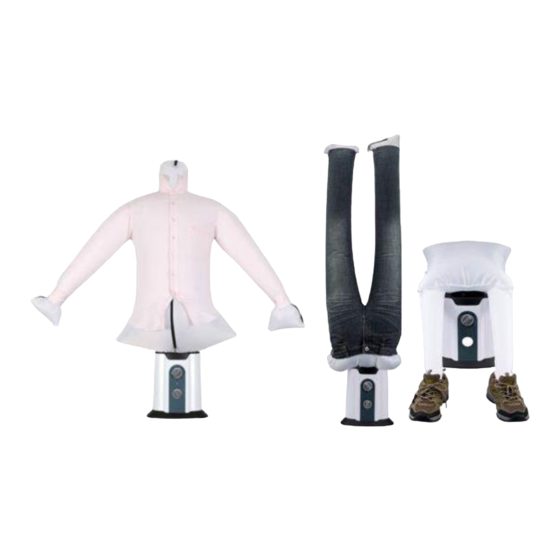
- Page 18 E. Product structure ①Motor unit ②Panel sticker ③Timer ④Shifting ⑤Fixed base ⑥Outlet vent ⑦Supporting tube ⑧Connector ⑨Clips ⑩Top rack ⑪Air bag for shirts ⑫Bottom rack ⑬Short tube ⑭Air bag for pants ⑮Air bag for shoes ⑮Air bag for shoes 4 / 9...
- Page 19 F. Components Part name Quantity Motor unit 1set Fixed base Outlet vent Supporting tube (31.5cm) 6pcs Connector 4pcs Clips 4pcs Top rack Air bag for shirts Bottom rack Short tube (13cm) Air bag for pants Air bag for shoes G. Assemble Put the motor on the fixed base.
- Page 20 Open the zip of air bag, and put the cover on to motor, install the outlet vent on the motor. SHIRTS: Install the two supporting tubes with the connector, and put the top rack on the supporting tube with the clips and zip the shirts air bag.
- Page 21 PANTS: Install three supporting tubes with two connector, Same way for rest three supporting tubes with two connector, then put two assembled tubes on the bottom rack with short tube and zip the pants air bag. SHOES: Zip the shoes air bag 7 / 9...
- Page 22 Wear the shirts/pants/shoes on the air bag and turn on the motor. H. Disassemble To disassemble this machine, follow the assemble steps in reverse. How to use Insert the power plug into power. Rotate the timer knob to “ON” until the machine starts to work, the power indicator will illuminate.
- Page 23 J. TIPS Please make the Shirts/Pants is formfitting and smooth on the air bag. K. Trouble shooting Possible reasons Solution Clothes may be very thick. Drying time too long Clothes may not have been dewatered. (>180minutes) Cover may not have been closed properly and hot air escaped.
Need help?
Do you have a question about the 5567869 and is the answer not in the manual?
Questions and answers