
Related Manuals for Tentsile Connect


Summary of Contents for Tentsile Connect
- Page 1 Connect Tree Tent O W N E R S M A N U A L It is important that all users read and understand the materials in this manual before any installation and use of the product.
- Page 2 R IS K O F SE R IOUS INJURY R IS K O F SE R IOUS INJURY A VISUAL AND TACTILE INSPECTION OF YOUR TENTSILE’S FLOOR, STRAPS AND RATCHETS SHOULD BE MADE BEFORE EACH USE. FOR SAFETY REASONS, STRAPS AND RATCHETS SHOULD BE REPLACED EVERY 2 YEARS.
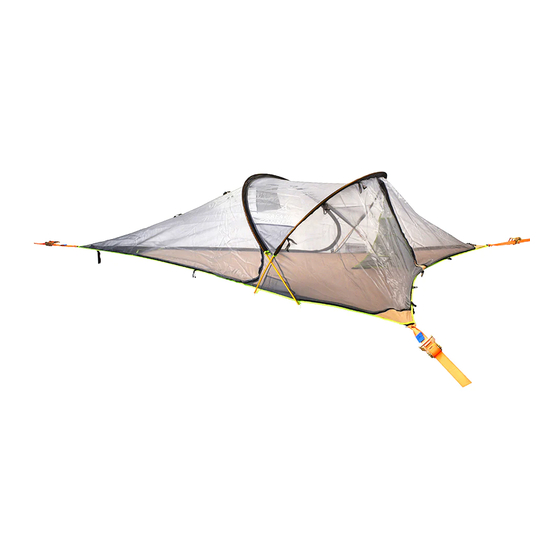
- Page 3 CONGRATULATIONS YOU ARE NOW THE PROUD OWNER OF A Tentsile Connect Tree Tent IT IS IMPORTANT THAT ALL USERS READ AND UNDERSTAND THE MATERIALS IN THIS MANUAL BEFORE ANY INSTALLATION AND USE OF THE PRODUCT. 03: Introduction 03: Introduction 09-28: Set up instructions...
- Page 4 Introduction The Connect provides a unique opportunity for you and your friends to experience the great outdoors with a whole new level of freedom and comfort. Tentsile invented Tree Tents as treehouses you can take anywhere, combining the versatility of a hammock with the comfort and security of a tent.
-
Page 5: Terms Of Use
Terms of Use Tentsile Tree Tent should be set up only as Tactile and visual checks should be made to outlined in this manual. ALL tent components and ALL anchor points before each use. NEVER jump into, onto or use it as a trampoline Replace any damaged elements if any are found. -
Page 6: Specifications
Specifications Size: Height: Rainfly: 100cm / 3ft 70D PU coated waterproof 2.56 x 4 x 4m / 8.4 x 13.5 x 13.5ft polyester, 5000HH Floor area: Tent weight: 5sqm / 52sqf 9.4kg / 20.7lbs Floor: 240D polyester-nylon Dry porch area Poles: composite, reinforced with x2 8.5mm diameter... -
Page 7: Warnings & Disclaimers
Warnings & Disclaimers Installation and use of the Tentsile Tree Tent may great care must be exercised when using it to involve heights, can be dangerous and may lead decrease the risk of injury and/or death. to injury and/or death. - Page 8 Tentsile Tree Tents need 3 secure and strong anchor points to suspend from. The distances are marked below. Once the location is found, lay out the Connect on the ground with the corners facing your selected trees. Protective tree wraps are provided should you wish to use them.
- Page 9 Alignment Sight Tag Use the pole sockets on the side of the tent. Look along the Connect and ensure it and the Tree Tree strap are inline with the tree. The central seam should line up with the tree strap at the rear of the Connect.
- Page 10 Tree Straps With a location found, start by wrapping the tree straps around your selected trees. 1, Wrap the loop end of each strap around your selected trees.
- Page 11 2, Once around, thread the 3, Ensure the strap is strap and pull it all through flat against the tree towards the Connect. and not twisted.
- Page 12 Attaching The Ratchet With the tree straps attached and the Connect laid in postion, you can now attach the 3 ratchet straps to the D-rings at each corner. 4, The ratchet has a loop in its strap Rear/Tail Rear/Tail 7, Pull the ratchet through...
- Page 13 5, The loop should be passed through the D-ring in the 6, Pass the ratchet through corners of the tent the loop. 8, Pull tight and dress the 9, Pushing the strap back Girth Hitch into the knot will loosen it.
- Page 14 Fitting Strap To The Ratchet With the ratchet strap attached to the D-rings, it can now be connected to the tree straps. Check each corner of the Connect is aligned to each anchor point. 10, Ensuring there’s enough length, bring the ratchet...
- Page 15 11, Feed the tree strap end through making sure it through the spindle. does not twist. 13, Lift the Connect off the 14, Give a strong pull before ground by pulling through cranking the ratchet. excess strap at each point.
- Page 16 Tightening The Ratchet Cranking the ratchet will give the tension needed and allows for easy adjustment. Ensure the ratchet is correctly in the locked position before entering the Connect. 15, Release the ratchet Attention - Ratchet Locking lock by pushing the inner latch upwards.
- Page 17 17, Pull the handle back and begin cranking 16, This will release the handle it back and forth. and allow it to be cranked. LOCKING RATCHET Lift the inner Lift the inner Lift the inner latch handle latch handle latch handle 19, Once achieved, move the to disengage to disengage...
- Page 18 Aligning The Connect Aligning The Connect Now the Connect is raised, it needs to be Now the Connect is raised, it needs to be aligned. This is adjusted by slacking the aligned. This is adjusted by slacking the other ratchets and re-adjusting the tension...
- Page 19 21, At either side, use the pole 21, At either side, use the pole socket nearest the rear to socket nearest the rear to align against the tree strap. align against the tree strap. Do the same for the other side. Do the same for the other side.
- Page 20 Inserting The Poles Inserting The Poles Insert the poles into the pole sleeves that Insert the poles into the pole sleeves that run across the top of the mesh. run across the top of the mesh. Once through, secure the ends into the Once through, secure the ends into the pole sockets and move around to the other pole sockets and move around to the other...
- Page 21 24, Insert the first pole through the pole sleeve 24, Insert the first pole through the pole sleeve closest to the tail end of the tent. Then, feed other closest to the tail end of the tent. Then, feed other pole through the remaining pole sleeve ensuring that pole through the remaining pole sleeve ensuring that the second one crosses over the first.
- Page 22 27, Take each pole end and push them towards the pole push them towards the pole The main body of the Connect is now The main body of the Connect is now sockets whilst the lengths sockets whilst the lengths complete and ready for the rainfly.
- Page 23 30, Double check the tree straps, 30, Double check the tree straps, ratchet locks and poles are secure ratchet locks and poles are secure before entering the Connect. before entering the Connect.
- Page 24 Fitting The Rainfly Fitting The Rainfly The rainfly is easily added to the Connect. The rainfly is easily added to the Connect. Each corner of the rainfly has C-clips that Each corner of the rainfly has C-clips that simply clip onto the ratchet handle for easy simply clip onto the ratchet handle for easy installtion.
- Page 25 35, Lace the cords around the 35, Lace the cords around the 34, Overlap the strap again 34, Overlap the strap again strap and connect the hooks strap and connect the hooks with the rainfly and with the rainfly and to secure.
- Page 26 Pegging Out Pegging Out The final part is to peg it out using the The final part is to peg it out using the bungees and pegs provided. bungees and pegs provided. Simply attach the bungee loop to the peg, Simply attach the bungee loop to the peg, pull until firm and then screw them into the pull until firm and then screw them into the...
- Page 27 38, Position so the rainfly can 38, Position so the rainfly can 37, Loop the bungee on 37, Loop the bungee on have good water runoff have good water runoff to the peg so that it will to the peg so that it will and minimise sagging.
- Page 28 Check all ratchets are in the locked Check all ratchets are in the locked position before entering. position before entering. 39, At each corner, connect the 39, At each corner, connect the rainfly hooks together to rainfly hooks together to secure it down.
- Page 29 Double check the tree straps, ratchet locks and poles Double check the tree straps, ratchet locks and poles are secure before entering the Connect. Enjoy. are secure before entering the Connect. Enjoy.
- Page 30 This re-tensioning will need to take place every so often as the materials can stretch over time. If you are using the Connect, you can slack off this strap completely and have the whole floor as a large single hammock berth to yourself.
- Page 31 BEFORE ENTERING THE TENTSILE TREE TENT. 2) Thread loop of the ratchet through the D-Ring at 7) Roll and tidy up strap ends to avoid any each corner of your Tentsile Tree Tent and take the possible trip hazzards. buckle through the loop.
- Page 32 Tentsile Promise - We will strive for a ‘get it right first Weather time, every time’ in all our dealings in manufacturing, The Tentsile Tree Tent is not intended to be used distribution, sales, and service.
-
Page 33: The Small Print
Do not attach or secure the Tentsile Tree Tent to a stolen, or re-manufactured, and being listed as new. - Page 34 1 million trees over the next 5 years. Where Do We Plant Them? Tentsile’s tree planting partners all meet a number of strict criteria; from regular updates and tracking donations, to working with local communities, training residents, planting native species and protecting saplings to maturity.
- Page 36 All rights reserved Tentsile Ltd 2015 Patent Approved...
Need help?
Do you have a question about the Connect and is the answer not in the manual?
Questions and answers