Table of Contents
Advertisement
Quick Links
Installing Dynamic C
Insert the Dynamic C CD from the Application Kit in your PC's CD-ROM drive.
If the installation does not auto-start, run the setup.exe program in the root
directory of the Dynamic C CD. Install any Dynamic C modules and the software
from the supplemental CD after you install Dynamic C.
Multi-Port Serial-to-Ethernet Application Kit
Application Kit Contents
2 CD-ROMs — Dynamic C
•
sample programs, software, and information related to the Application Kit.
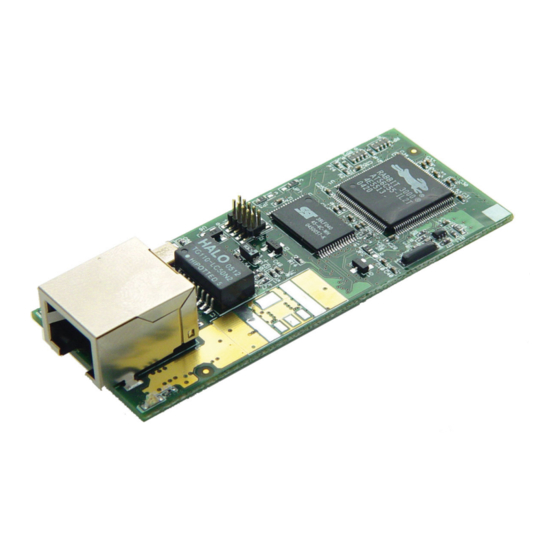
RCM3700 module.
•
RCM3700 Prototyping Board, with a bag of accessory parts and jumpers for use on the Prototyping
•
Board.
QKits QK145 Serial Temperature Sensor.
•
AC adapter, 12 V DC, 1 A (included only with Application Kits sold for the North American market). A
•
header plug leading to bare leads is provided to allow overseas users to connect their own power supply
with a DC output of 7.5–30 V.
10-pin header to DB9 programming cable with integrated level-matching circuitry.
•
Cables and cable kits to access QK145 temperature sensor and serial and analog input connectors on
•
Prototyping Board.
Ethernet crossover cable.
•
Getting Started instructions.
•
Rabbit 3000 Processor Easy Reference poster.
•
Registration card.
•
Rabbit and Dynamic C are registered trademarks of Rabbit Semiconductor Inc.
®
®
with complete product documentation on disk, and supplemental CD with
Advertisement
Table of Contents

Related Manuals for Rabbit Dynamic C RCM3700


Summary of Contents for Rabbit Dynamic C RCM3700
- Page 1 Cables and cable kits to access QK145 temperature sensor and serial and analog input connectors on • Prototyping Board. Ethernet crossover cable. • Getting Started instructions. • Rabbit 3000 Processor Easy Reference poster. • Registration card. • Rabbit and Dynamic C are registered trademarks of Rabbit Semiconductor Inc.
- Page 2 Hardware Connections 1. Attach Module to Prototyping Board Turn the RCM3700 module so that the Ethernet jack is on the left as shown in Figure 1 below. Insert the module’s J1 header into the TCM_SMT_SOCKET socket on the Prototyping Board. The shaded corner at the bottom right corner of the RCM3700 module should face the same direction as the corre- sponding shaded corner below it on the Prototyping Board.
- Page 3 NOTE: Be sure to use the programming cable supplied with this Application Kit—the program- ming cable has blue shrink wrap around the RS-232 converter section located in the middle of the cable. Programming cables from other Rabbit Semiconductor kits are not designed to work with RCM3700 modules.
- Page 4 Troubleshooting If Dynamic C cannot find the target system (error message "No Rabbit Processor Detected."): Check that the RCM3750 is powered correctly — the power LED above the RESET button on the •...
Need help?
Do you have a question about the Dynamic C RCM3700 and is the answer not in the manual?
Questions and answers