Table of Contents
Advertisement
Advertisement
Table of Contents

Subscribe to Our Youtube Channel
Summary of Contents for Frey TN-100
- Page 1 TN-100 NON-CONTACT TONOMETER OPERATION MANUAL All specifications are subject to changes without notice. September 2018. 24-24904.04 1434 FREY S.J. 05-502 Piaseczno ul. Wołodyjowskiego 38 POLAND Tel:+48 (22) 397-86-09 E-mail: frey@freymedical.eu www.freymedical.eu...
-
Page 3: Table Of Contents
TN-100 NON-CONTACT TONOMETER TABLE OF CONTENTS INTRODUCTION..................5 SYMBOLS ....................6 SYSTEM DESCRIPTION ................... 7 SAFETY PRECAUTIONS................8 Intended use..................... 8 Installation....................8 Precautions during operation............... 9 Interferences ..................11 PACKAGE CONTENT ................12 GLOSSARY ................... 13 DEVICE DESCRIPTION................14 Operator's side view .............. - Page 4 TN-100 NON-CONTACT TONOMETER 7.3.3 Printout format................45 Database operations..............47 7.4.1 Browsing the patient list .............. 47 7.4.2 Searching for patient..............47 7.4.3 Detailed view of patient ............... 47 7.4.4 Adding patient to database ............47 7.4.5 Removing patient from database ..........48 7.4.6...
-
Page 5: Introduction
FREY can not be held responsible for misdiagnosis of results. The right to repair or set up the TN-100 Tonmeter or to carry out periodical part replacements is reserved only to the Manufacturer or to persons authorized by the Manufacturer. -
Page 6: Symbols
TN-100 NON-CONTACT TONOMETER SYMBOLS Manufacturer Date manufacture Follow Instructions for Use The CE mark - indicates conformity with the provisions of 93/42/EEC Medical Device Directive Separate collection of Waste Electrical and Electronic Equipment - Indicates that this device should be disposed of for EU member countries in accordance with Directive 2002/96/EC (WEEE). -
Page 7: System Description
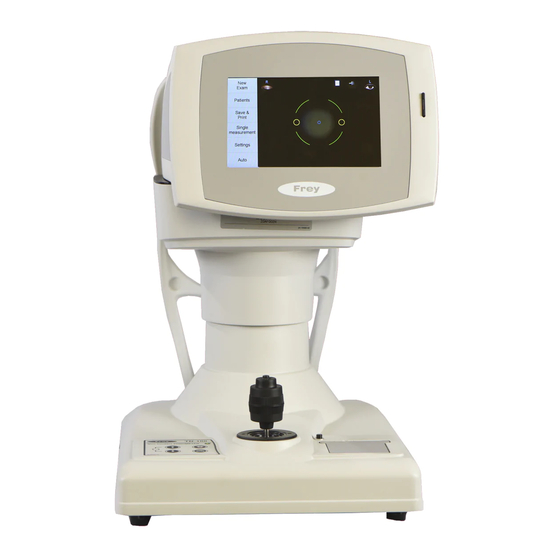
TN-100 is equipped with a color 7" touch screen display, with which can be controlled all the operations. The friendly and easy user interface allows intuitive navigate through available options. -
Page 8: Safety Precautions
TN-100 NON-CONTACT TONOMETER SAFETY PRECAUTIONS Intended use TN-100 Non-contact Tonometer is medical device designed to calculate intraocular pressure of patient's eye. Do not use tonometer for any other purpose! Installation Do not lift device by holding the measuring head, chin rest, or joystick. -
Page 9: Precautions During Operation
TN-100 NON-CONTACT TONOMETER Power connections Check the frequency, voltage and allowable current (or power consumption) of the power source before connecting the power supply. Connecting to inappropriate power source may cause fire or an electric shock! Connect the power plug only to a grounded 3P-outlet. Otherwise a short circuit due to failure of the device may result in electric shock. - Page 10 TN-100 NON-CONTACT TONOMETER If any device failure occurs, stop operation immediately, indicate the failure, and contact local distributor to request repair. Do not attempt to repair device yourself! Never modify the device! Doing so may cause electric shock or failure of the device!
-
Page 11: Interferences
The electric setting of the room complies with the electric standards. The instrument is used in compliance with Operation Manual. The Manufacturer accepts no responsibility for any modifications made to the TN-100 Non-contact Tonometer outside the factory. Operation Manual 24-24904.04... -
Page 12: Package Content
TN-100 NON-CONTACT TONOMETER PACKAGE CONTENT Open the package and check that the specified amount of the following items are included in the package and are not damaged. If any item is missing or damaged, contact local distributor as soon as possible. -
Page 13: Glossary
TN-100 NON-CONTACT TONOMETER GLOSSARY [CCT]: Central cornea thickness [IOP]: Intraocular pressure Operation Manual 24-24904.04... -
Page 14: Device Description
TN-100 NON-CONTACT TONOMETER DEVICE DESCRIPTION 6.1 Operator's side view Eye level mark - a reference mark when aligning the patient's eye. LCD Touch screen - displays the measurement screen and various settings screens. Touch the touch panel buttons shown on the screen to make various settings and operate the device. -
Page 15: Patient's Side View
TN-100 NON-CONTACT TONOMETER 6.2 Patient's side view Forehead support. The outlet of the measuring head. Chin rest. Power switch. Operation Manual 24-24904.04... -
Page 16: Bottom Side View
TN-100 NON-CONTACT TONOMETER 6.3 Bottom side view 1. DC Input. Operation Manual 24-24904.04... -
Page 17: Control Panel
TN-100 NON-CONTACT TONOMETER 6.4 Control panel LED Power indicator. Chin rest 'Up' button. Chin rest 'Down' button. 'Sleep' button - to switch the device in the sleep mode - it turns off the display. 'Packing' button - pressing this button for 3 seconds moves the measuring head to the lowest position for packing. -
Page 18: Display
TN-100 NON-CONTACT TONOMETER 6.5 Display 6.5.1 Main screen 'New Exam' - prepares the device for examination by clearing the previous results. 'Patients' - go to the list of patients (7.5.7). 'Print' - allows to save and/or print the results. 'Single measurement'/'Triple measurement' - toggles between two available measurement modes: triple and single measurement. - Page 19 TN-100 NON-CONTACT TONOMETER 11. In this place on the screen patient's name is displayed, if he was selected from the database. 12. These buttons allow to choose the eye which will be examined. 13. Inside this circle, during the examination in a manual mode, the reflection of the fixation LED on the eye should be placed.
-
Page 20: Common Settings
TN-100 NON-CONTACT TONOMETER 6.5.2 Common settings 'Common' - go to the common settings screen. 'Tonometer' - go to the tonometer settings (7.5.3). 'Printer' - go to the printer settings (7.5.4). 'Storage' - go to the storage settings (7.5.5). 'Info' - go to the info screen (7.5.6). - Page 21 TN-100 NON-CONTACT TONOMETER You need to enter 4 digit PIN code and confirm with OK. When PIN protection is enabled, you must enter the code: - when trying to enter the list of patients; - when trying to export / import a database to / from a SD memory card;...
-
Page 22: Tonometer Settings
TN-100 NON-CONTACT TONOMETER 6.5.3 Tonometer settings Common - go to the common settings screen (7.5.2). Tonometer - go to the tonometer settings. Printer - go to the printer settings (7.5.4). Storage - go to the memory settings (7.5.5). Info - go to the info screen (7.5.6). - Page 23 TN-100 NON-CONTACT TONOMETER pressure mode occurs also when pressing the 'New exam' button on the main screen. b) Off – device always operating in the normal pressure mode. 10. Units - is used to choose the pressure units: a) mmHg – results are shown in mmHg.
-
Page 24: Printer Settings
TN-100 NON-CONTACT TONOMETER 6.5.4 Printer settings Common - go to the basic settings screen (7.5.2). Tonometer - go to the tonometer settings (7.5.3). Printer - go to the printer settings. Storage - go to the storage settings (7.5.5). Info - go to the info screen (7.5.6). - Page 25 TN-100 NON-CONTACT TONOMETER Print time and date - enables/disables adding time and date of measurement to the printout. Print ID - enables/disables adding patient's ID to the printout. Print name - enables/disables adding patient's name to the printout. 10. PRINT SURNAME - enables/disables adding patient's surname to the printout.
-
Page 26: Storage Settings
TN-100 NON-CONTACT TONOMETER 6.5.5 Storage settings Common - go to the basic settings screen (7.5.2). Tonometer - go to the tonometer settings (7.5.3). Printer - go to the printer settings (7.5.4). Storage - go to the storage settings. Info - go to the info screen (7.5.6). - Page 27 TN-100 NON-CONTACT TONOMETER 13. IMPORT PATIENTS LIST FROM SD CARD – with this option you can import list of the patients from another FT-800 Tonometer or from ‘Perimeter’ application on a Only patients that have unique ID number assigned are subject to import. In case in the list which is to be imported there are any patients already present in tonometer's database, their data will not be changed at all;...
-
Page 28: Device Info
TN-100 NON-CONTACT TONOMETER 6.5.6 Device info Common - go to the basic settings screen (7.5.2). Tonometer - go to the tonometer settings (7.5.3). Printer - go to the printer settings (7.5.4). Storage - go to the storage settings (7.5.5). Info - go to the info screen. -
Page 29: Patients List
TN-100 NON-CONTACT TONOMETER 6.5.7 Patients list Add patient - go to the screen for adding patient (7.5.8). Search by surname - when you touch this button, the onscreen keyboard appears, allowing you to enter a surname to search (8.4.2). Logout - allows you to log out, if the PIN Password database protection is enabled (6.5.2). -
Page 30: Adding A Patient
TN-100 NON-CONTACT TONOMETER 6.5.8 Adding a patient Create - adding the new patient. Back - return to the previous screen. Field for entering patient's ID. Field for entering patient's forename. Field for entering patient's surname. Field for entering the patient's date of birth. -
Page 31: Detailed View Of Patient
TN-100 NON-CONTACT TONOMETER 6.5.9 Detailed view of patient 1. Append results - appends results located on the main screen to the currently displayed patient. 2. Print last exam - allows to print the last exam of the patient. 3. Print all - allows to print all exams of the patient. - Page 32 TN-100 NON-CONTACT TONOMETER 13. Header of the exam, containing time and date of performing the exam. 14. Results for the left eye. Color of pressure value displayed indicates reliability of that result, from most to least reliable: black (reliable), yellow, red. The arrow next to the result indicates that the exam has been conducted in the high IOP mode.
-
Page 33: On Screen Keyboard
TN-100 NON-CONTACT TONOMETER 6.5.10 On screen keyboard Field in which the entered content is displayed. Button to confirm the entered content. SHIFT button to toggle between lower and upper case letters. BACKSPACE button that removes last entered sign. Holding this button removes subsequent signs continuously. -
Page 34: Operating The Device
TN-100 NON-CONTACT TONOMETER OPERATING THE DEVICE 7.1 Preparation for the measurement 7.1.1 Starting tonometer Immediately after starting the device, the measuring head moves and an air blow test is performed. Do not allow the patient to place their face on the chin rest until the air blow test is complete. -
Page 35: Measurement
TN-100 NON-CONTACT TONOMETER 7.2 Measurement This device is designed to calculate the intraocular pressure based on the Goldmann applanation tonometry. If more accurate measurement is required, it is recommended to use the Goldman applanation tonometer. Do not use this device for eyes with weak corneas due to disease or surgery. -
Page 36: Setting The Patient's Position
TN-100 NON-CONTACT TONOMETER 7.2.1 Setting the patient's position When moving the measurement head and/or chinrest of the device, pay attention to the position of the patient's face, hands and fingers. The patient may be injured by the moving section of the device. -
Page 37: Conducting The Measurement
TN-100 NON-CONTACT TONOMETER 7.2.2 Conducting the measurement Do not allow any person to place their hands or fingers in the clearance under the measuring head or the section under the chinrest. Their hands or finger may be injured! The eye lid and/or eyelash covering the automatic alignment ring during measurement may affect measurement results. - Page 38 TN-100 NON-CONTACT TONOMETER 8.2.2.1 Automatic mode measurement In order to conduct measurement in automatic mode, follow the steps below: 1. Using the button (1) select the measurement mode: single or triple. 2. Using joystick, roughly get close with the measuring head to the patient's eye, so that the white markers reflected off the cornea, were near the yellow circles on the screen (2).
- Page 39 TN-100 NON-CONTACT TONOMETER next to the result indicates that the exam has been conducted in the high pressure mode. 8.2.2.2 Manual mode measurement In order to conduct measurement in manual mode, follow the steps below: 1. Using joystick, roughly get close with the measuring head to the patient's eye, so that the white markers reflected off the cornea, so that white markers were accurately within the yellow circles (1).
- Page 40 TN-100 NON-CONTACT TONOMETER 8.2.2.3 Aborting measurement To abort the auto measurement operator needs to pull the joystick maximally towards oneself. Alternatively, touching any button on the main screen while the auto alignment/measurement is ongoing, also canceling the measurement. Aborting the measurement is always confirmed with the on screen message.
-
Page 41: High / Normal Iop Selection Dialog
TN-100 NON-CONTACT TONOMETER 7.2.3 High / Normal IOP selection dialog 1. When the measurement is conducted in normal IOP mode. When the measurement result exceeds the range of a normal pressure, and in settings of the tonometer the high IOP mode is enabled, the on-screen dialog appears, asking whether to switch to the high pressure mode (HIOP). -
Page 42: Error Messages During Measurement
TN-100 NON-CONTACT TONOMETER 7.2.5 Error messages during measurement In case any error message appears during the examination, the measurement is automatically halted. This message indicates that the measurement head has reached one of travel limits on one of axis. You need to use joystick to move out of the limit, check the patient's position and correct if needed, then start the measurement procedure again. - Page 43 TN-100 NON-CONTACT TONOMETER You need to verify and correct if needed patient's head position, then start measurement procedure again. Operation Manual 24-24904.04...
-
Page 44: Printing
TN-100 NON-CONTACT TONOMETER 7.3 Printing Before printing, make sure the printer has enough paper. The built-in printer is a thermal printer. Therefore, the printout fades over time, so if printouts are to be stored for a long time, you need to make a copy. -
Page 45: Printing From The Database
TN-100 NON-CONTACT TONOMETER 7.3.2 Printing from the database. In order to perform printing from the database: 1. On the main screen touch the 'Patients' button. 2. Then select a patient from the patient list, by touching the field with their ID or the name. - Page 46 TN-100 NON-CONTACT TONOMETER Menu item Description Print date and time Include date and time in the printout. No date and time on the printout. Print ID Include patient's ID in the printout. No patient's ID on the printout. Print name Include patient's first name in the printout.
-
Page 47: Database Operations
TN-100 NON-CONTACT TONOMETER 7.4 Database operations 7.4.1 Browsing the patient list To browse the list of patients: Touch 'Patients' button on the main screen. Now list of all patients appears. To browse the patients, scroll the list up and down. -
Page 48: Removing Patient From Database
TN-100 NON-CONTACT TONOMETER 7.4.5 Removing patient from database To remove patient from database: 1. Go to the detailed view of patient (refer to chapter 7.4.3). 2. Touch 'Delete' patient' button. 3. A popup dialog appears where you'll be asked to confirm, choosing 'Yes' permanently deletes the patient. -
Page 49: Database Export
TN-100 NON-CONTACT TONOMETER 7.4.10 Appending the results, when no patient selected To append the results currently displayed on the main screen to the patient that was not selected during the exam: 1. Go to the detailed view of patient (refer to chapter 7.4.3). -
Page 50: Technical Data
TN-100 NON-CONTACT TONOMETER TECHNICAL DATA Device type TN-100 Non-contact tonometer Intraocular pressure 0 - 60 mmHg (0 – 80 hPa) measurement range Measurement resolution 0.5 mmHg Main unit. Dimensions H/W/L 460 x 300 x 480 mm Weight 18 kg Power source... -
Page 51: Energy Of Visible Light And Infrared Light
TN-100 NON-CONTACT TONOMETER 8.1 Energy of visible light and infrared light Light for measuring intraocular pressure Ligh source Wavelength 940nm Output Measurement < 100 µW (limit¹: 3200 µW, t = 0.02 s) Fixation LED Ligh source LED, blue Wavelength 435nm Output <... -
Page 52: Conforming Standards
TN-100 NON-CONTACT TONOMETER 8.3 Conforming standards EN 60601-1:2006 (PN-EN 60601-1:2011) EN 60601-1-2:2007 (PN-EN 60601-1-2:2007) EN 62304:2006/AC:2008 (PN-EN 62304:2010) EN ISO 10993-1:2009 (PN-EN ISO 10993-1:2010) EN ISO 14971:2012 (PN-EN ISO 14971:2012) EN ISO 8612:2009 Operation Manual 24-24904.04... -
Page 53: Maintenance And Service
TN-100 NON-CONTACT TONOMETER MAINTENANCE AND SERVICE 9.1 Durable years This device has been designed so that its life cycle was 10 years for use, under the appropriate environment and adequately inspected and serviced. 9.2 Control of the accuracy of the measurement Immediately after starting the device, the measuring head moves and an air blow test is performed. -
Page 54: Chin Rest And Forehead Support
TN-100 NON-CONTACT TONOMETER Method for cleaning: dust and dirt located at the outlet of the head to blow away with compressed air; the glass cover at the outlet of the measuring head to gently wipe out with a ... -
Page 55: Replacing Consumables
TN-100 NON-CONTACT TONOMETER 9.4 Replacing consumables 9.4.1 Printer paper Never touch the cutter in the printer, it may cause the injury. Use only a special paper designed for the printer. Using a different paper may damage the printer. Do not start printing if there's no paper in the printer. -
Page 56: Storing And Transportation
TN-100 NON-CONTACT TONOMETER 9.5 Storing and transportation The device should be properly prepared for transportation, moving or long-term inactivity. For details, refer to chapter 10.5.1. Do not store the device in a place exposed to water or chemicals. Any water or ... -
Page 57: Disposal
TN-100 NON-CONTACT TONOMETER 9.5.2 Disposal Disposal of the device, or parts of it, should be done according to local environmental and waste disposal and recycling regulations. This symbol is applicable for EU member countries only. To avoid potential damage to the environment and possibly human... - Page 58 TN-100 NON-CONTACT TONOMETER NOTES Operation Manual 24-24904.04...
Need help?
Do you have a question about the TN-100 and is the answer not in the manual?
Questions and answers