
Summary of Contents for Canmac TT14
- Page 1 CANMAC C AT E R I N G E Q U I P M E N T S U P P L I E R PRESSURE FRYER INSTRUCTION MANUAL...
- Page 2 MODEL TT14 SPECIFICATIONS CANMAC Standard Table Top Pressure Fryer Ergonomic single-handed opening and closing operating system offers easy use in modern life. Saving up to P of your time and P of energy. The integrated blocking system only permits the cookers to be opened when the pressure has been released completely.
- Page 3 In this method of cooking, pressure and heat are two important elements. Canmac pressure fryers are designed for 145-165 °C heat (6-7) and 6-8 pci pressure. If the heat gets lower than this, then coating around the chicken won’t be crispy enough.
-
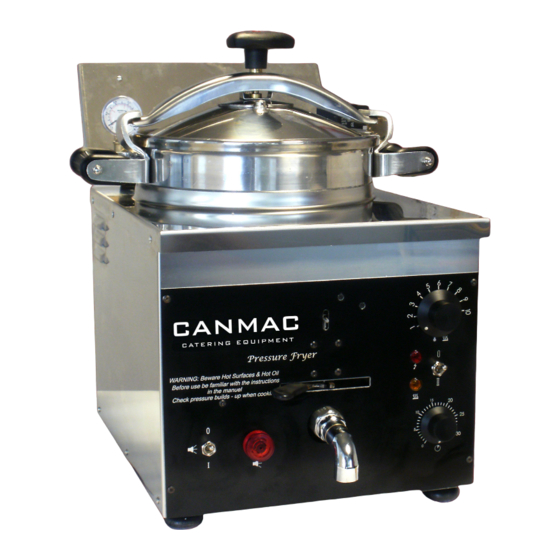
Page 4: Control Panel
THE CONTROLS Control Panel 1. Timer The timer is controlled by the bottom knob. To set the required cooking time turn the knob clockwise to the mark which will normally be 12 to 15 minutes. Timing will begin immediately and the timer knob will begin to rotate counter clockwise, the time remaining is continuously shown on the scale. - Page 5 THE CONTROLS Control Panel 3. Lamps There are two lamps, which indicate the state of the controls. The red lamp indicates when power is available at the fryer. The amber lamp indicates when power is being applied to the heaters - it will go on and off as the thermostat controls the temperature.
- Page 6 FILTERING THE COOKING OIL The cooking oil should be filtered from time to time to remove the excess breading and discarded completely when badly discoloured. If you use a nylon filter bag, do not try to filter when the oil is at cooking temperature, allow it to cool a little or it may damage the bag.
-
Page 7: Cleaning The Solenoid Valve
CLEANING THE SOLENOID VALVE (Please refer to enclosed drawing) The solenoid valve may need cleaning from time to time and has been mounted in an accessible position for this purpose. To clean the solenoid valve it has to be dismantled as follows: * The fryer should be switched off at the 13 amp plug first and moved forward to give access to the back. -
Page 8: Preparing The Food
PREPARING THE FOOD Soak the uncooked chicken portions in milk or water and then roll in Southern Fry breading mix. Allow the breaded portions to stand for a minimum of half an hour to ensure maximum adhesion of the mix to the meat and obtain full flavour retention. - Page 9 FRYING PROCEDURE 1. Start with the frying basket immersed in the oil. A cold basket can chill the oil. 2. Switch on and set the thermostat to about 165°C at least 20 minutes before you need to use the fryer from cold. After 20 minutes check the oil temperature with a thermometer, when you are sure it is up to 165°C you can start cooking.
- Page 10 FRYING PROCEDURE 6.The rest is automatic. Pressure will build and remain at 8 psi on the gauge during cooking, excess steam being released through the steam purge valve on the lid. If the pressure does not build check that the lid is setting properly. At the end of the timed frying cycle pressure will be automatically released.
- Page 11 FRYING PROCEDURE If your results are below expectations first check. 1.Is the oil temperature 165° C, more? 2.Is pressure building rapidly when you start the timer? Just one piece of chicken will produce steam much slower than a full basket. Too many pieces of chicken can, on the other hand, chill the oil and cause it to overflow.
-
Page 13: General Notes
GENERAL NOTES * The lid and the cabinet will become hot when running. Touch with care! A new machine may smoke a little the first time it is used, this is from the binding agent in the insulation and is normal. * Always switch off the wall socket before removing the plug. - Page 14 GENERAL NOTES Drain Pipe to pressure gauge (LHS) Pipe to solenoid valve (RHS) Dead weight valve nozzle in lid Spring loaded safety valve in lid DO NOT use solid fat because it will solidify in the solenoid valve and in other parts and cause the fryer to malfunction. DO NOT use a water jet or a steam jet cleaner.
- Page 16 Transport charges to be paid by the owner. This guarantee may be invalidated if the fryer is subjected to misuseor damage. SERIAL NUMBER: 18/10 Cr-Ni GUARANTEE: 1 YEAR MODEL: TT14 VALID FROM: 5 JULY 2017 Signature:...
- Page 17 CANMAC C AT E R I N G E Q U I P M E N T S U P P L I E R MAKFRY UK LTD Northfield House Farm Rugby Road, Cotesbach LUTTERWORTH LE17 4HS (+44) 01788 877 020 www.canmac.co.uk...
Need help?
Do you have a question about the TT14 and is the answer not in the manual?
Questions and answers