Table of Contents
Advertisement
Quick Links
Peter Sinkiwskij
Sinkiwskij
Digitally signed by Peter
-04'00'
Date: 2018.06.27 20:30:03
tor.com, c=US
email=peter@pneumerca
ou=Headquarters,
o=Pneumercator Co., Inc.,
DN: cn=Peter Sinkiwskij,
PNEUMERCATOR
Liquid Level Control Systems
© COPYRIGHT 2018 PNEUMERCATOR CO., INC.
TMS1000D Installation.docx
INSTALLATION MANUAL
MODEL TMS1000D
1785 EXPRESSWAY DRIVE NORTH
HAUPPAUGE, NY 11788
TEL: (631) 293-8450
FAX: (631) 293-8533
http://www.pneumercator.com
SINGLE
DEF TANK
MONITORING
SYSTEM
DRAWING NO. 20156 REV. N/C
June 27, 2018
Advertisement
Table of Contents

Summary of Contents for Pneumercator TMS1000D
- Page 1 Liquid Level Control Systems DEF TANK MONITORING SYSTEM INSTALLATION MANUAL DRAWING NO. 20156 REV. N/C MODEL TMS1000D © COPYRIGHT 2018 PNEUMERCATOR CO., INC. 1785 EXPRESSWAY DRIVE NORTH HAUPPAUGE, NY 11788 TEL: (631) 293-8450 FAX: (631) 293-8533 http://www.pneumercator.com TMS1000D Installation.docx June 27, 2018...
-
Page 3: Table Of Contents
INSTRUCTION MANUAL TMS1000D Note: A separate OPERATING MANUAL is available, but NOT required for TMS1000D installation. TABLE OF CONTENTS Page SAFETY INFORMATION ..................4 Section 1 PRODUCT DESCRIPTION General System Overview ..................5 Control Console ......................6 Liquid Level Probes ....................8 Liquid Leak Sensors .................... -
Page 4: Safety Information
AND EQUIPMENT DAMAGE. WARNING Alteration, modification or replacement with non-factory components could impair the operation of this equipment, and void the warranty. FAILURE TO COMPLY MAY RESULT IN PERSONAL INJURY, PROPERTY LOSS AND EQUIPMENT DAMAGE. TMS1000D Installation.docx June 27, 2018 PAGE 4... -
Page 5: Product Description
SECTION 1 – PRODUCT DESCRIPTIONS 1.1 GENERAL SYSTEM OVERVIEW The TMS1000D is a fully integrated tank monitor system that combines level measurement with leak detection using external sensors for secondary containment. Figure 1-1 shows a typical block diagram of how a system should be configured for installation. This diagram is not a detailed wiring diagram, which is found in Section 3 of this manual. -
Page 6: Control Console
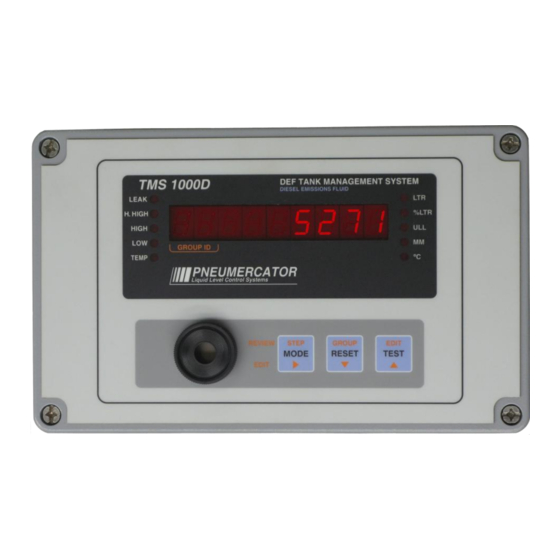
INDICATOR LIGHTS ANNUNCIATOR DIGITAL DISPLAY DRAWING NO. 20174 REV. A Figure 1-2 – TMS1000D Console Outline WARNING The console is designed for Ordinary Location, Non-Hazardous installation only, as defined by the National Electrical Code (NEC). DO NOT install where flammable vapors may be present. FAILURE TO COMPLY MAY RESULT IN PERSONAL INJURY, PROPERTY LOSS AND EQUIPMENT DAMAGE. - Page 7 A1 = PROBE INPUT / (2) SENSOR INPUTS A2 = COMMUNICATIONS CABLES A3 = RELAY INPUTS / OUTPUTS A4 = POWER DRAWING NO. 20176 REV. A Figure 1-3 – TMS1000D Designated Conduit Locations TMS1000D Installation.docx June 27, 2018 PAGE 7...
-
Page 8: Liquid Level Probes
TMS1000D 1.3 LIQUID LEVEL PROBE DESCRIPTION TMS1000D should be ordered with the MP550S magnetostrictive level probe. This probe will provide inventory management on tanks up to 15’. Figure 1-4 shows the standard MP550S probe with dimensions and specifications. Note the standard probe requires a 2-inch female NPT tank fitting, and is supplied with a 6-foot cable;... -
Page 9: Liquid Leak Sensors
Figures 1-5 through 1-8 show four (4) typical sensor types provided by Pneumercator with their most typical applications. Other non-Pneumercator models may be used; however, their use with TMS1000D should have been approved before attempting to wire them into the system. - Page 10 22 AWG CABLE 22 AWG CABLE CABLE GRIP CABLE GRIP PVC HOUSING FLOAT HIGH ALARM 18.25" 18.25" 11.00" 15.00" 15.00" FLOAT ALARM 2.25" 2.25" Ø2.88" Ø2.88" DRAWING NO. 20009 REV. N/C Figure 1-8 – RSU800 TMS1000D Installation.docx June 27, 2018 PAGE 10...
-
Page 11: Installation Details
2.1 INSTALLATION CHECKLIST WARNING Do NOT apply power to the TMS1000D until its installation has been checked and found to be in accordance with these instructions; National Electric Code; Federal, State and Local codes; and other applicable safety codes. FAILURE TO COMPLY MAY RESULT IN PERSONAL INJURY, PROPERTY LOSS AND EQUIPMENT DAMAGE. -
Page 12: Control Console Installation
TMS1000D 2.2 CONTROL CONSOLE INSTALLATION The TMS1000D is designed for both indoor and outdoor installation. If the unit is to be installed outdoors, the installer must pay attention to local code requirements for outdoor conduit runs containing AC line voltage. - Page 13 TMS1000 MOUNTING AND CONDUIT LOCATION TEMPLATE DIMENSIONS: INCHES [MM] SCALE 1:1 [240.0] USE (4) #10 [5] X 2" [50] LENGTH MOUNTING SCREWS (3/8" [10] MAX. SCREW HEAD DIA.) 8 [10.0] NOTE: TEMPLATE MUST BE PRINTED WITHOUT SCALING (1:1) ON STANDARD 8 1/2"...
- Page 15 1/2 AMP 115V 250 VAC FAST ACTING LINE VOLTAGE OPEN NEUTRAL RS232 SWITCH ISGND RS-232 AC POWER CONNECTION SWITCH STANDARD TERMINAL BLOCK DRAWING NO. 20169 REV. N/C Figure 2-3 – Control Console Interior TMS1000D Installation.docx June 27, 2018 PAGE 14...
-
Page 16: Level Probe Installation
When the probe touches the bottom, screw the bushing into the tank. DO NOT tighten the compression fitting at this time. Mark the shaft and lift the probe up 1 INCH. TMS1000D Installation.docx June 27, 2018 PAGE 15... - Page 17 2" X 3/4" NPT * BUSHING PRODUCT FLOAT 1/2" S.S. COLLAR * PURCHASED SEPARATELY FROM PNEUMERCATOR AS MODEL NO. PK2-DMx. PNEUMERCATOR Liquid Level Control Systems Bulletin 238 No Change (05/09/14) Page 1 of 1 Figure 2-5 – MP55xS Probe Assembly Instructions - Direct Mount TMS1000D Installation.docx...
-
Page 18: Leak Sensor Installation - Steel Tanks
12" MINIMUM MANHOLE IS REQUIRED FOR UNDERGROUND TANKS 2" OR LARGER MOUNTING HEIGHT MONITORING PIPE LEAK SENSOR DOUBLE WALL TANK DRAWING NO. 20016 REV. C Figure 2-6 – Leak Sensor Installation - Steel Vaulted Tanks TMS1000D Installation.docx June 27, 2018 PAGE 17... -
Page 19: Leak Sensor Installation - Piping Sumps And Dispenser Pans, Vaulted Tank
AND CONDUIT SEAL SENSOR FLEXIBLE CABLE MANHOLE PIPING SUMP OR LEAK SENSOR DISPENSER PAN MOUNTING HEIGHT DRAWING NO. 20017 REV. D Figure 2-7 – Leak Sensor Installation in Piping Sumps, Manholes, and Dispenser Pans TMS1000D Installation.docx June 27, 2018 PAGE 18... -
Page 20: Leak Sensor Installation - Fiberglass Underground Tanks
CONNECTOR while positioning cap over the riser pipe. Mate riser and cap. 7. Tighten CONNECTOR over the cable to ensure a WATERTIGHT SEAL. 8. Complete the wiring installation in accordance with Section 3. TMS1000D Installation.docx June 27, 2018 PAGE 19... -
Page 21: Leak Sensor Installation - Fiberglass Underground Tank Reservoirs
VENT TUBE is only recommended where local installation requires one. 2. If the riser cap does not contain its own cord connector, thread the PNEUMERCATOR SUPPLIED CONNECTOR into the tapped hole using sealing compound as required. (Alternately, the CONNECTOR may be threaded into the sidewall of the riser). - Page 22 LEAK SENSOR MODEL RSU800 7" RESTS ON BOTTOM OF RESERVOIR RECOMMENDED HYDROSTATIC FILL LIQUID DEPTH IN RESERVOIR FIBERGLASS TANK DRAWING NO. 20019 REV. C Figure 2-9 – Hydrostatic Leak Sensor Installation in Fiberglass Tanks TMS1000D Installation.docx June 27, 2018 PAGE 21...
-
Page 23: Wiring Installation And Diagrams
4. Attach the conduit at the TMS1000D console ONLY to the 1/2" conduit knockout located on the bottom LEFT SIDE. Use NEMA 4 fittings for outdoor locations. - Page 24 TABLE 1 PROBE LEADER CABLE 250 VAC FAST ACTING MAY HAVE ALTERNATE COLORS AS FOLLOWS WHT OR GRN RED/BLK PROBE EXAMPLE RED/WHT (SEE TABLE 1) 2-WIRE SENSOR EXAMPLE PNEUMERCATOR Liquid Level Control Systems 50466 Rev. C (01/16/13) Page 1 of 3...
- Page 25 WIRING DRAWING - Tank Management System (TMS1000 SERIES) WIRING w/ EXTERNAL JUNCTION BOX(ES) - See page 1 for preferred wiring FOR NON-FUEL, NON-INTRINSICALLY SAFE APPLICATIONS INTERNAL VIEW (SHOWN OVERSIZED FOR CLARITY) IMPORTANT NOTES - READ CAREFULLY BEFORE INSTALLATION UNLESS OTHERWISE SPECIFIED: (NOTES 1-5 DO NOT APPLY TO THIS PAGE) 6.
- Page 26 6. Fill all conduit VAPOR SEAL-OFF FITTINGS with approved filling compound and tighten all conduit fittings. 7. Connect probe/sensor wires to the TMS1000D INPUT TERMINALS following Figure 3-1. Maintain correct polarity between wires and respective terminal points. 8. Probe and sensors should be logically identified as to location and type and recorded on the probe map provided in this manual, SECTION 3.6.
-
Page 27: Power Wiring
WIRING DRAWING - Tank Management System (TMS1000 SERIES) FOR NON-FUEL, NON-INTRINSICALLY SAFE APPLICATIONS INTERNAL VIEW (SHOWN OVERSIZED FOR CLARITY) IMPORTANT NOTES - READ CAREFULLY BEFORE INSTALLATION UNLESS OTHERWISE SPECIFIED: SEE NOTE 3 (NOTES 6 & 7 DO NOT APPLY TO THIS PAGE) FUSE 1. -
Page 28: Probe/Sensor Wiring & Splices
OPTIONAL FIELD CABLE IS USED MP450/MP460 SERIES ARE NOT COMPATIBLE Questions? Contact Technical Support at (800) 209-7858 PNEUMERCATOR Liquid Level Control Systems Bulletin 229 Rev. A (01/27/14) Page 1 of 2 Figure 3-3a - TMS1000D probe wiring TMS1000D Installation.docx June 27, 2018 PAGE 27... - Page 29 ARE NOT COMPATIBLE RSU800 (DISCRIMINATING) * RED IS COMMON GROUND WIRE Bulletin 229 Rev. A (01/27/14) Page 2 of 2 Figure 3-3b - TMS1000D sensor wiring (Note: ES825-400FL sensor does not apply to the TMS1000D) TMS1000D Installation.docx June 27, 2018 PAGE 28...
-
Page 30: Programmable Relay Outputs/Contact Closure Inputs
These relays also provide a simple and straightforward interface to most programmable logic controllers, building management systems, and similar input monitoring devices. The standard TMS1000D includes two (2) dry contact closure inputs and four (4) relay contact closure outputs as illustrated in Figure 3-4 below. -
Page 31: Data Communications Wiring
Figure 3-5 shows the locations of these ports. CAUTION All communication terminations are located in the RIGHT side of the TMS1000D console. ALL wiring to these terminals MUST enter the designated conduit opening. Refer to FIGURE 2-1. FAILURE TO COMPLY MAY RESULT IN PERSONAL INJURY, PROPERTY LOSS AND EQUIPMENT DAMAGE. -
Page 32: Probe Map/System Setup
The probe map/system setup below should be completed by the electrical installer as each probe, sensor and control output function is wired to the TMS1000D system. This will provide the equipment operator a means of identifying each field device for proper system setup programming and use. The PROBE MAP should be adhered to or kept near the TMS1000D console. - Page 36 TMS Series Pneumercator, here and after referred to as PCO, warrants its TMS Series family of products to be free of defects in material and workmanship for a period of Twelve (12) months from date of installation or Fifteen (15) months from date of invoice, whichever comes first.
Need help?
Do you have a question about the TMS1000D and is the answer not in the manual?
Questions and answers