
Related Manuals for ComfortNET CTK04


Summary of Contents for ComfortNET CTK04
- Page 1 ComfortNet CTK04 Featuring the RedLINK™ Suite of Home Comfort Solutions © 2015 Goodman Manufacturing Company, L.P.
- Page 2 Agenda Comfort Advantage System Configurations Installing ComfortNet ComfortNet Control Set‐up Dehumidification and Defrost Settings Redlink Internet Gateway Link Optional Accessories to Wireless Network Mobile Apps and PC Access © 2015 Goodman Manufacturing Company, L.P.
- Page 3 ComfortNet Advantage Premium control that provides optimal comfort. Easy to use, energy efficient, reliable, and ensures that the system is set up properly. Advanced operating algorithms built into the control. Designed to regulate and communicate with HVAC equipment. © 2015 Goodman Manufacturing Company, L.P.
- Page 4 ComfortNet Advantage Honeywell Redlink Compatible: RedLINK accessories include the Wireless Outdoor Sensor, Portable Comfort Control (PCC), RedLINK Internet Gateway, Wireless Indoor Sensor, TrueSTEAM™ humidifier with Wireless Adapter, Vent Boost Remote and Entry/Exit Remote. © 2015 Goodman Manufacturing Company, L.P.
- Page 5 ComfortNet Advantage Customizable Service Reminders Set up to 10 service reminders. Preset or customize your own. Preset reminder options include: Filter replacement Annual service Spring service Fall service Warranty expiring soon © 2015 Goodman Manufacturing Company, L.P.
- Page 6 ComfortNet Advantage User Interactions Log Stores history of thermostat setting changes, such as temperature changes and changes from the original installer set up. This log can be used to help determine if any issue is a system error, or a accidental user error. (human caused issue) Troubleshooting which use to take hours can now be done in minutes. Configurable for Residential and Light Commercial Applications Can be utilized to meet the needs of residential and light commercial applications. Simply select residential or commercial during the installer setup. If commercial is selected, the thermostat will use commercial language, meet building codes, and offer 365 day holiday scheduling. © 2015 Goodman Manufacturing Company, L.P.
- Page 7 ComfortNet Advantage User Interactions Log Navigating to the user interactions equipment status/ date code from home screen: Menu Installer options Date code/ Yes to warning screen Data logs User Interactions Log © 2015 Goodman Manufacturing Company, L.P.
- Page 8 ComfortNet Advantage When the user interactions log appears, you will see all changes made to the ComfortNet settings. © 2015 Goodman Manufacturing Company, L.P.
- Page 9 ComfortNet Advantage USB Port Visit thermostatsetup.honeywell. com to enter your dealer info and save to a USB stick. Load your dealer info and company logo into multiple thermostats. Insert USB into port at the bottom of ComfortNet, and then select the item you would like to load or save. You can also, setup holiday/ event schedules and custom reminders. © 2015 Goodman Manufacturing Company, L.P.
- Page 10 ComfortNet Advantage Build Dealer Info Screen for Upload www.thermostatsetup.honeywell.com to enter your dealer Go to info and save to a USB stick. © 2015 Goodman Manufacturing Company, L.P.
- Page 11 ComfortNet Advantage Select dealer information setup, and another menu will drop down with “Prestige” or “Vision” PRO as options. Select “Prestige.” © 2015 Goodman Manufacturing Company, L.P.
- Page 12 ComfortNet Advantage Select browse, then upload your dealer logo from your PC files. Enter all of your dealer information in the boxes below, then next. © 2015 Goodman Manufacturing Company, L.P.
- Page 13 ComfortNet Advantage The next screen will display an image of how your company logo and info will appear on the ComfortNet screen. If all looks good, hit next. © 2015 Goodman Manufacturing Company, L.P.
- Page 14 ComfortNet Advantage You will then be prompted to save your newly created dealer screen to a USB drive, or email them to your email address. Download your logo and text file to your USB drive. (HD or SD logo) © 2015 Goodman Manufacturing Company, L.P.
- Page 15 ComfortNet Advantage Load Newly Created Dealer Screen into ComfortNet via USB Drive Plug your USB drive into the bottom of your ComfortNet. The screen will change automatically and prompt you to add your dealer information. Select dealer information. Then, select: load dealer logo into thermostat. © 2015 Goodman Manufacturing Company, L.P.
- Page 16 ComfortNet Advantage Tap the image name the ends with 1.BMP, then press load. Enter password then done. Press yes to warning screen. Your logo will appear on the following screen. Hit ok, and then return back to the dealer information screen. © 2015 Goodman Manufacturing Company, L.P.
- Page 17 ComfortNet Advantage Select: load contact information logo into thermostat. Tap the image name the ends with .XML, then press load. Enter password then done. Press yes to warning screen. Your company info will appear on the following screen, along with your logo that was loaded prior. © 2015 Goodman Manufacturing Company, L.P.
- Page 18 Agenda Comfort Advantage System Configurations Installing ComfortNet ComfortNet Control Set‐up Dehumidification and Defrost Settings Redlink Internet Gateway Link Optional Accessories to Wireless Network Mobile Apps and PC Access © 2015 Goodman Manufacturing Company, L.P.
- Page 19 Valid System Configurations This control may be used with certain system configurations Communicating Air Handler Communicating AC unit Communicating Air Handler Communicating Heat Pump Communicating Furnace Communicating AC unit Communicating Furnace Communicating Heat Pump Communicating Furnace Non‐ Communicating single stage AC © 2015 Goodman Manufacturing Company, L.P.
- Page 20 Agenda Comfort Advantage System Configurations Installing ComfortNet ComfortNet Control Set‐up Dehumidification and Defrost Settings Redlink Internet Gateway Link Optional Accessories to Wireless Network Mobile Apps and PC Access © 2015 Goodman Manufacturing Company, L.P.
- Page 21 Installing ComfortNet Mount the thermostat approximately 5’ from the floor. Mount on interior wall using the screws and anchors included. Drill 3/16” holes for drywall, and 7/32” holes for plaster. © 2015 Goodman Manufacturing Company, L.P.
- Page 22 Installing ComfortNet DO NOT Install The Thermostat Where It Can Be Affected By: Drafts or dead spots behind doors and in corners. Hot or cold air from ducts. Radiant heat from Too Close the sun or appliances. Concealed pipes and chimneys. Unheated (uncooled) areas such as an outside wall. © 2015 Goodman Manufacturing Company, L.P.
- Page 23 Installing ComfortNet Maximum wire distance between the ComfortNet and the indoor unit should not exceed 100 feet using 18 gauge wire. Data Line 1 Data Line 2 24 volt power 24 volt common © 2015 Goodman Manufacturing Company, L.P.
- Page 24 Installing ComfortNet‐ Terminal Functions/ Wiring Connect 1, 2, R and C from the ComfortNet, to 1, 2, R and C at the Indoor Unit. Connect wires 1 and 2 from the Indoor Unit to 1 and 2 at the Outdoor Unit. Do NOT connect R and C between the Indoor Unit and Outdoor Unit. Indoor Outdoor Board Board Terminal Terminal CTK04 Connections Connections Data 2 Outdoor Data 2 Transformer 24VAC (Hot) 240V 24VAC 24VAC (Common) Required for 2‐Stage outdoor communicating units. Not required for inverter/variable speed outdoor communicating units. © 2015 Goodman Manufacturing Company, L.P.
- Page 25 Installing ComfortNet Optional Transformer NOTE: installing the additional transformer is NOT required for inverter/variable speed outdoor communicating units. However, the additional transformer IS required for 2‐stage outdoor communicating units. Install the transformer provided and connect to R and C at the outdoor unit. © 2015 Goodman Manufacturing Company, L.P.
- Page 26 Agenda Comfort Advantage System Configurations Installing ComfortNet ComfortNet Control Set‐up Dehumidification and Defrost Settings Redlink Internet Gateway Link Optional Accessories to Wireless Network Mobile Apps and PC Access © 2015 Goodman Manufacturing Company, L.P.
- Page 27 ComfortNet Control Setup Basic Setup Turn on AC power to the system. The ComfortNet control will begin to walk you through the user friendly setup procedures. Select language, then press next. Select application: Residential, or commercial, then press next. © 2015 Goodman Manufacturing Company, L.P.
- Page 28 ComfortNet Control Setup Enter a device name, then press next. If you have multiple systems in your home, you can name these individually. (unit 1, unit 2, upstairs unit, downstairs unit, etc.) The ComfortNet will automatically identify the ComfortNet communicating equipment installed. © 2015 Goodman Manufacturing Company, L.P.
- Page 29 ComfortNet Control Setup Select zoned or non‐zoned. If your system is zoned and you select that option here, the zoning controller will control the dual fuel functions of your system. You will then be prompted to add RedLINK accessories and set up the installer options. You can add accessories at this time, or press next and add later. © 2015 Goodman Manufacturing Company, L.P.
- Page 30 ComfortNet Control Setup Factory set for programmable, and Fahrenheit. © 2015 Goodman Manufacturing Company, L.P.
- Page 31 ComfortNet Control Setup This screen displays the cooling and heating stages of your equipment. The ComfortNet will configure this as it communicates with your HVAC system. (can’t be modified by homeowner) The next screen will prompt you to set your system changeover and deadband. (factory set for manual changeover) © 2015 Goodman Manufacturing Company, L.P.
- Page 32 ComfortNet Control Setup Auto Changeover from the Home Screen Follow the next four (4) steps if you decide to set the auto changeover at a later date. © 2015 Goodman Manufacturing Company, L.P.
- Page 33 ComfortNet Control Setup Auto Changeover Menu Installer Options Date code Yes to warning screen View/ edit current setup Heat/ cool equipment setup Heat/ cool control options © 2015 Goodman Manufacturing Company, L.P.
- Page 34 ComfortNet Control Setup Auto Changeover Changeover: Manual (factory setting) The final screen will allow the homeowner to set the auto changeover from manual to automatic. It will also allow adjustments to the deadband setting. © 2015 Goodman Manufacturing Company, L.P.
- Page 35 ComfortNet Control Setup Equipment Status The equipment status screen displays the systems current status. The list of status updates seen on this screen depends on the type of system that’s installed in your home. © 2015 Goodman Manufacturing Company, L.P.
- Page 36 ComfortNet Control Setup Basic Equipment Status Equipment Status: Displays stages of heat and cool. Fan Mode: Fan operations. Currently set for ON, or Automatic. Date Code: 4 digit code also located on rear of thermostat. Indoor Air Quality Equipment: Lists any IAQ on your system. Equipment Replacement Reminders: Lists air filters and the days remaining before replacing. © 2015 Goodman Manufacturing Company, L.P.
- Page 37 ComfortNet Control Setup The equipment status screen also displays the password/ date code Navigating to equipment status/ date code from home screen: Menu Equipment status Scroll down to read each status, and date code. © 2015 Goodman Manufacturing Company, L.P.
- Page 38 Agenda Comfort Advantage System Configurations Installing ComfortNet ComfortNet Control Set‐up Dehumidification and Defrost Settings Redlink Internet Gateway Link Optional Accessories to Wireless Network Mobile Apps and PC Access © 2015 Goodman Manufacturing Company, L.P.
- Page 39 Dehumidification In order to successfully enable dehumidification, make the following changes via ComfortNet. Two steps for maximum dehumidification: Step 2: ComfortNet User Menu Step 1: Installer Options © 2015 Goodman Manufacturing Company, L.P.
- Page 40 Dehumidification Select menu from the home screen. Select installer options. © 2015 Goodman Manufacturing Company, L.P.
- Page 41 Dehumidification Enter installer password/ date code that’s located on the back of the ComfortNet. The date code can also be obtained from the equipment status menu. Select yes at the next screen. Select view/edit current setup © 2015 Goodman Manufacturing Company, L.P.
- Page 42 Dehumidification Scroll down the edit setup list and select dehumidification. Select dehumidification equipment: none. © 2015 Goodman Manufacturing Company, L.P.
- Page 43 Dehumidification Select a/c with low speed fan, and then done. (the factory setting is none) The next screen will display additional dehumidification options. Dehumidification‐ Overcooling limit 0 degrees Dehumidification‐ Away mode © 2015 Goodman Manufacturing Company, L.P.
- Page 44 Dehumidification Select dehumidification‐ overcooling limit (factory setting is 3) Set overcool to 3 degrees, or whatever setting is applicable to your home/region. Select dehumidification away mode: not allowed. Change setting to allowed, and then press done. © 2015 Goodman Manufacturing Company, L.P.
- Page 45 Dehumidification Dehumidification Away Mode Defined The dehumidification away mode protects the home when its unoccupied for long periods of time. It also maintains the desired humidity and temperature settings during the hot and humid months. © 2015 Goodman Manufacturing Company, L.P.
- Page 46 Dehumidification Dehumidification Away Mode Options Select any of the following dehumidification away modes to adjust all three settings: Dehumidification away mode‐ low limit temperature setting Dehumidification away mode‐ temperature setting Dehumidification away mode‐ dehumidification setting © 2015 Goodman Manufacturing Company, L.P.
- Page 47 Dehumidification Dehumidification Away Mode Example The following screen will appear and show all three away modes. The temperature setting for this system is 85 degrees, with a dehumidification setting of 65%. The temperature low limit setting of 76 degrees will allow the cooling mode to operate down to a temperature of 76 degrees, or 65% humidity. © 2015 Goodman Manufacturing Company, L.P.
- Page 48 Dehumidification Navigate back to the home screen, and select menu again. The dehumidification option now appears on the list. Select dehumidification, and the following screen will display the current humidity level in your home, and your ComfortNet setting. Tap the left or right arrows to set desired humidity level. © 2015 Goodman Manufacturing Company, L.P.
- Page 49 Dehumidification Step 2‐ ComfortNet User Menu Select menu from the home screen. Select ComfortNet user menu. © 2015 Goodman Manufacturing Company, L.P.
- Page 50 Dehumidification Enter 4‐digit date code. Select yes at home owner warning screen. © 2015 Goodman Manufacturing Company, L.P.
- Page 51 Dehumidification Select heat pump or air conditioner. Select cool set‐up. © 2015 Goodman Manufacturing Company, L.P.
- Page 52 Dehumidification Scroll up until all three (3) trim settings appear on the screen. C TR H: High C TR I: Intermediate C TR L: Low Starting with C TR H, (highest trim setting) adjust each setting to ‐15% trim. (factory setting is “0”) © 2015 Goodman Manufacturing Company, L.P.
- Page 53 Dehumidification Make sure that all three trim settings (C TR H, C TR I, C TR L) have been changed to a ‐15% trim after the last setting. Lastly, check to make sure that the factory cool airflow profile is still set to the “D” setting. (factory setting) © 2015 Goodman Manufacturing Company, L.P.
- Page 54 Defrost Setup The defrosting of the outdoor coil is controlled by the inverter board, outdoor coil temperature thermistor, and defrost sensor. However, the defrost timing periods are modified via ComfortNet user menu. Defrost times can be set at intervals of 30, 60, 90, and 120 minutes. (30 min, 1 hr, 1.5 hrs, and 2 hrs) The factory defrost setting is 30 minutes. © 2015 Goodman Manufacturing Company, L.P.
- Page 55 Defrost Setup Change Factory Defrost Setting From The Home Screen: Menu ComfortNet user menu Password Yes to warning screen Heat pump Heat set‐up Select defrost Scroll down and select desired defrost setting. Select done © 2015 Goodman Manufacturing Company, L.P.
- Page 56 Agenda Comfort Advantage System Configurations Installing ComfortNet ComfortNet Control Set‐up Dehumidification and Defrost Settings Redlink Internet Gateway Link Optional Accessories to Wireless Network Mobile Apps and PC Access © 2015 Goodman Manufacturing Company, L.P.
- Page 57 Redlink Internet Gateway The Honeywell RedLINK Internet Gateway gives homeowners remote access to home climate‐control systems from any location with Internet access. © 2015 Goodman Manufacturing Company, L.P.
- Page 58 RedLINK Internet Gateway Using a Web browser, users can review and adjust: Indoor temperature. System mode. The gateway can also send alerts to as many as 6 email addresses if a problem occurs. Register online before use at www.mytotalconnectcomfort.com You will establish a user name (email address) and password during registration. © 2015 Goodman Manufacturing Company, L.P.
- Page 59 RedLINK Internet Gateway Registration Page © 2015 Goodman Manufacturing Company, L.P.
- Page 60 RedLINK Internet Gateway Once you’ve established an account, a conformation email will be sent to you. Press the link that was sent by Honeywell, and it will prompt you to log into the total connect comfort home page. © 2015 Goodman Manufacturing Company, L.P.
- Page 61 RedLINK Internet Gateway After logging in, your account will be confirmed. You can now name your location, and select home or building. Type in your location name, and email addresses you would like to receive notifications. Select building or home, then submit. © 2015 Goodman Manufacturing Company, L.P.
- Page 62 RedLINK Internet Gateway After you establish your location and building type, you will then be prompted to add your Redlink Internet Gateway. © 2015 Goodman Manufacturing Company, L.P.
- Page 63 RedLINK Internet Gateway Find your Mac ID and MAC CRC codes located under your gateway. Enter your codes when prompted by the registration screen. Mac ID and MAC CRC © 2015 Goodman Manufacturing Company, L.P.
- Page 64 RedLINK Internet Gateway If all of your information was entered correctly, the screen will let you know that your gateway has been registered successfully. © 2015 Goodman Manufacturing Company, L.P.
- Page 65 RedLINK Internet Gateway Your device will then appear on the control center screen. Ensure that the MAC ID and CRC codes are correct. From here you can add thermostat names located within this location. Press “submit” once you are done entering home or office information. © 2015 Goodman Manufacturing Company, L.P.
- Page 66 RedLINK Internet Gateway Your location will be displayed, with no thermostats installed. The ComfortNet and Redlink Internet Gateway will need to be connected at this time. © 2015 Goodman Manufacturing Company, L.P.
- Page 67 RedLINK Internet Gateway Enter the wireless setup mode on your ComfortNet. Menu Press and Installer options Release Password/ yes Wireless device manager Add device Once the add device screen appears on the ComfortNet, go to your gateway and press and release the connect button on the bottom. © 2015 Goodman Manufacturing Company, L.P.
- Page 68 RedLINK Internet Gateway Your My Locations screen will then change from no thermostats attached, to view thermostats. Press view thermostats to view your recently connected ComfortNet. © 2015 Goodman Manufacturing Company, L.P.
- Page 69 RedLINK Internet Gateway Your location will be displayed, but your ComfortNet will need to be connected at this time. © 2015 Goodman Manufacturing Company, L.P.
- Page 70 Agenda Comfort Advantage System Configurations Installing ComfortNet ComfortNet Control Set‐up Dehumidification and Defrost Settings Redlink Internet Gateway Link Optional Accessories to Wireless Network Mobile Apps and PC Access © 2015 Goodman Manufacturing Company, L.P.
- Page 71 Link Wireless Accessories Portable Outdoor Air Indoor Air Comfort Sensor Sensor Control Internet Entry/Exit Gateway Remote ComfortNet CTK04 Mobile App © 2015 Goodman Manufacturing Company, L.P.
- Page 72 Link Wireless Accessories Wireless Indoor sensors enable the homeowner the ability to choose which sensor to use for temperature, humidification, and dehumidification. Multiple sensors can be used in combination for temperature averaging, or individually to condition humidity levels in separate spaces. Compares requested cooling demand to what the equipment is providing. © 2015 Goodman Manufacturing Company, L.P.
- Page 73 Link Wireless Accessories Wireless outdoor sensors enable the homeowner to view outdoor temperature and humidity. This Honeywell outdoor sensor is also used via RedLINK enabled thermostats and accessories. © 2015 Goodman Manufacturing Company, L.P.
- Page 74 Link Wireless Accessories As you are performing a basic setup of your new ComfortNet, this screen will appear and prompt you to add wireless devices/ accessories. If you have additional wireless devices in your home, you can add them during this initial setup. RedLINK internet gateway Wireless indoor sensors Wireless outdoor sensor Portable comfort control © 2015 Goodman Manufacturing Company, L.P.
- Page 75 Link Wireless Accessories Link Wireless Devices Post ComfortNet Setup‐ From the Home Screen If you need to return to the "Add Device" screen at a later time, follow these steps: Menu Installer Options Date Code/ Yes Wireless Device Manager Add Device © 2015 Goodman Manufacturing Company, L.P.
- Page 76 Link Wireless Accessories Press “add device” and the next screen will prompt you to add your wireless accessories. The add device screen shows a timer for 15 minutes. You will have 15 minutes to link in your accessories. Once your device has been added: The add device screen will flash, and let you know that your device was added successfully. © 2015 Goodman Manufacturing Company, L.P.
- Page 77 Link Wireless Accessories After you press done, you will be directed back to the wireless device manager options. Press view connected devices and a list of connected devices will appear. If your device isn’t listed here, you will have to go back and try to reconnect. © 2015 Goodman Manufacturing Company, L.P.
- Page 78 Link Wireless Accessories Adding Wireless Indoor Sensor While the add device screen is displayed on the ComfortNet, Press and release the connect button on each wireless device to be added. Note: Make sure that all of your accessories have new batteries installed. © 2015 Goodman Manufacturing Company, L.P.
- Page 79 Link Wireless Accessories After a short delay, the status light will glow green for 15 seconds. Once the green light disappears, press the view devices button to make sure it was added. If the status light turns red, the sensor did not link with thermostat. MCR32934 MCR32935 © 2015 Goodman Manufacturing Company, L.P.
- Page 80 Link Wireless Accessories Adding Wireless Outdoor Sensor © 2015 Goodman Manufacturing Company, L.P.
- Page 81 Link Wireless Accessories Choose a location that is out of direct sunlight. Mount wireless outdoor sensor at least 6 inches below any over hang. © 2015 Goodman Manufacturing Company, L.P.
- Page 82 Link Wireless Accessories Follow the same steps presented for the indoor wireless sensor to add the outdoor wireless sensor. Note: Add the outdoor wireless sensor to the wireless network, before placing it in it’s bracket. (outside) While the add device screen is displayed on the thermostat, press and release the connect button on the back of the outdoor wireless sensor. Note: Make sure that all of your accessories have new batteries installed. © 2015 Goodman Manufacturing Company, L.P.
- Page 83 Link Wireless Accessories Portable Comfort Control The portable comfort control allows the homeowner to make changes from anywhere in the home within the RedLINK network range. When used with a single comfort system, it can be used as the primary temperature sensor. It’s expandable up to 16 systems. © 2015 Goodman Manufacturing Company, L.P.
- Page 84 Link Wireless Accessories Adding Portable Comfort Control Navigate to the add device screen. Press connect on the portable comfort control display screen. Press done when the screen displays connected. You will then be prompted to connect more, or additional portable comfort controls. REMOVE CONNECT WIRELESS SETUP CONNECTED Press yes to link another control. Press no at this screen to save and exit. © 2015 Goodman Manufacturing Company, L.P.
- Page 85 Link Optional Accessories * If The Portable Comfort Control Becomes Disconnected: Press and hold in the lower right corner of the screen until the display changes (about 3 seconds) Press connect device when prompted by remote. Press done when the screen displays connected. DONE WAIT © 2015 Goodman Manufacturing Company, L.P.
- Page 86 Agenda Comfort Advantage System Configurations Installing ComfortNet ComfortNet Control Set‐up Dehumidification and Defrost Settings Redlink Internet Gateway Link Optional Accessories to Wireless Network Mobile Apps and PC Access © 2015 Goodman Manufacturing Company, L.P.
- Page 87 Mobile Apps and PC Access PC Access: https://mytotalconnectcomfort.com © 2015 Goodman Manufacturing Company, L.P.
- Page 88 Mobile Apps and PC Access Once you login at the Total Connect Comfort homepage, you will then be directed to the thermostat locations page. If you have multiple thermostats registered, choose the location/ name you would like to view or adjust. “View Thermostat” © 2015 Goodman Manufacturing Company, L.P.
- Page 89 Mobile Apps and PC Access Choose your thermostat by clicking into the “View Thermostat(s)” area to the far right. “View Thermostat(s)” © 2015 Goodman Manufacturing Company, L.P.
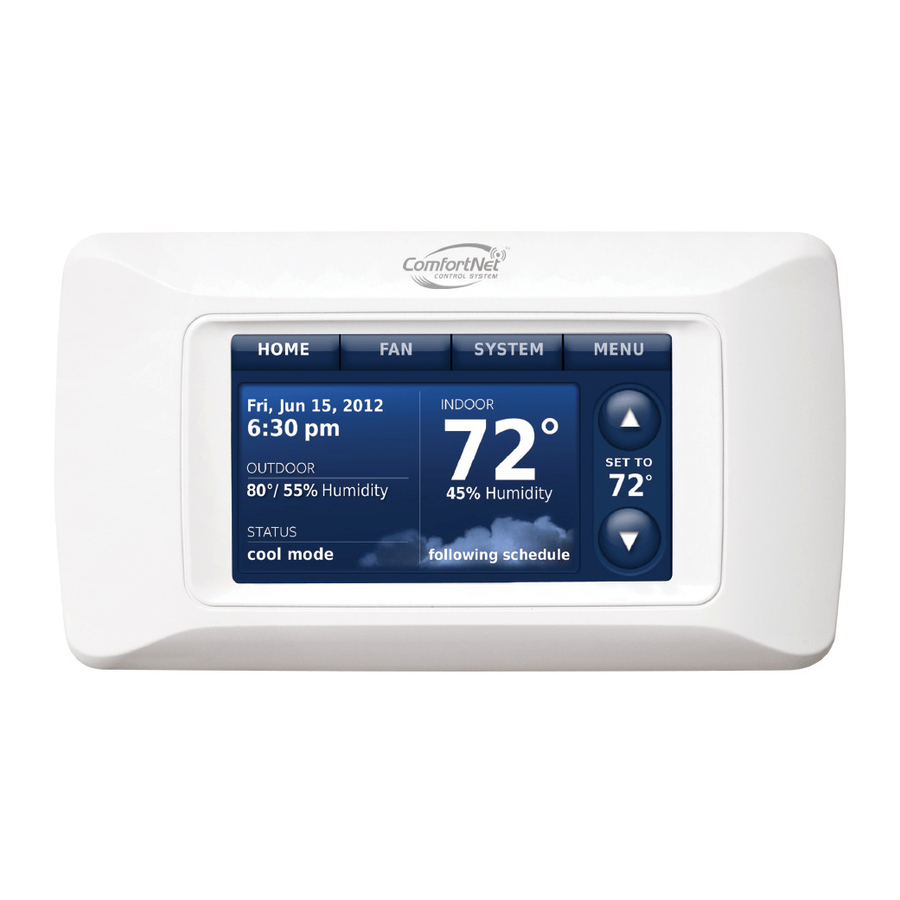
- Page 90 Mobile Apps and PC Access Your thermostat screen will appear, and you can now adjust any of its settings… Just like you were standing in front of it at home. © 2015 Goodman Manufacturing Company, L.P.
- Page 91 Mobile Apps and PC Access Mobile Apps Go to the App Store on our phone, and search for the Honeywell Total Connect App. Download App to your phone. Sign in with the same email and password used to open your Honeywell account. © 2015 Goodman Manufacturing Company, L.P.
- Page 92 Mobile Apps and PC Access Choose the thermostat you would like to view or adjust. That thermostat will appear with it’s current data. You are now able to adjust your ComfortNet settings from your remote geographic location. © 2015 Goodman Manufacturing Company, L.P.
- Page 93 QUESTIONS? © 2015 Goodman Manufacturing Company, L.P.
Need help?
Do you have a question about the CTK04 and is the answer not in the manual?
Questions and answers
how to replace battery in CTK04 Thermostat