Advertisement
Table of Contents
Phoenix Flight Gear Zenmuse
H3-3D/H3-2D F450 Zenplate
Mount the DJI Zenmuse H3-3D/H3-2D to your F450
*Note for installation of the Phoenix Flight Gear Zenmuse H3-
2D/H3-3D F450 Zenplate to your F450 the bottom plate wings
must be oriented to the front and rear of your Flame Wheel.
1. Mount the Zenmuse dampening unit (top plate with pillow balls)
to the Zenplate with the hardware included with your Zenmuse, 4 -
M3x8 screws and 4 - M3 locking nuts.
2. Remove one forward bottom arm screw on each forward arm.
3. Place the Zenplate in place over the arm screw holes and install
the included M2.5x8 screws. If you are using the DJI Landing Gear
for Flame Wheel, the legs will mount while the Zenplate is secured
with the arm screws, use a M2.5x10 screw and carbon fiber washer
between the leg and bottom frame plate.
4. Use the M3x8 screws to secure the Zenplate to the slots in the
bottom plate wings with M3 washers and locknuts on the top.
www.PhoenixFlightGear.com
Advertisement
Table of Contents

Related Manuals for Zenmuse H3-3D


Summary of Contents for Zenmuse H3-3D
- Page 1 Flame Wheel. 1. Mount the Zenmuse dampening unit (top plate with pillow balls) to the Zenplate with the hardware included with your Zenmuse, 4 - M3x8 screws and 4 - M3 locking nuts.
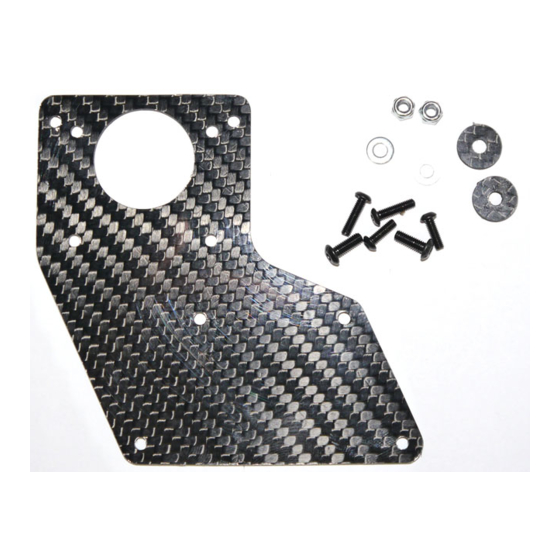
- Page 2 Included: Zenmuse H3-2D/H3-3D F450 Zenplate 2 - M2.5x8 screws 2 - M2.5x10 screws 2 - M3 carbon fiber washers 2 - M3x8 screws 2 - M3 locknuts 2 - M3 washers Required: 2.0mm allen wrench 1.5mm allen wrench 5.5mm nut driver...
Need help?
Do you have a question about the H3-3D and is the answer not in the manual?
Questions and answers