Table of Contents
Advertisement
Quick Links
Advertisement
Table of Contents

Related Manuals for Etherma eTOUCH-WIFI


Summary of Contents for Etherma eTOUCH-WIFI
- Page 1 Thermostat Instructions Easy touch Easy warm...
- Page 2 eTOUCH-WIFI...
-
Page 3: Table Of Contents
Introduction ....................Technical Specifications................Installation....................Wiring Instructions..................Thermostat Symbols..................Startup Wizard........WiFi Connection........Function and Operation....... 8.1 Temporary Override Temperature..8.2 Mode........... 8.3 Key-Lock..........8.4 Menu..........8.4.1 Clock............. 8.4.2 Event Setting........8.4.3 Readout..........8.4.4 Advanced Setting........8.5 Open Window detection...... Troubleshooting........ -
Page 4: Introduction
NTRODUCTION The eTouch-WIFI is an intuitive programmable thermostat used to control an electrical floor heating system or a water heating system. It will keep homes at comfortable temperatures whilst minimiz- ing energy use. Install the app on your smart phone to control the heating system remotely with the WiFi thermostat . -
Page 5: Wiring Instructions
IRING INSTRUCTIONS ROOM -OUT SENSOR POWER POWER FLOOR SENSOR FLOOR SENSOR Please select floor sensor or room-out sensor or SENSOR S2 COM SENSOR S2 COM S1 floor sensor and room-out sensor to run the POWER POWER 85V-265V thermostat if you install it in a bathroom or other 85V-265V FLOOR FLOOR... -
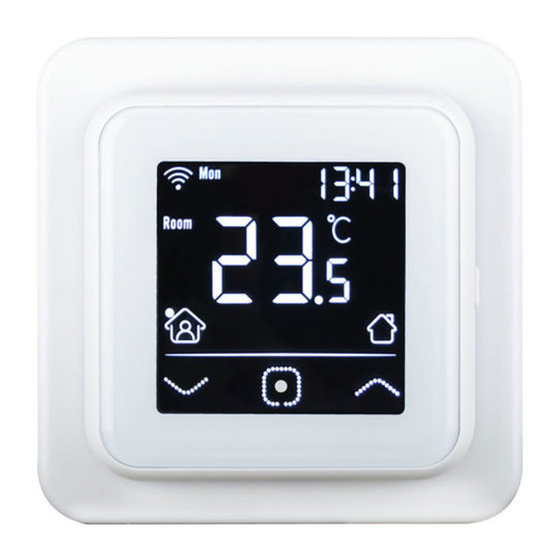
Page 6: Thermostat Symbols
HERMOSTAT SYMBOLS Press to confirm When the thermostat is installed and the selection connected to the electricity, move the On/Off switch down to turn the thermostat on, Press to select and move it up to turn the thermostat off. parameters. WiFi Clock Room temp Floor temp... -
Page 7: Startup Wizard
TARTUP WIZARD Initial settings must be specified when the unit is activated for the first time. Clock Sensor selection There are 5 options: 00 Floor sensor: floor sensor mode (default). 01 Room-in sensor: built-in room sensor > > mode. 02 Room-in sensor and floor sensor: built-in sensor mode with floor temperature limit. -
Page 8: Wifi Connection
IFI CONNECTION Step 4: Click “WIFI thermostat”. Step 3: Click “Add device” or “+” in the top right corner to add the device. Step 2: Register and log in with mobile number/email address in the APP. Attention: Please read and confirm “Privacy Policy and Service agreement”... - Page 9 Step 5: Check the thermostat display: When the WIFI icon on the thermostat flashes quickly click “Press to connect”. Step 6: Enter the Wifi password, and click “Confirm”. Step 7: If the device was added successfully, you can change the device name and set the region, then click “Done”.
-
Page 10: Function And Operation
UNCTION AND OPERATION 8.1Temporary Override Temperature n the main interface, Press to set a temporary override temperature. The temperature is only valid for the current event and will not be saved. 8.2 Mode n the main interface, Press to select the mode. There are 3 modes: Auto mode: This is the default mode. -
Page 11: Menu
8.4 Menu On the actual temp interface, press and hold for 3 seconds to enter the menu. Set day and time Set heating or cooling Sensor selection Set event’s parameters Room temp Adaptive function calibration READ Read heating Floor temp Set home or time of a certain office use... -
Page 12: Clock
8.4.1 Clock The default interface of the menu is CLK. Day and clock is set here. Press to enter day setting. Press to set day. Press to enter hour setting. Press to set hour. Press to enter minute setting. Press to set minute. -
Page 13: Readout
Default parameters (Wake) (Leave) (Back) (Sleep) Mon-Fri °C °C °C °C 06:00 20.0 08:30 15.0 17:00 20.0 23:00 15.0 Home Sat/Sun 06:00 20.0 °C 08:30 20.0 °C 17:00 20.0 °C 23:00 15.0 °C (Work) (Off work) Mon-Fri 07:00 20.0 °C 18:00 15.0 °C Office... - Page 14 Parameters Name Default Range 00: Floor sensor 00: Floor sensor Sensor selection 01: Room -in sensor 02: 01+00 03: Room -out sensor 04: 03+00 Room temp calibration 0.0°C -5.0°C - 5.0°C Floor temp calibration 0.0°C -5.0°C - 5.0°C Floor temp limit 35.0°C 20.0°C - 50.0°C Schedule...
- Page 15 1. Sensor selection: There are 5 options: 00 Floor sensor: floor sensor mode (default). 01 Room-in sensor: built-in room sensor mode. 02 Room-in sensor and floor sensor: built-in sensor mode with floor temperature limit. 03 Room-out sensor: external room sensor mode. 04 Room-out sensor and floor sensor: external room sensor mode with floor temperature limit.
- Page 16 Name Default Range 00: Adaptive 00: Adaptive Adaptive function 01: No Setting home or office 00: Home 00: Home 01: Office 00: 10 Sensor selection 00 – 10 kOhm floor sensor 01 – 12 kOhm 02 – 2 kOhm 03 – 15 kOhm 00: No Reset 00: No...
-
Page 17: Open Window Detection
8. Location setting: home or office. 9. Choose floor sensor: There are 4 options: 00: 10 – Etherma default 01: 12 – OJ Sensor 02: 2 – HRT Sensor 03: 15 – Devi Sensor 10. -
Page 18: Troubleshooting
ROUBLESHOOTING Room-in sensor error. Floor sensor error. Room-out sensor error. -
Page 19: Dimensions
IMENSIONS (MM) - Page 20 INSTALL...
Need help?
Do you have a question about the eTOUCH-WIFI and is the answer not in the manual?
Questions and answers