Table of Contents
Advertisement
Quick Links
PLEASE READ ENTIRE INSTRUCTIONS CAREFULLY BEFORE PROCEEDING
Four Easy Steps:
If you need additional assistance: E-mail us at info@feherguard.com or call Monday to Friday 905-876-4766 during business hours 8:30 a.m. to 5:00 p.m. Eastern Time.
Before starting reel assembly, trim cover to clear inside top rail.
Allow an extra 4" (10 cm) on length when installing the reel at mid-point to allow for fold.
Surface Rider II (SREII ) Must be installed on your pool at the mid point.
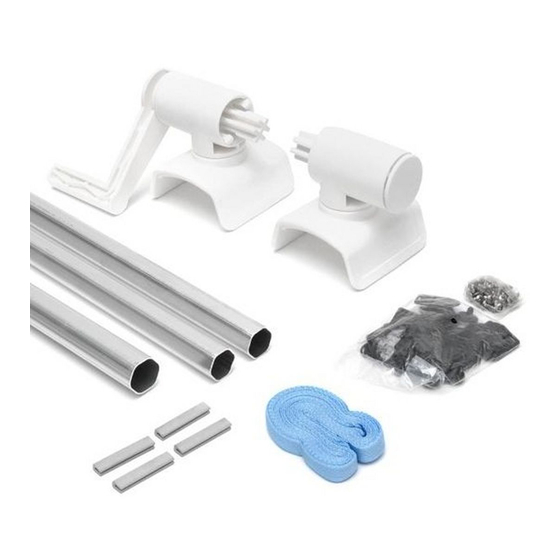
REEL SYSTEMS COMPONENTS AND PREPARATION:
Barrel
Handle End
2 Rubber
Pads
Getting started:
Ensure that your system has two cartons consisting of one end carton and one tube set carton.
Tools required for assembly:
Portable drill (driver bit provided)
Tape measure
Pencil and Scissors
STEP 1:
SOLAR REEL PLACEMENT:
A.
Determine the best location for the reel system. On round pools, the reel should be located across the center of the pool.
On oval or rectangular pools, locate the reel at its widest point where there is no decking on either side (see Fig. 2 below).
Note: Surface Rider II (SREII) systems must be installed at mid-point.
B.
At the determined location, measure the width of the pool from the
outside edges of top rail and subtract 4" (10 cm) to ensure ends of
system are 1/2" wider than outside of top rail. Ends must sit loosely
on pool. System Ends must be FULLY inserted into end tubes.
STEP 2: TUBE ASSEMBLY
for SRT14, SRT18 and SRT24 Tube Sets
(See page 2 for assembly of SRT28 and SRT34 Tube Sets)
A.
Ensure minimum insert of each end tube is inside center tube
Less than minimum insert causes screws to loosen and/or tubes to split.
B. Lock tubes together by rotating the center tube in the opposite direction to end tube.
INSTALL THE FIRST SELF-DRILLING SCREW ON A DRILL LINE, 1" (2.5 cm) back from the end of the center tube at Location
"C1" (see Fig. 4 & 5).
.
C.
Pla
ce 2 more self-drilling screws at Location "C2" & "C3" - 1 screw at every second
drill line around tubes (see Fig. 4 & 5).
At "D" locations install 3 screws around the center tube at every second drill line, 1"
D.
(2.5 cm) back from where you marked the end of the inner tube (see Fig. 4).
E.
Repeat for other end tube.
C
Center tube
D
End tube
Tubes Must be in Locked Position
Drill Lines DO NOT line up when tubes are locked
Center Tube(s)
End Tube
Note: THIS STEP REQUIRES A TOTAL OF 12 SELF-DRILLING SCREWS
Do not pre-drill holes.
Insert both end tubes equal distance into center tube
Fig. 3
and mark on center tube where inner tubes end
C1
D1
End tube
Fig. 4
A B O V E • G R O U N D S O L A R R E E L
A B O V E • G R O U N D S O L A R R E E L
ASSEMBLY INSTRUCTIONS
Surface Rider and Surface Rider II
Please make special note of areas marked in RED
2 Rubber
Pads
End Tube
Deck
(see table at right)
C1
D1
C3
C2
D3
TM
IMPORTANT
Barrel
Fig. 1
Axle End
End Carton Parts List:
1 Handle End
1 Axle End
4 Rubber Pads
Hardware Kit:
Driver Bit
16 Strap Plates 22 Metal Screws
8 Plastic Screws 8 Straps
Minimum
Maximum
Insert
Extension
SRT14 7" (17.5 cm) 14' (4.2 m)
SRT18 8" (20 cm)
18' (5.5 m)
SRT24 10" (25 cm)
24' (7.3 m)
HOLD TUBES LOCKED WHILE YOU
D2
Fig. 5
Deck
Fig. 2
Advertisement
Table of Contents

Subscribe to Our Youtube Channel
Related Manuals for FeherGuard Surface Rider


Summary of Contents for FeherGuard Surface Rider
- Page 1 PLEASE READ ENTIRE INSTRUCTIONS CAREFULLY BEFORE PROCEEDING Four Easy Steps: If you need additional assistance: E-mail us at info@feherguard.com or call Monday to Friday 905-876-4766 during business hours 8:30 a.m. to 5:00 p.m. Eastern Time. Before starting reel assembly, trim cover to clear inside top rail.
- Page 2 Fig. 11 Fold Do not attach the Surface Rider to the pool in any way. If this is done you will damage the system and void the warranty. With round pools, the ends of the cover should unroll in opposite directions. With oval or rectangular pools pull the leading edge of the cover slowly down the pool.
- Page 3 Check screws periodically and tighten, if necessary. The solar reel may be stored outside for the winter. It is not recommended to disassemble it for storage inside. ACCESSORIES AVAILABLE FROM YOUR DEALER: FG-SRFAS SURFACE RIDER TUBE & COVER FASTENING KIT FG-BS2 FG-PFS TUBE AND COVER FASTENERS (10 sets per pouch) FG-RS26 REEL STRAPPING (10 Straps 26”...
- Page 4 L9T 3Z3 Specifications subject to change without notice. 11/02 Thank you for buying the Surface Rider Solar Cover Reel System. We know it will make solar cover handling easy for you. FeherGuard “Five Year” Warranty Registration Please Print : ______________________________________________________________________________...
Need help?
Do you have a question about the Surface Rider and is the answer not in the manual?
Questions and answers