Advertisement
Quick Links
Advertisement

Summary of Contents for Kobo MT-101
-
Page 2: Safety Precautions
WARNING SAFETY PRECAUTIONS Thank you purchasing our product. Even though we go efforts to ensure the quality of each product we produce, occasional errors and/or omissions do occur. In. any event should you find this product to have either a defective or a missing part please contact us for a replacement. This product has been designed for home use only. -
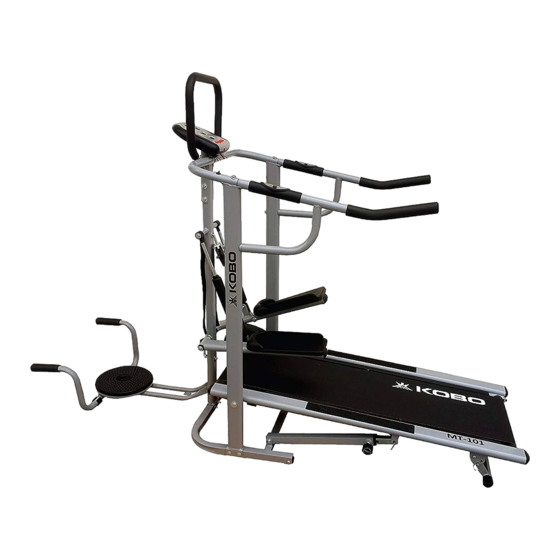
Page 3: Parts And Exploded View
PARTS AND EXPLODED VIEW... -
Page 4: Parts List
PARTS LIST ON DESRIPTION QT'Y ON DESRIPTION QT'Y MAIN FRAME 26 BOLT M8*80L 3PCS 2 BASE FRAME HEX-HEAD BOLT M10*70L 2PCS UPRIGHT PILLAR 28 BOLT M8*40L 4PCS SIDE HAND POST(L+R) 2PCS 29 BOLT M8*20L 4PCS FRONT HANDLEBAR 30 BOLT M8*50L HANDLEBAR 2PCS 31 SPEACIAL BOLT M8*60L... - Page 6 STEP 1. Step 1 *Attach the left and right upright(4L / 4R) to the base frame(2). Secure using two bolts 8*50mm(25). Two washers 8mm(36) and two Nuts(41). *Attach the upright pillar(3) to base frame using two bolts 8*50mm(25). Two washers 8mm(36) and two Nuts(41).
- Page 7 STEP 3. Step 3 *Attach waist twist tray(10) to upright pillar(3). Secure using bolts 8*80mm(26) and washer(36) ,secure using nuts (41). *Attach bolt(31) to upright pillar(3),using washers(36) and nuts(41).then secure using bolt(42) *When fold the waist twist tray(10) to upright(3) position, you must insert the waist twist tray to the Bolt (31) and fixed through the bolt hole located in twist tray with bolt(42).
- Page 8 STEP 5. Step 5 *Attach the front handlebar(5) to upright pillar(3) using washer(35) and two bolts 10*50mm(22). *Attach the handlebar(6) to the front handlebar(5) using washer(40) and two bolts 8*40mm(28). Attach the hand- lebar(6)to the left and right upright (4L / 4R)using washer(37) and two bolt(27).
- Page 9 STEP 7. Step 7 *Insert push-up bar(17L / 17R) to waist twist Tray(10) using washers(36) and bolt (28) and nuts(41)
- Page 10 IT IS EASY FOR STORAGE ① CAUTION You must Close up the pedal making it Folding then using the fixed rope in upright Pillar(3). See diagram left. CAUTION When storing the treadmill, you must secure the main frame with the locking bolt (13) by pulling it out through the bolt hole located near the bottom of your treadmill.
- Page 11 3 3 3 3 CAUTION When storing the treadmill in the FOLDING position, you must secure the main frame with the locking bolt (13) by inserting it through the bolt hole located near the top of your treadmill. THREE-LEVEL ADJUSTABLE INCLINE There are three-level for you to adjust, You can choose best angle that you feel So comfortable as you doing exercising.
- Page 12 RUNNING BELT ADJUSTING RUNNING BELT ADJUSTING If the following situation is happened on the running belt, it will make some noise on the machine. So if the running belt is not in the center position, too tight or too loose, please use the tool to adjust it.
Need help?
Do you have a question about the MT-101 and is the answer not in the manual?
Questions and answers