Honeywell RTH3100C Owner's Manual
Non-programmable digital thermostat
Hide thumbs
Also See for RTH3100C:
- Installation manual (52 pages) ,
- Quick installation manual (48 pages) ,
- Operating manual (20 pages)
Table of Contents
Advertisement
Available languages
Available languages
Quick Links
Non-Programmable
Digital Thermostat
Owner's Manual
Read and save these
instructions.
For help please visit
yourhome.honeywell.com
Installation is Easy
1. Label wires and remove your old thermostat
2. Install and wire your new thermostat
3. Set your new thermostat to match your heating/cooling system
RTH3100C
Do you need assistance? We are here to help.
Call 1-800-468-1502 for wiring assistance before returning
the thermostat to the store.
For use with Heat Pump Systems ONLY.
Advertisement
Chapters
Table of Contents

Related Manuals for Honeywell RTH3100C


Summary of Contents for Honeywell RTH3100C
- Page 1 RTH3100C Non-Programmable Digital Thermostat Owner’s Manual Read and save these instructions. For help please visit yourhome.honeywell.com Installation is Easy 1. Label wires and remove your old thermostat 2. Install and wire your new thermostat 3. Set your new thermostat to match your heating/cooling system Do you need assistance? We are here to help.
- Page 2 50°F (10°C). Customer assistance For assistance with this product, please visit http://yourhome.honeywell.com. Or call Honeywell Customer Care toll-free at 1-800-468-1502. To save time, please note your model number and date code before calling.
-
Page 3: Table Of Contents
Table of contents Installation Programming and operation Compressor protection .......10 Installation ..........3 Replace batteries .......11 System Setup ........8 Accessories/replacement parts ..11 About your new thermostat Appendices Controls ..........9 Troubleshooting ........12 Home screen quick reference ....10 Limited warranty .........13 1 Turn Off Power to Heating/Cooling System Circuit breaker Heating/cooling system M31535... - Page 4 2 Remove Old Thermostat Remove old thermostat but leave wallplate with wires attached. If you have an older thermostat with a Do not remove wallplate yet sealed mercury tube, turn to page 2 for proper disposal instructions. Terminal designation 3 Label Wires with Tags MCR33823 Label the wires using the supplied wire labels as you disconnect them.
- Page 5 5 Mount Wallplate Mount the new wallplate using the included screws and anchors. Drill 3/16-in. holes for drywall Drill 3/32-in. holes for plaster 6 Connect Wires 1. Match each labeled wire with same letter on terminal. 2. Use a screwdriver to loosen screw terminals, insert wires, then tighten screws. 3.
- Page 6 Alternate Wiring Aux Y If the old thermostat had both V and VR wires, contact a heating/cooling contractor for help. If the old thermostat had both O and B wires, attach the B wire to the C terminal. If another wire is attached to the C terminal, call 1-800-468-1502 for help.
- Page 7 8 Install Thermostat onto Wallplate Install thermostat onto the wallplate on the wall. 9 Turn Power Back On Turn the power back on to the heating/cooling system. Circuit breaker box Heating/cooling system M31544 power switch...
-
Page 8: System Setup
System Setup Enter System Setup Next, you must set the thermostat to control the heating and cooling system in your home. To enter system setup, press and hold both the buttons until the display changes (approximately 5 seconds). Changing Settings 1. -
Page 9: About Your New Thermostat
About your new thermostat Your new Honeywell thermostat has been designed to give you many years of reliable service and easy-to-use, push-button climate control. One-touch temperature controls • Large, clear backlit display is easy to read, even in the dark •... -
Page 10: Home Screen Quick Reference
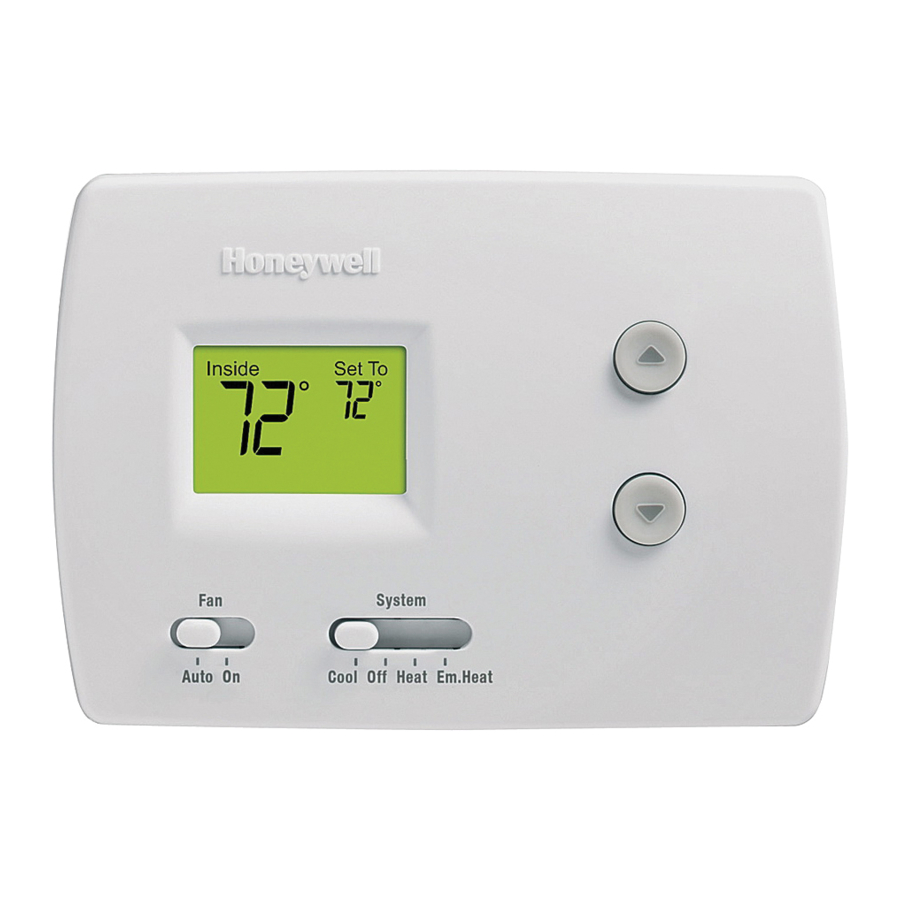
Display screen Current inside temperature Temperature setting Inside Set To Low battery Heat On Replace Batt warning (see page 11) M28328 System status Cool on: Cooling system is on. Heat on: Heating system is on. Em: Emergency heat is on. Aux: Auxiliary heat is on. -
Page 11: Replace Batteries
M28331 Turn thermostat over, insert fresh AA alkaline batteries, then reinstall thermostat. M28332 Accessories/replacement parts To order, please call Honeywell Customer Care toll-free at 1-800-468-1502. Cover plate*....Part No. 50002883-001 *Use to cover marks left by old thermostats. -
Page 12: Troubleshooting
Set the System switch to Cool, and set the temperature “Cool On” is • level below the current room temperature. not displayed For assistance with this product, please visit http://yourhome.honeywell.com or call Honeywell Customer Care toll-free at 1-800-468-1502. -
Page 13: Limited Warranty
This warranty does not cover removal or reinstallation costs. This warranty shall not apply if it is shown by Honeywell that the defect or malfunction was caused by damage which occurred while the product was in the possession of a consumer. - Page 14 Automation and Control Solutions Honeywell International Inc. 1985 Douglas Drive North Golden Valley, MN 55422 yourhome.honeywell.com ® U.S. Registered Trademark. © 2015 Honeywell International Inc. 33-00141ES—03 M.S. Rev. 08-15 33-00141ES-03 Printed in U.S.A.
- Page 15 RTH3100C Termostato Programable Manual del propietario Lea y guarde estas instrucciones. Para obtener ayuda, visite yourhome.honeywell.com La instalación es fácil 1. Rotule los cabes y retire el termostato viejo 2. Instale y conecte los cables de su nuevo termostato 3. Ajuste su nuevo termostato para que concuerde con su sistema de calefacción/refrigeración...
- Page 16 50 °F (10 °C). Asistencia al cliente Para obtener asistencia relacionada con este producto, visite http://yourhome.honeywell.com. O comuníquese con el número gratuito del servicio de atención al cliente, llamando al 1-800-468-1502. Para ahorrar tiempo, anote el número de modelo y el código de fecha antes...
-
Page 17: Instalación Instalación
Acerca Instalación Programación y funcionamiento Protección del compresor ....10 Instalación ..........3 Reemplazo de la batería ....11 Programación del sistema ....8 Accesorios y piezas de repuesto ..11 Acerca de su nuevo termostato Apéndices Controles del termostato ......9 Localización y solución Pantalla de visualización ....10 de problemas ........12 Garantía limitada ........13 1 Desconecte la alimentación en el sistema de... - Page 18 2 Remueva su viejo termostato Retire el termostato existente pero deje la placa de montaje con los cables adheridos. Si el termostato existente tiene un tubo de mercurio No retirar la placa sellado, vaya a la página 2 para obtener instrucciones mural todavía sobre cómo desecharlo adecuadamente.
- Page 19 5 Coloque la placa de montaje Monte la nueva placa de montaje utilizando los tornillos y anclajes que se suministran. Taladre agujeros de 3/32 in. (2,4 mm) en yeso Taladre agujeros de 3/16 in. (4,8 mm) en paneles de yeso 6 Conecte los cables 1.
- Page 20 Conexión alternativa Aux Y Si el termostato viejo tenía cables V y VR, póngase en contacto con un contratista de sistemas de calefacción y enfriamiento para solicitar ayuda. Si el termostato viejo tenía cables O y B, fije el cable B en el terminal C.
- Page 21 8 Instale el termostato en la placa de montaje Instale el termostato en la placa de montaje en la pared. 9 Active nuevamente el suministro eléctrico Active nuevamente el suministro eléctrico del sistema de calefacción/aire acondicionado. Caja de interruptores Interruptor de energía del sistema M31544 de circuito de calefacción/refrigeración...
-
Page 22: Programación Del Sistema
Programación del sistema Ingrese la configuración del sistema Luego, debe fijar el termostato para controlar el sistema de calefacción y enfriamiento de su hogar. Para ingresar la configuración del sistema, presione y mantenga presionados los botones (arriba) y (abajo) hasta que el visualizador cambie (5 segundos aproximadamente). -
Page 23: Acerca De Su Nuevo Termostato
Acerca de su nuevo termostato Su nuevo termostato ha sido diseñado para brindarle muchos años de funcionamiento confiable y para brindarle un control climático fácil de usar y con sólo apretar un botón. Controles de temperatura con un botón • La pantalla grande e iluminada es fácil de leer, aun en la oscuridad •... -
Page 24: Pantalla De Visualización
Pantalla de visualización Temperatura interna actual Ajuste de temperatura Inside Set To Aviso de batería baja Heat On Replace Batt (vea la página 11) M28328 Estado del sistema “Cool on” (frío encendido): El sistema de refrigeración está encendido. “Heat on” (calor encendido): El sistema de calefacción está encendido. “Em”... -
Page 25: Reemplazo De La Batería
Accesorios y piezas de repuesto M28332 Para hacer el pedido, comuníquese con el número gratuito del servicio de atención al cliente de Honeywell, llamando al 1-800-468-1502. Placa protectora*..Pieza N.º 50002883-001 *Úselo para cubrir las marcas que dejan los termostatos viejos. -
Page 26: Localización Y Solución De Problemas
Para obtener asistencia relacionada con este producto, visite http://yourhome.honeywell.com o comuníquese con el número gratuito del servicio de atención al cliente, llamando al 1-800-468-1502. -
Page 27: Garantía Limitada
Garantía limitada de 1 año Honeywell garantiza este producto, a excepción de la batería, por el término de un (1) año contra cualquier defecto de fabricación o de los materiales, a partir de la fecha de compra por parte del consumidor. Si en cualquier momento durante el período de garantía se verifica que el producto tiene un defecto o que funciona mal, Honeywell lo... - Page 28 Automatización y control desenlace Honeywell International Inc. 1985 Douglas Drive North Golden Valley, MN 55422 yourhome.honeywell.com ® Marca Registrada en los E.U.A © 2015 Honeywell International Inc. 33-00141ES—03 M.S. Rev. 08-15 33-00141ES-03 Impreso en EE. UU.
Need help?
Do you have a question about the RTH3100C and is the answer not in the manual?
Questions and answers