Advertisement
Table of Contents
- 1 Tools Needed
- 2 Step 1: Pull Rubber Mat out of Center Console
- 3 Step 2: Using a Hot Knife, Cut the Center of the Console out
- 4 Step 3: Cut a 5”X 4” Hole in the Lower Panel
- 5 Step 4: Knock out the Round Accessory Plug in the Back of the Console Cubby
- 6 Step 5: Assemble and Run Cables
- 7 Step 6: Install Assembled Mount into Console
- Download this manual
Tools Needed:
• 10mm end wrench
• 8mm end wrench
• 7mm end wrench
NOTE: Please read Rugged Radios Installation guide before installing your communication system:
https://www.ruggedradios.com/PDF/Installation-Tech-Guide.pdf
Step 1: Pull rubber mat out of center
console. There are 6 rubber tabs holding it
in the console that can be a bit stubborn
to remove.
Step 4: Knock out the round accessory
plug in the back of the console cubby.
This hole will be used to run your Push to
talk buttons and the Antenna Coax cable
through when the mount is installed.
RZR PRO XP MOUNT
INSTALLATION GUIDE
Rugged Radios
|
www.ruggedradios.com
• Tape measure
• Hot knife (we use a Demand Part #HKTCR but most hot knives should work)
• Screwdriver
Step 2: Using a hot knife, cut the center of
the console out. Be very cautious when
cutting the bottom of the console
because the 12v power socket cable
runs under it.
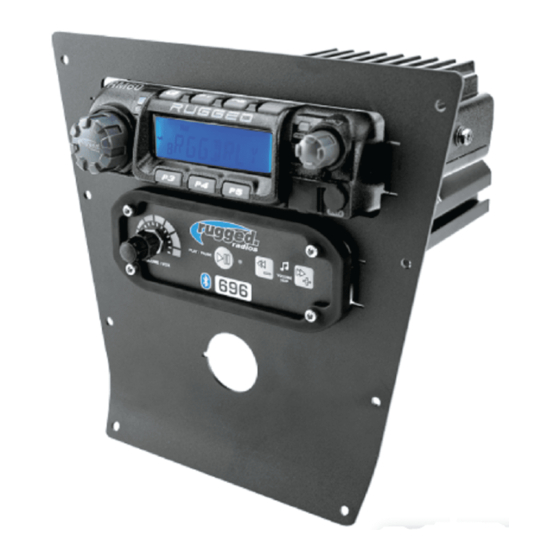
Step 5:
a) Assemble the mount with radio, intercom and the 12v power socket.
b) Run power cables down the center console on the drivers side of the shifter and under
the seat to the battery. Secure them well with zip ties.
c) Run the driver, co-driver and rear seat helmet/headset cables down the console on the
passenger side of the shifter and to their speci c seat. Secure cabling with zip ties but do
not over tighten them.
d) Run Push to talk cables and Antenna cable through round socket hole
e) Connect all cables to their appropriate location on the radio and intercom
f ) Don't forget to plug in the 12v power supply!
|
888-541-7223
5"
4"
3"
Step 3: Cut a 5"x 4" hole in the lower panel
making the rst cut 3" forward of the edge
of the cup holder. This will allow the
cables on the back side of the intercom
clearance and allow it to be serviced.
Advertisement
Table of Contents

Summary of Contents for Rugged Radios RZR PRO XP Mount
- Page 1 • 8mm end wrench • Hot knife (we use a Demand Part #HKTCR but most hot knives should work) • 7mm end wrench • Screwdriver NOTE: Please read Rugged Radios Installation guide before installing your communication system: https://www.ruggedradios.com/PDF/Installation-Tech-Guide.pdf 5” 4”...
- Page 2 RZR PRO XP MOUNT INSTALLATION GUIDE Rugged Radios www.ruggedradios.com 888-541-7223 Step 6: Install assembled mount into console. Center the mount in the console and push it up to bottom of the dash. Hold in place while screwing supplied screws into each one of the 8 mounting holes.
Need help?
Do you have a question about the RZR PRO XP Mount and is the answer not in the manual?
Questions and answers