Table of Contents
Advertisement
Quick Links
Advertisement
Table of Contents

Summary of Contents for Grozone Control LP5
- Page 1 Propane CO2 Generator LP5 / LP10 Repair & Maintenance Guide Version 1.2 May 2012...
-
Page 2: Table Of Contents
Robertson (Square or socket head) Screwdriver (#2 or Red) 1 roll Teflon Tape Roll REPLACEMENT PARTS # Ref. Tool 3000 BTU/hr Slotted Cap Burner Rubber Feet 10-ft Hose / Regulator Assembly 1A SLOW BLOW Fuse (do not use Fast Blow Type) LP5 / LP10 Maintenance Guide Version 1.2... -
Page 3: C Illustrated Glossary
MANIFOLD / BURNER ASSEMBLY: and up to the slotted cap at MF – Manifold (Single LP5, Dual LP10) top. Caps are removable. SCB – Slotted Cap Burners (5 or 10) TS: the sensor is a thermo-... -
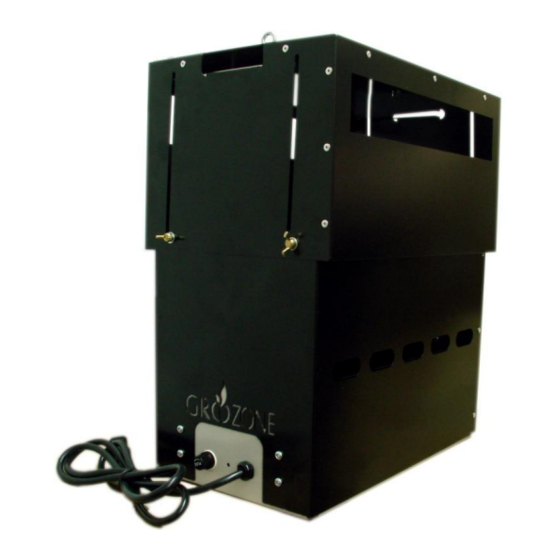
Page 4: D Lifting And Collapsing The Enclosure Top Part (Flame Shield)
Once fully collapsed, tighten the 4 wing screws by hand (no tool required). Once the wing screws are tightened, you can manipulate the unit using the large opening on top. LP5 / LP10 Maintenance Guide Version 1.2... -
Page 5: E Troubleshooting Steps And Contact Information
Sections L and M. CONTACT: All email inquiries can be sent to service@grozonecontrol.com or by phone at 418-308-0940 / 1-855-262-1800 Monday to Friday, 8am to 5pm EST LP5 / LP10 Maintenance Guide Version 1.2... -
Page 6: F Basic Functional Test Without Gas
In this case, the fuse is likely to blow up each time the power cord is connected! If pilot needs to be changed: change replaceable Base. LP5 / LP10 Maintenance Guide Version 1.2... -
Page 7: G Basic Functional Test With Gas
In normal AIR CIRCULATION conditions, the other burners will ignite in just seconds. It may be longer when using the unit for the first time (the manifold need to fill up with propane before flowing through the burners). LP5 / LP10 Maintenance Guide Version 1.2... - Page 8 Air quality in your environment is also likely to influence the flame color. If the flames are “dancing” (going up and down every 2-3 seconds), the gas tank pressure or level is probably too low: fill up the tank with propane. LP5 / LP10 Maintenance Guide Version 1.2...
-
Page 9: H Connecting The Hose / Regulator Assembly
1/8 turn using a 3/4 inch key. DO NOT apply excessive strength, assure a tight connection. SOAP WATER SOLUTION can be used to check gas leak. Bubbles are formed where gas is leaking. LP5 / LP10 Maintenance Guide Version 1.2... -
Page 10: I Bleeding The Gas Line
It may take up to 2or 3 cycles to bleed the line, before the pilot finally ignites. If it take more than 3 cycles to bleed the line, check the tank valve level or pressure. LP5 / LP10 Maintenance Guide Version 1.2... -
Page 11: J Replacing A Fuse
Remove fuse from CAP and place a new fuse. Fuse has no polarity: any end can be placed in the Holder CAP. Verifying that the fuse is good: the tiny filament inside the glass compartment shall not be melted or cut ! LP5 / LP10 Maintenance Guide Version 1.2... -
Page 12: K Cleaning The Burners Orifices And Slotted Caps
SIDE HOLES are important for combustion quality and need to be free of dirt at all times. If the dirt cannot be removed, REMOVE THE BURNER FROM THE MANIFOLD USING THE ½ INCH KEY. LP5 / LP10 Maintenance Guide Version 1.2... - Page 13 MANIFOLD HOLE THREAD before screwing the new burner into place. Using too much grease (sealant) may obstruct the burner orifice. DO NOT use excessive strength when screwing the burner back into place. Use ½ inch key. LP5 / LP10 Maintenance Guide Version 1.2...
-
Page 14: L Removing The Enclosure Top Part (Flame Shield) For Maintenance
FLAME SHIELD. However, it is possible to use the burner without the shield for maintenance purpose, in a SAFE AND VENTILATED LOCATION. In this case, use the generator away from combustible or explosive material. LP5 / LP10 Maintenance Guide Version 1.2... -
Page 15: M Closing The Enclosure Top Part (Flame Shield) After Maintenance
BASE LIP TIP: Lifting the flame shield slightly may be needed (with a flat screwdriver) to align the 4 screws holes on flame shield with the 4 threaded holes on base. End of document LP5 / LP10 Maintenance Guide Version 1.2...
Need help?
Do you have a question about the LP5 and is the answer not in the manual?
Questions and answers