
Related Manuals for 123Filter iSpring


Summary of Contents for 123Filter iSpring
- Page 1 Reverse Osmosis Water Filter Systems INSTALLATION INSTRUCTION Ver 2005-6 Copyright ©2005-2015 ISPRING WATER SYSTEMS, LLC. All rights reserved.
-
Page 2: Table Of Contents
How to change inline cartridges in 5th – 7th stages ................13 O-rings: Replace every 3 years or sooner if leak happens at O-ring..........13 Extra Installation............................. 14 UV Lamp (part# iSpring UVB11) and Ice maker kit (part# iSrping ICEK) ........14 www.123filter.com | (678) 261-7611 sales@ispringfilter.com... -
Page 3: Before Installation
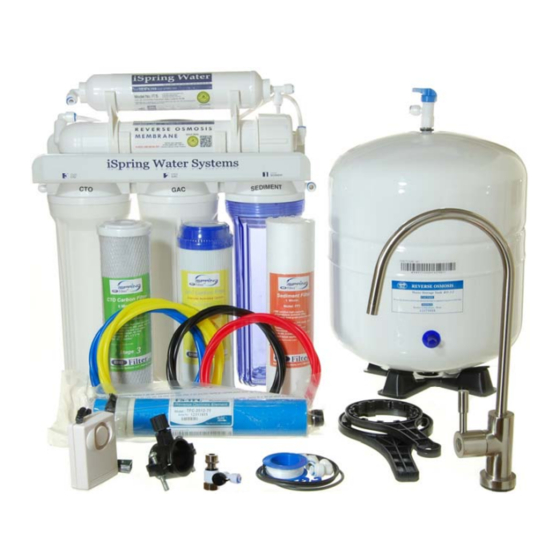
Please open the box, and take all the components and tool kit out. Inspect them to ensure that nothing is damaged during shipping. If any part is cracked or broken, please immediately contact iSpring Customer Support for replacement. Identify and get familiar with the components. -
Page 4: Components Identification
4-color tubing set Drinking faucet with Feed Water Adapter (AFW) installation kit Drain saddle ¼” Housing wrenches Tank valve Spare Housing O-rings x 3, Elbow Fitting x 2, Lock Water Detector (optional) Teflon tape Clips www.123filter.com | (678) 261-7611 sales@ispringfilter.com Page 3... -
Page 5: Installation Tips
2. With two fingers PUSHING IN and PRESSING DOWN the Lock Sleeve to eliminate the Gap that the blue Lock Clip occupied, pull the tubing out. (Pressing down the Lock Sleeve releases the spring-loaded steel teeth that grab the tubing inside the fitting body). www.123filter.com | (678) 261-7611 sales@ispringfilter.com... -
Page 6: How To Use Compression Fitting With Brass Nut, Collar, And Tube Insert
7. Once breaking through the smooth surface, swirl the drill a little to apply pressure in a circle evenly. 8. Be patient and deliberate. It can take 20 – 40 minutes to drill through one inch. www.123filter.com | (678) 261-7611 sales@ispringfilter.com... - Page 7 H. RO water to Drinking Faucet An Ice Maker Kit (part# iSpring ICEK) can be purchased separately to feed RO water to refrigerator and get crystal clear ice cubes and great tasting water at ease. It could make Drinking Water Faucet not absolutely necessary.
-
Page 8: Installation Steps
Installation Steps Before you begin installation, it is highly recommended that you watch the video “iSpring reverse osmosis installation” on YouTube. Note: Steps 1 – 7 are independent, and can be performed in any order. Step 1: Install Feed Water Adapter (AFW) 1.1 See Figure 5. -
Page 9: Step 3: Install Drain Saddle
5.1 Wrap 10 - 15 turns of Teflon tape clockwise (looking from top) onto the metal thread at the top of the tank. 5.2 Screw (clockwise) the Tank Shut-off Valve on and tighten up by hand. Do not over tighten. Connect the YELLOW tubing onto the Quick-Fitting of TSV. www.123filter.com | (678) 261-7611 sales@ispringfilter.com... -
Page 10: Step 6: Install Reverse Osmosis Membrane
(will do it in system start up). Step 7: Tubing Hook up (model specific sub-steps are marked with * ) 7.1 See Figure 5 and Figure 10 RCC7P & RCC7 TOP VIEW, note connection points A-B, C-D, E-F, and G-H. www.123filter.com | (678) 261-7611 sales@ispringfilter.com... -
Page 11: Step 8: System Start Up (Model Specific Sub-Steps Are Marked With * )
Figure 10 7.2 Facing the iSpring logo up front, the pre-filter 1st stage is located on the right hand side. Connect the tubing Feed Water Adapter (AFW) (point A) to the elbow fitting (point B). 7.3 Connect the Flow Restrictor (point C) , which is a 3-inch long cylinder with a FLOW sign laying beside the... - Page 12 Flood Alarm can be used together for better protection. Congratulations! You have successfully installed the iSpring Reverse Osmosis Water Filtration System! Start enjoying the cleanest water right from your tap! www.123filter.com...
-
Page 13: System Maintenance
TDS level periodically, the system will work properly for many years. Note: stage 6 or 7 only exists in certain models. For a filter pack supply, visit 123Filter.com or Google “Model replacement filter” online, in which “Model” is the model number of the system, e.g. RCC7 Stages 1 –... -
Page 14: Stage 4 Ro Membrane: Replace Every 2 - 3 Years Or Sooner If Tds Level Starts Increasing
O-rings: Replace every 3 years or sooner if leak happens at O-ring. The package comes with 3 spare O-rings for the pre-filter housing, and 1 spare O-ring for the membrane housing. Please save them with this manual. www.123filter.com | (678) 261-7611 sales@ispringfilter.com... -
Page 15: Extra Installation
The Ice Maker Kit (model#: iSpring ICEK) can be purchased separately to feed RO water to a refrigerator and get crystal clear ice cubes and great tasting water. It would make a Drinking Water Faucet not absolutely necessary.
Need help?
Do you have a question about the iSpring and is the answer not in the manual?
Questions and answers