
Summary of Contents for Kenner KNR500
- Page 1 OWNER’S MANUAL Model KNR500 ROLLING DOOR OPENER PLEASE READ CAREFULLY BEFORE INSTALLATION...
-
Page 2: Table Of Contents
Content Safety warnings………………………………………………………..1 Pre-installation note……………………………………………….2 Installation Instructions…………………………………………………4 Setting top and bottom limits…………………………………………….5 Control box set up………………………………………………………..7 Owner’s manual………………………………………………………….8 Trouble shooting………………………………………………………...10... -
Page 3: Safety Warnings
Repeat the test once a month and make adjustments if necessary. (see sensitivity adjustment). KNR500 operator has an electronic obstruction system that provides safe and reliable operation. It is however a legal requirement in some countries to also install a Photo-electric sensor across the door way. -
Page 4: Preinstallation Note
CAUTION: Activate operator only when the door is in full view, free of obstructions and properly adjusted. Do not enter or leave the garage while the door is in motion. Do not allow children to play near the door. Disconnect electric power to the garage door operator before making repairs or removing covers. - Page 5 If the operator is being fitted at the same time as the new door installation, read these instructions in conjunction with the KNR500 roller door installation instructions. If the operator is being retrofitted, make sure the door operates smoothly and is properly balanced.
-
Page 6: Installation Instructions
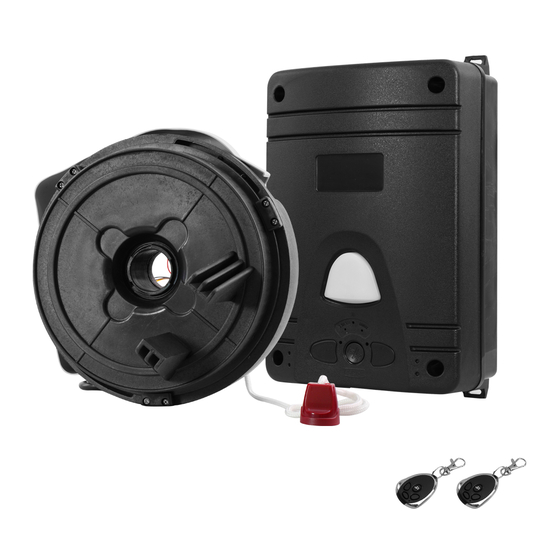
INSTALLATION INSTRUCTIONS STEP1 Whilst the door roll is on the floor, rotate shaft backwards and forwards by hand and then release. This action will allow the roll to centralize itself on the shaft. (new installation only). STEP2 Slide drive unit onto shaft as shown figure 5, ensuring drive lugs engage fully with the narrowest spoken on drum wheel. -
Page 7: Setting Top And Bottom Limits
Disengage the motor drive by pulling the manual release string downwards. See Figure6. Tension door and complete door installation as per Door Installation Instructions. Ensure door is correctly balanced and is not binding or sticking within vertical tracks. Ensure locking bars (if fitted) are moved to the retracted (unlocked) position and keys removed from the lock. - Page 8 STEP4 Ensure that the manual release lever is still in the “disengaged” position, and manually raise the door until it is approx 100mm from the top stop position. STEP5 Rotate cam “T” (in the same direction that is moving as you were manually raising the door), so that it actuates the top Limit Switch.
- Page 9 Press Button on Control Box Front and check closing and stopping position. STEP 11 If you are achieving the desired stop position, then replace the Limit Switch Cover Plate. If not, then reset the Limit Cams (STEP 2 to 9) after first turning off the mains power.
-
Page 10: Owner's Manual
2, Auto close option If keep the cover in the PCB, the auto close function closed, If remove the cover in the PCB, the auto close function opened. 3, Right hand and left hand installation swap Please pay attention number “9” 4, Sensitivity adjustment For right hand installation: Please pay attention number “2”, and “3”... -
Page 11: Trouble Shooting
Obstruction Detection During an open cycle if an obstruction is detected the door will stop. During a closing cycle if an obstruction is detected the door will reverse to the open position. The sensitivity or the amount force required to cause an obstruction detection is fully adjustable. - Page 12 Move aerial manually and try in different orientations, keeping it away from steel structures and electrical cables. DOOR OPERATES BUT FAILS TO FULLY OPEN OR REVERSE BEFORE FULLY CLOSED Check manual operation for correct, door balance manually, not binding. Adjust it if necessary.
- Page 13 Technical Specifications INPUT VOLTAGE 240VAC /50Hz Single phase TRANSFORMER SEPC Primary Voltage 240VAC Secondary Voltage 24VAC Power 80Watt WORKING CIRCUMSTANCE: Temperature -20℃-70℃ MOTOR SPEC Motor Type Permanent Magnet D.C Motor Voltage 24V DC Max. Lift force 500N CONTROL DOARD SPEC Control Board Voltage 24V DC/5V DC Light Globe Voltage...
Need help?
Do you have a question about the KNR500 and is the answer not in the manual?
Questions and answers