
Summary of Contents for NexDome 2.2m Dome Rotation Kit
- Page 1 NEXDOME OBSERVATORIES NEXDOME.COM NexDome 2.2m Dome Rotation Kit Installation and Operation Manual Page 1...
- Page 2 NEXDOME OBSERVATORIES NEXDOME.COM The NexDome dome rotation kit provides motorized dome rotation. This also allows for rotation control by various software packages including ASCOM and TheSkyX. To install the dome rotator, start by attaching the double-sided tape on the inside of the dome lip along the center of the track slot.
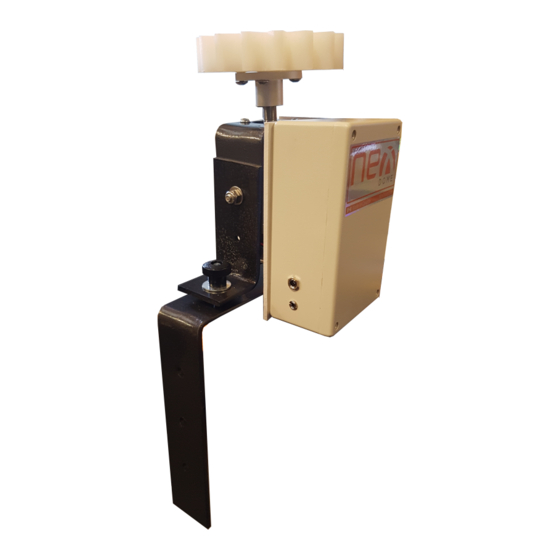
- Page 3 NEXDOME OBSERVATORIES NEXDOME.COM Figure 2: Install the gear track along the tape. Mounting the motor unit will require drilling 3 holes in the wall brace. If you have a bay, pick a brace near the bay so that the USB control cable can reach the computer. Position the motor unit with the gear in the middle of track and mark the hole positions on the wall post.
- Page 4 NEXDOME OBSERVATORIES NEXDOME.COM To use the motor with dome rotation software, we need to install the magnetic switch. Attach the switches to the brackets as shown in Fig 14. Locate an angled roller bolt near the control box. The “V” shaped bracket mounts on the wall and is for the switch, the “L” shaped bracket mounts on the dome for the magnet.
-
Page 5: Operation
NEXDOME OBSERVATORIES NEXDOME.COM OPERATION For Windows Your NexDome rotation unit is already programmed with the latest firmware and it is ready to use but we recommend downloading the following software: Arduino IDE software: https://www.arduino.cc/en/Main/Software This software does two things for you. First, enables your computer to recognize the Arduino board and therefore connect to it. - Page 6 NEXDOME OBSERVATORIES NEXDOME.COM checking the “COM and Serial Port” listings under the devices list for the computer. Arduino Leonardo should appear next to a COM number (Fig 5). You’ll need this information for the setup process. Figure 5: Port assignment for Arduino.
- Page 7 Start by opening the control software (Fig 6-7), and click on “setup”. Next, click on “Dome” and then “Choose Dome”. The ASCOM Dome Chooser window will open. Select NexDome from the dropdown list. Click on the “Properties” button and select the COM Port that was assigned to the Arduino controller, click “OK”.
- Page 8 NEXDOME OBSERVATORIES NEXDOME.COM Figure 7: Connect to dome. Next, click the “Connect” button and a new control window will open (Fig 8). Press the home button and the dome should start to rotate. It will stop when the magnetic switch and magnet align.
- Page 9 NEXDOME OBSERVATORIES NEXDOME.COM Figure 8: Dome Setup If this is the first time you’ve run the software, the dome will need to be calibrated too. Make sure you are not connected to a telescope and that the track and slave boxes are not selected (if they are, the calibration will fail).
- Page 10 NEXDOME OBSERVATORIES NEXDOME.COM Figure 9: Telescope geometry measurements. Once all the measurements are entered, home the dome one more time, then press ok. You will be returned to the control window. The position of the dome should reflect the home values you entered earlier.
- Page 11 NEXDOME OBSERVATORIES NEXDOME.COM Figure 10: Dome and telescope control interface. If you notice that the dome goes to a position that is 180 off (in other words, you enter a GoTo azimuth value of 90 and the dome rotates to 270), go back into the setup window and check the “reversed”...
-
Page 12: Updating The Firmware
Arduino IDE software that you have already installed. The new firmware will be available through a link on the SUPPORT webpage (https://www.nexdome.com/support). Download the NexDome.ino file (https://github.com/grozzie2/NexDome/tree/master/arduino/NexDome) and open it using the Arduino IDE software.
Need help?
Do you have a question about the 2.2m Dome Rotation Kit and is the answer not in the manual?
Questions and answers