Advertisement
Quick Links
Advertisement

Related Manuals for BCP Cabana SKY5786


Summary of Contents for BCP Cabana SKY5786
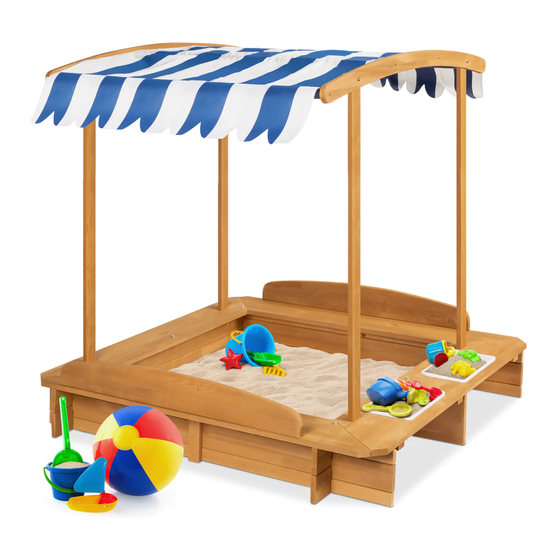
- Page 1 INSTRUCTION MANUAL Sandbox Cabana SKY5786 Ver. 1...
- Page 2 ADULT ASSEMBLY REQUIRED CHOKING HAZARD - Small parts. Not for children under 3 years old. NOTICE Please retain these instructions for future reference. • Please do not exceed the weight limitations of this item. • Do not stand on or use any part of this item as a step ladder. •...
- Page 3 PARTS SIDE FRAME I SIDE FRAME II FRAME I 4 PCS 2 PCS 2 PCS FRAME II FRAME SUPPORT SIDE BENCH 2 PCS 2 PCS 2 PCS BENCH BENCH WITH BENCH SUPPORT BUCKETS 1 PC 1 PC 1 PC BACKREST ROOF SUPPORT ROOF FRAME 2 PCS...
- Page 4 PARTS POLE ROOF SAND TARP 4 PCS 1 PC 1 PC BUCKET COVER 2 PCS 1 PC...
- Page 5 PRODUCT ASSEMBLY Insert part 3 and part 4 frames into the designated slots on two part 1 side frames. Insert two part 2 side frames into the designated slots. LONG END Make sure to position the long end of the side frames on the same side.
- Page 6 PRODUCT ASSEMBLY Attach two part 5 frame supports with six part B screws. Attach part 9 bench support with two part A screws.
- Page 7 PRODUCT ASSEMBLY Attach two part 6 side benches with ten part A screws. Make sure benches are positioned correctly and slots on part 7 and 8 are clear of obstructions. Attach part 7 and part 8 benches with fourteen part A screws.
- Page 8 PRODUCT ASSEMBLY Attach two part 10 backrests with four part C screws. NOTE: If necessary, flip assembly on its side. Insert four part 11 roof supports into the designated slots, then attach them with eight part D bolts and eight part E sleeve nuts.
- Page 9 PRODUCT ASSEMBLY Slide four part 13 poles into the part 14 roof. Attach two part 12 roof frames with eight part A screws. Attach the roof with four part D bolts and four part E sleeve nuts.
- Page 10 PRODUCT ASSEMBLY Place two part 16 buckets. Place the sandbox on top of the part 15 sand tarp.
- Page 11 COVERING SANDBOX Drill eight part F snap button screws into the sandbox. Make sure the screws align witthe buttons on the cover. Secure the part 17 cover with the built-in buttons.
-
Page 12: Help Center
HELP CENTER HELP CENTER Question about your product? We're here to help. Visit us at: Question about your product? We're here to help. Visit us at: help.bestchoiceproducts.com help.bestchoiceproducts.com CHAT CHAT Product Assembly Product Assembly Returns & Refunds Returns & Refunds PRODUCT WARRANTY INFORMATION PRODUCT WARRANTY INFORMATION All items can be returned for any reason within 60 days of the receipt and will receive a full refund as long...
Need help?
Do you have a question about the Cabana SKY5786 and is the answer not in the manual?
Questions and answers