Table of Contents
Advertisement
Available languages
Available languages
Quick Links
Advertisement
Chapters
Table of Contents

Related Manuals for HappyFabric HappyPress

Summary of Contents for HappyFabric HappyPress
- Page 1 OPERATING MANUAL...
- Page 2 Vielen Dank, dass du dich für eine HappyPress entschieden hast. Wir hoffen, dass du mit deiner neuen HappyPress noch mehr Spaß am Textildruck und an der Umsetzung deiner Designs hast. Für Rückfragen zu deiner HappyPress kannst du hier die Seriennummer deiner HappyPress eintragen.
-
Page 3: Table Of Contents
Inhaltsverzeichnis Vorwort Warnhinweise Sicherheitsvorschriften Anleitungen für Standardfunktionen Abbildungen Bedienfelderläuterung 232 Fehlermeldung Inbetriebnahme Temperatur- & Zeiteinstellung Anpressdruck einstellen Drucken/ Anpressen Anleitungen optionale Erweiterungen Auto-open Funktion Heizplatte A3 Bodenplatte A3 Beheizbare Bodenplatte Technische Daten & Abmessungen CE-Zertifizierung Garantiebedingungen April 2020... -
Page 4: Vorwort
VORWORT Diese Bedienungsanleitung wurde anwenderfreundlich gestaltet. Lies sie sorgfältig und folge der Schritt-für-Schritt-Anleitung, um die besten Druckergebnisse zu erzielen. Bitte bewahre diese Anleitung auf. WARNHINWEISE • Kontrolliere deine Presse nach dem Auspacken sofort auf Transportschäden. Lass die Presse vor der ersten Inbetriebnahme mehrere Stunden bei Raumtemperatur stehen, um das Kondenswasser verdunsten zu lassen und einen damit eventuell verbundenen Kurzschluss zu verhindern. -
Page 5: Sicherheitsvorschriften
Bei Problemen mit deiner Presse, wende dich bitte direkt an uns zu den üblichen Geschäftszeiten. Telefon (+49) 030 / 89 747 348 oder E-Mail kontakt@happyfabric.de Bei eigenständigem Öffnen des Gehäuses erlischt jeglicher Garantieanspruch. Vermeide Standorte, an denen Kinder oder dritte Personen unbeaufsichtigt Zugang zu deiner Presse haben. -
Page 6: Anleitungen Für Standardfunktionen
ANLEITUNGEN FÜR STANDARDFUNKTIONEN Alle nachfolgenden Daten und Informationen gelten allgemein für die HappyPress 4. -
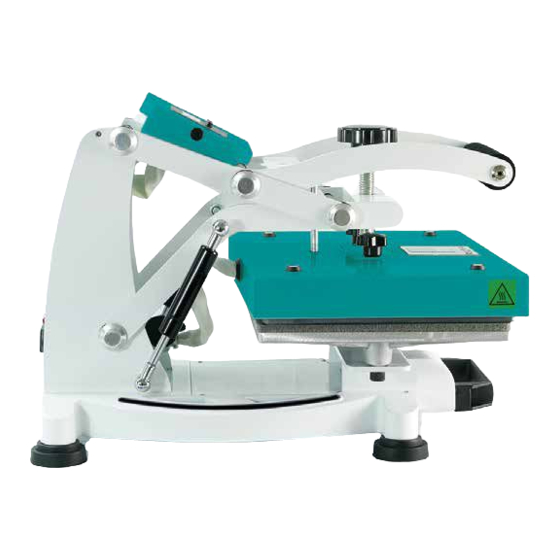
Page 7: Abbildungen
ABBILDUNGEN ANSCHLÜSSE GUMMIFUß BODENPLATTE LED DISPLAY DÄMPFER GRIFF QUERSTREBE DRUCKARM ABDECKUNG HEIZPLATTE DRUCKEINSTELLSCHRAUBE INBUSSCHRAUBE GUMMISTOPPER DRUCKARM STERNGRIFFSCHRAUBE HappyFabric HappyFabric.de HappyFabric.de... - Page 8 Detailabbildung Pressenrückseite EIN/AUS SCHALTER SICHERUNG 4 A ANSCHLUSS STROMKABEL Detailabbildung Heizplattenanschlüsse ANSCHLUSS FÜR DIE UNTERE HEIZPLATTE ANSCHLUSS FÜR DIE OBERE HEIZPLATTE Detailabbildung Anschluss für Auto-open Modul ANSCHLUSS FÜR DAS AUTO-OPEN MODUL...
-
Page 9: Bedienfelderläuterung
UPPER & LOWER gewechselt. 9. PLUS TASTE Hiermit werden Temperatur und Zeit heraufgeregelt. Achtung: Solange eines der Lämpchen auf der rechten Seite des Display leuchtet, befindest du dich im Einstellmodus der Presse. Die Presse heizt in diesem Modus nicht auf! HappyFabric HappyFabric.de HappyFabric.de... - Page 10 221 °C ist die höchste Temperatur, die du einstellen kannst und die im Display angezeigt wird. Bei der Verwendung der HappyPress mit der unteren Heizplatte beträgt die TEMP 130°C und die obere Heizplatte wird auf 120°C eingestellt. Mit einer Andruckzeit von ca. 5 Sekunden.
-
Page 11: 232 Fehlermeldung
232 FEHLERMELDUNG Sollte die Presse einmal die Fehlermeldung 232 auf dem Display anzeigen, kontrolliere bitte die Anschlüsse der Heizplatte/n. Ist alles korrekt eingesteckt, die Fehlermeldung erscheint jedoch noch immer, melde dich bitte beim Kundenservice. www.happyfabric.com HappyFabric HappyFabric.de HappyFabric.de... - Page 12 Der EIN-/AUS-Schalter befindet sich an der Rückseite deiner HappyPress 4. Stelle den Schalter auf EIN. Sollte sich deine HappyPress 4 einmal von selbst abschalten, starte sie neu, indem du den Schalter erst in die AUS-Position (O) und anschließend wieder in die EIN-Position ( I ) schaltest.
-
Page 13: Temperatur- & Zeiteinstellung
Heizplatte einstellen. Drück ein viertes Mal den Mode-Knopf um aus dem Einstellmodus zu gelangen Alle Lämpchen müssen aus sein, nur dann heizt die HappyPress 4 auf. Die aktuelle Starttemperatur wird im Display angezeigt und die Presse heizt auf. Hat die Presse die gewünschte Temperatur erreicht, kannst du mit dem Drucken beginnen. -
Page 14: Anpressdruck Einstellen
ANPRESSDRUCK EINSTELLEN Einstellung der Druckintensität STELLSCHRAUBE ZUM EINSTELLEN DES ANPRESSDRUCKS Mittig auf der Heizplatte befindet sich eine Stellschraube, mit der du den Anpressdruck anpassen kannst. Durch Drehen der Stellschraube bewegst du die obere Heizplatte nach oben oder unten. Die obere Heizplatte muss an die Dicke des zu bedruckenden Textils/Materials angepasst werden. -
Page 15: Drucken/ Anpressen
Niemals die Presse mit Gewalt schließen! • Der Timer zählt die eingestellte Zeit automatisch runter. Wenn die Zeit abgelaufen ist, ertönt ein Signalton. Solltest du deine HappyPress 4 bereits mit dem Auto-open Modul aufgerüstet haben, öffnet sich die Presse nach Ablauf der Zeit automatisch. -
Page 16: Anleitungen Optionale Erweiterungen
ANLEITUNGEN OPTIONALE ERWEITERUNGEN Alle nachfolgenden Erweiterungen können nachträglich der HappyPress 4 hinzugefügt werden. -
Page 17: Auto-Open Funktion
Druck nach dem Schließen aufliegt. Zubehör für den Einbau des Auto-open Modul Flügelschraube Auto-open Modul mit zur Sicherung bei Gummiunterlage Nichtbenutzung. und Schraube Schraube Steckplatz für das Befestigen des Auto-open Modul. Auto-open Modul. Inbusschlüssel wird benötigt. HappyFabric HappyFabric.de HappyFabric.de... - Page 18 AUTO-OPEN FUNKTION Einbau des Auto-open Modul Kurzanleitung Hinweis: Bei zu gering eingestelltem Anpressdruck greift das Auto-open Modul nicht. Optional Für einen leichteren Umbau, kann die obere Heizplatte vor dem Austausch abgenommen werden.(Siehe Seite 20) Für den Fall, dass das Auto-open Modul die Platte nicht angehoben bekommt, müssen die mitgelieferten Gasdruckfedern eingebaut werden.
- Page 19 Nimm die Presse vor jedem Umbau vom Strom! Für einen leichteren Umbau, kann die obere Heizplatte vor dem Austausch abgenommen werden. Dies funktioniert wie folgt: Schritt 1 Nachdem die HappyPress 4 vom Strom genommen wurde, schließe sie komplett. Die nächsten Schritte sind so leichter umzusetzen.
- Page 20 AUTO-OPEN FUNKTION Einbau des Auto-open Modul Schritt 4 Da die HappyPress 4 komplett geschlossen war, kannst du sie nun mit dem Druckhebel vorsichtig öffnen. Die obere Heizplatte sollte auf der Bodenplatte liegen bleiben. Lege sie, zur Sicherheit bei Seite. Schritt 5...
- Page 21 Steckplatz Es helfen dir Markierungen beim Einstecken. Fixiere den Stecker dann mit dem Gewindering. Schritt 9 Jetzt kann die HappyPress 4 wieder geschlossen werden. Die Halterung sollte glatt auf der oberen Heizplatte aufliegen. HappyFabric HappyFabric.de HappyFabric.de...
- Page 22 Hilfe des Inbusschlüssels an der Heizplatte befestigt werden, damit die Heizplatte in Position bleibt. Schritt 12 Jetzt kann die HappyPress 4 wieder an den Strom angeschlossen und in Betrieb genommen werden. Befestige bei Nichtbenutzung oder Transport der Presse die Flügelschraube...
-
Page 23: Heizplatte A3
Umbau der Heizplatte im Format A3 Für den Umbau brauchst du: Ein Inbusschlüssel für die Gewindeschraube die die Heizplatte in Position hält. Sterngriffschrauben lassen sich einfach mit der Hand lösen. Anschlussstecker der oberen Heizplatte. Optionales Zubehör Gasdruckfedern für die Heizplatte in HappyFabric HappyFabric.de HappyFabric.de... - Page 24 HEIZPLATTE A3 Umbau der Heizplatte im Format A3 Kurzanleitung Hinweis: Für die A3 Heizplatte müssen auch die mitgelieferten Gasdruckfedern eingebaut werden. Schritt 1 Nimm die Presse vom Strom. Schritt 2 Schließe die Presse, um die obere Heizplatte zu montieren. Löse die Sterngriffschrauben Schritt 3 Schritt 4 Löse die Gewindeschraube, die die Heizplatte in Position hält.
- Page 25 HEIZPLATTE A3 Umbau der Heizplatte im Format A3 Detaillierte Anleitung Nimm die Presse vor jedem Umbau vom Strom! Schritt 1 Nachdem die HappyPress 4 vom Strom genommen wurde, schließe sie komplett. So sind die nächsten Schritte leichter umzusetzen. Schritt 2 Löse mit Hilfe eines Inbusschlüssels die...
- Page 26 Buchse ziehen und die A4 Heizplatte abnehmen und beiseite legen. Achtung: Vor dem Ziehen muss der Gewindering aufgedreht werden. Schritt 6 Jetzt kann die HappyPress 4 wieder geschlossen werden. Die Halterung sollte glatt auf der oberen Heizplatte aufliegen.
- Page 27 Anschlussbuchse. Zieh die Bodenplatte komplett heraus, um den Anschlussstecker einfacher einstecken zu können. Anschlussstecker einstecken und mit dem Gewindering fixieren. Die Presse kann wieder an den Strom angeschlossen und in Betrieb genommen werden. HappyFabric HappyFabric.de HappyFabric.de...
-
Page 28: Bodenplatte A3
BODENPLATTE A3 Umbau der Bodenplatte im Format A3 Für den Umbau brauchst du: Ein Inbusschlüssel für die Schrauben die die Bodenplatte fixieren. - Page 29 Schritt 5 Lege jetzt die Bodenplatte in A3 auf den Unterbau der Presse und schraube sie mit den entsprechenden Schrauben von unten fest. Schritt 6 Die Presse kann wieder angeschlossen und in Betrieb genommen werden. HappyFabric HappyFabric.de HappyFabric.de...
- Page 30 BODENPLATTE A3 Umbau der Bodenplatte im Format A3 Detaillierte Anleitung Nimm die Presse vor jedem Umbau vom Strom! Schritt 1 Nachdem die HappyPress 4 vom Strom genommen wurde, schließe sie komplett. So sind die nächsten Schritte leichter umzusetzen. Schritt 2...
- Page 31 Schritt 5 Lege jetzt die A3 Bodenplatte auf den Unterbau der Presse und fixiere sie mit den Schrauben an der Unterseite. Schritt 6 Jetzt kann die HappyPress 4 wieder an den Strom angeschlossen und in Betrieb genommen werden. HappyFabric HappyFabric.de HappyFabric.de...
-
Page 32: Beheizbare Bodenplatte
BEHEIZBARE BODENPLATTE Umbau der beheizbaren Bodenplatte im Format A4/A3 Für den Umbau brauchst du: Ein Inbusschlüsse Schraubendreher für die Schrauben für die Kreuzschrauben die die Bodenplatte fixieren. Bodenabdeckung und Schienen. Detailansicht Standfuß Anschlüsse für die für Heizplatten. die beheizbare Bodenplatte. Links: untere Heizplatte Rechts: obere... - Page 33 Schritt 10 schraube sie mit den Schrauben fest. Schritt 11 Jetzt kannst du den Anschlussstecker in den linken Anschluss einstecken und durch Drehen des Gewinderings fixieren. Schritt 12 Die Presse kann wieder angeschlossen und in Betrieb genommen werden. HappyFabric HappyFabric.de HappyFabric.de...
- Page 34 Nimm die Presse vor jedem Umbau vom Strom! Für einen leichteren Umbau, kann die obere Heizplatte vor dem Austausch abgenommen werden. (Siehe Seite 26) Schritt 1 Nachdem die HappyPress 4 vom Strom genommen wurde, öffne die Presse komplett. Schritt 2 Unter der Bodenplatte befinden sich zwei Schrauben Diese können mit Hilfe eines...
- Page 35 , nicht umkippen kann. Schritt 6 Nimm den Standfuß für die beheizbare Bodenplatte und platziere ihn auf dem Unterbau. Fixiere den Standfuß mit den dazugehörigen Schrauben von unten. Die Presse muss dazu angehoben werden. Hol dir auch hier Hilfe. HappyFabric HappyFabric.de HappyFabric.de...
- Page 36 BEHEIZBARE BODENPLATTE Umbau der beheizbaren Bodenplatte im Format A4/A3 Schritt 7 Alle drei Schrauben Unterlegscheiben müssen angebracht werden. Schritt 8 Lege jetzt die Abdeckung wieder auf und schraube sie mit den kleinen Kreuzschrauben wieder fest. Schritt 9 Jetzt legst du die beheizbare Bodenplatte auf den Standfuß...
- Page 37 Schritt 11 Solltest du die obere Heizplatte vor dem Umbau abgenommen haben, kann sie jetzt wieder eingebaut und angeschlossen werden. (Siehe Seite Schritt 12 Sind alle Heizplatten fest und angeschlossen, kann die Presse wieder in Betrieb genommen werden. HappyFabric HappyFabric.de HappyFabric.de...
-
Page 38: Technische Daten & Abmessungen
TECHNISCHE DATEN & ABMESSUNGEN Das sind die technischen Angaben, die du benötigst, um die HappyPress 4 in Betrieb nehmen zu können. TECHNISCHE DATEN HAPPYPRESS 4 - A4* HAPPYPRESS 4 - A3* 220–240 Volt, 220–240 Volt, Energieleistung Single 800 Watt 1000 Watt 220–240 Volt,... -
Page 39: Ce-Zertifizierung
EG Niederspannungsrichtlinie 73/23 EWG, sowie der EG-EMV-Richtlinie 89/336. Wir als europäischer Importeur erklären, dass unser Produkt: Transferpresse zum Aufbügeln von Thermodrucken. Fabrikat: HappyPress in der gelieferten Ausführung folgenden einschlägigen Bestimmungen in jeweils letzter Fassung – entspricht. EMC Directive (2004/108/EC) & MDD Directive (93/42/EEC) Angewendete harmonisierte Normen:... - Page 40 GSE TexPrint Solutions GmbH Telefon: +49 30 897 47 348 Kablower Weg 89, Fax: +49 30897 47 348 12526 Berlin Web: www.happyfabric.de Germany E-Mail: kontakt@happyfabric.de Garantiebedingungen Für dieses Gerät leistet die Firma GSE TexPrint Solutions GmbH gegenüber dem Kunden zu den nachstehenden Bedingungen folgende Garantie: Garantiezeit Die Garantiezeit beträgt 2 Jahre und beginnt mit dem Zeitpunkt der...
-
Page 41: Garantiebedingungen
Sicherung der Presse. Du hast noch Fragen? Dann rufe uns einfach an unter 030 897 47 348 oder sende uns eine E-Mail an kontakt@happyfabric.de www.happyfabric.de | GSE TexPrint Solutions GmbH | Kablower Weg 89 | 12526 Berlin HappyFabric HappyFabric.de HappyFabric.de... - Page 42 Thanks a lot, that you have chosen a HappyPress. We hope you‘re happy with your new HappyPress even more fun with textile printing and the realisation of your designs. For questions about your HappyPress you can enter the serial number of your HappyPress here.
- Page 43 Table of contents Foreword Warnings Safety Regulations Instructions for standard functions Illustrations Control panel explanation 232 error message Commissioning Temperature & time setting Set contact pressure Print / press on Instructions optinal extensions Auto-open Function Heating plate A3 Bottom plate A3 Heated base plate Technical data &...
-
Page 44: Foreword
FOREWORD These operating instructions have been designed to be user-friendly. Read it carefully and follow the step-by-step instructions to get the best printing results. Please keep this manual in a safe place. WARNINGS • Check your press for transport damage immediately after unpacking. Leave the press to stand at room temperature for several hours before first use to allow the condensation water to evaporate and to prevent a possible short circuit. -
Page 45: Safety Regulations
If you have problems with your press, please contact us directly during normal business hours. Phone (+49) 030 / 89 747 348 E-Mail kontakt@happyfabric.de Opening the housing on your own will invalidate any warranty claim. Avoid locations where children or third persons have unattended access to your press. -
Page 46: Instructions For Standard Functions
INSTRUCTIONS FOR STANDARD FUNCTIONS All the following data and information apply generally to HappyPress 4. -
Page 47: Illustrations
ILLUSTRATIONS CONNECTIONS RUBBER FOOT BOTTOM PLATE LED DISPLAY SILENCER GRIP COVER HEATING PLATE CROSS STRUT LOW PRESSURE SOCKET SCREW RUBBER STOPPER PRESSURE ADJUSTMENT SCREW PRESSURE ARM STAR GRIP SCREW HappyFabric HappyFabric.de HappyFabric.de... - Page 48 Detailed illustration Back of the press ON/OFF SWITCH FUSE 4 A POWER CABLE CONNECTION Detailed illustration Heating plate connections CONNECTION FOR THE LOWER HEATING PLATE CONNECTION FOR THE UPPER HEATING PLATE Detailed illustration Connection for magnets CONNECTION FOR THE AUTO-OPEN MODUL...
-
Page 49: Control Panel Explanation
9. PLUS BUTTON This is used to increase the temperature and time. Attention: As long as one of the lights on the right side of the display is lit, you are in the press setting mode. The press does not heat up in this mode! HappyFabric HappyFabric.de HappyFabric.de... - Page 50 221 °C is the highest temperature you can set and which is shown in the display. When using the HappyPress with the lower heating plate the TEMP is 130°C and the upper heating plate is set to 120°C is set. With a pressure time of approx. 5 seconds.
-
Page 51: 232 Error Message
232 ERROR MESSAGE If the press shows error message 232 on the display, please check the connections of the heating plate(s). If everything is plugged in correctly, but the error message still appears, please contact customer service. www.happyfabric.com HappyFabric HappyFabric.de HappyFabric.de... -
Page 52: Commissioning
The ON/OFF switch is located on the back of your HappyPress 4. Set the switch to ON. Should your HappyPress 4 ever switch itself off, restart it by moving the switch first to the OFF position (O) and then back to ON position ( I ). -
Page 53: Temperature & Time Setting
Press the mode button a fourth time to leave the setting mode. All lights must be off, only then will the HappyPress 4 heat up. The current start temperature is shown in the display and the press heats up. -
Page 54: Set Contact Pressure 57 En
SET CONTACT PRESSURE Setting the pressure intensity SETTING SCREW TO ADJUST THE CONTACT PRESSURE In the middle of the heating plate there is an adjusting screw with which you can adjust the contact pressure. By turning the adjusting screw you move the upper heating plate up or down. -
Page 55: Print / Press On
Never close the press by force! • The timer automatically counts down the set time. When the time is up, a beep sounds. If you have already upgraded your HappyPress 4 with the magnetic switch, the press opens automatically after the time has expired. -
Page 56: Instructions Optinal Extensions
INSTRUCTIONS OPTINAL EXTENSIONS All subsequent extensions can be subsequently added to HappyPress 4. -
Page 57: Auto-Open Function
Accessories for installing the magnetic switch Wing screw Auto-open modul with rubber backup when base and screw not in use.. Screw Slot to fix for the the auto-open auto-open Modul. modul. Allen key required. HappyFabric HappyFabric.de HappyFabric.de... - Page 58 AUTO-OPEN FUNCTION Installation of the auto-open modul Quick guide Notice: If the contact pressure is set too low, the magnet will not engage. Optional For ease of conversion, the upper heating plate can be removed before replacement (see page 62).To prevent the magnet from lifting the plate, shock absorbers must be installed.
- Page 59 For an easier conversion, the upper heating plate can be removed before replacement. This works as follows: Step 1 After the HappyPress 4 has been disconnected from the power supply, close it completely. The next steps are thus easier to implement.
- Page 60 AUTO-OPEN FUNCTION Installation of the auto-open modul Step 4 Since the HappyPress 4 was completely closed, you can now open it carefully with the pressure lever. The upper heating plate should remain on the base plate. Put it aside for safety.
- Page 61 There are markings to help you plug it in. Then fix the plug with the threaded ring. Step 9 Now the HappyPress 4 can be closed again. The holder should rest smoothly on the upper heating plate.
- Page 62 Allen key so that the heating plate remains in position. Step 12 Now the HappyPress 4 can be reconnected to the power supply and put into operation. When the press is not being used or transported, fasten the wing screw so that the press does not spring open.
-
Page 63: Heating Plate A3
An Allen key for the threaded screw that holds the heating plate in position. star knob screws can be easily loosened by hand. Connection plug the upper heating plate. Optional accessories: Pneumatic spring for the heating plate in A3 HappyFabric HappyFabric.de HappyFabric.de... - Page 64 HEATING PLATE A3 Conversion of the heating plate in A3 Quick guide Notice: For the A3 heating plate the supplied pneumatic spring must also be installed. Step 1 Unplug the power cable. Step 2 Close the press to mount the upper heating plate. Loosen the star knob screws Step 3 Step 4...
- Page 65 Conversion of the heating plate in A3 Detailed guide Disconnect the press from the power supply before every conversion! Step 1 After the HappyPress 4 has been disconnected from the power supply, close completely. This makes the next steps easier to implement.
- Page 66 HEATING PLATE A3 Conversion of the heating plate in A3 Step 4 As the HappyPress 4 was completely closed, you can now open it carefully with the pressure lever. The heating plate should remain on the base plate. Step 5...
- Page 67 Pull the bottom plate out completely to make it easier to insert the connector plug. Insert the connection plug and fix it with the threaded ring. The press can be reconnected to the power supply and put into operation. HappyFabric HappyFabric.de HappyFabric.de...
-
Page 68: Bottom Plate A3
BOTTOM PLATE A3 Conversion of the base plate in A3 Format For the extension you need: An Allen key for the screws that fix the base plate. - Page 69 Step 5 Now place the base plate in A3 on the base of the press and screw it on from below using the appropriate screws Step 6 The press can be reconnected and can be put into operation. HappyFabric HappyFabric.de HappyFabric.de...
- Page 70 Conversion of the base plate in A3 Detailed guide Disconnect the press from the power supply before every conversion! Step 1 After the HappyPress 4 has been disconnected from the power supply, close completely. This makes the next steps easier to implement.
- Page 71 Now place the A3 base plate on the base of the press and fix it with the screws at the bottom. Step 6 Now the HappyPress 4 can be reconnected to the power supply and put into operation. HappyFabric HappyFabric.de...
-
Page 72: Heated Base Plate
HEATED BASE PLATE Conversion of the heatable base plate in A4/A3 format Format For the extension you need: An Allen key for the Screwdriver for screws the cross screws that fix the base plate. of the base cover and rails. Detailed view Stand Connections for the... - Page 73 Step 11 Now you can insert the connector plug into the left connector and fix it by turning the threaded ring. Step 12 The press can be reconnected and can be put into operation. HappyFabric HappyFabric.de HappyFabric.de...
- Page 74 Always disconnect the press from the power supply before any conversion! For an easier conversion, the upper heating plate can be removed before replacement. (See page Step 1 After the HappyPress 4 has been taken off the power, open the press completely. Step 2 There are two screws under the base plate.
- Page 75 Step 6 Take the stand for the heatable base plate and place it on the base. Fix the stand from below with the corresponding screws The press must be lifted for this purpose. Get help here too. HappyFabric HappyFabric.de HappyFabric.de...
- Page 76 HEATED BASE PLATE Conversion of the heatable base plate in A4/A3 format Step 7 All three screws with washers must be fitted. Step 8 Now put the cover back on and screw it back on with the small cross screws Step 9 Now place the heatable base plate on the stand and screw it down.
- Page 77 If you have removed the upper heating plate before the conversion, it can now be reinstalled and connected. (See page Step 12 Once all heating plates are fixed and connected, the press can be put back into operation. HappyFabric HappyFabric.de HappyFabric.de...
-
Page 78: Technical Data & Dimensions
Heating plate size 32,5 cm x 25 cm 40 cm x 30 cm Weight ca. 20 kg ca. 25 kg The HappyPress with a bottom and heating plate of A4 format The HappyPress with a bottom and heating plate of format A3... -
Page 79: Ce-Certification
We as European importer declare that our product: Transfer press for ironing on thermal prints. Product: HappyPress in the delivered version complies with the following relevant regulations in their latest version. EMC Directive (2004/108/EC) & MDD Directive (93/42/EEC) Harmonised standards applied:... - Page 80 GSE TexPrint Solutions GmbH Phone: +49 30 897 47 348 Kablower Weg 89, Fax: +49 30897 47 348 12526 Berlin Web: www.happyfabric.de Germany E-Mail: kontakt@happyfabric.de Guarantee conditions For this device GSE TexPrint Solutions GmbH provides the following warranty to the...
-
Page 81: Guarantee Conditions
If a auto-open modul is installed, use the wing screw provided to secure the press. For further questions call +49 ( 0 ) 30 897 47 348 or send us an e-mail to kontakt@happyfabric.de www.happyfabric.de | GSE TexPrint Solutions GmbH | Kablower Weg 89 | 12526 Berlin HappyFabric HappyFabric.uk HappyFabric.uk... - Page 82 HappyPress et que vous vous amusez beaucoup à décorer des textiles et réaliser vos motifs. Pour toute demande concernant votre HappyPress, vous pouvez entrer le numéro de série de votre HappyPress ici. Enregistrez votre HappyPress le : Extension de la garantie jusqu‘au : www.die-happy-press.de...
- Page 83 Table des matières Avant Propos Avertissement Consignes de sécurité Instructions pour les fonctions standard Images Panneau de contrôle 232 Message d‘erreur Mise en service Réglage de la température et de la minuterie Réglage de la pression La pose/le transfert Instructions extensions facultatives Fonction d‘auto-ouverture Plaque chauffante A3 Plaque inférieure A3...
-
Page 84: Avant Propos
AVANT PROPOS Ce mode d‘emploi a été conçu pour être convivial. Lisez-le attentivement et suivez les instructions étape par étape pour obtenir des résultats optimum. Veuillez conserver ce mode d‘emploi. AVERTISSEMENT • Vérifiez immédiatement après le déballage si votre presse n‘a pas été endommagée pendant le transport. -
Page 85: Consignes De Sécurité
à l‘adresse habituelle aux heures d‘ouverture. Téléphone +33 (0)2 52 46 06 07 ou courriel à contact@happyfabric.fr N‘ouvrez jamais le boîtier technique vous-même,cela invaliderait toute demande de garantie. Évitez les endroits où des enfants ou des tiers peuvent accéder à l‘unité... -
Page 86: Instructions Pour Les Fonctions Standard
INSTRUCTIONS POUR LES FONCTIONS STANDARD Toutes les données et informations suivantes s‘appliquent à la HappyPress 4. -
Page 87: Images
IMAGES CABLE PIEDS EN CAOUTCHOUC PLATEAU AFFICHAGE À LED AMORTISSEUR POIGNEE BRAS DE PRESSION SOCLE PLAQUE CHAUFFANTE BOUCHON EN CAOUTCHOUC VIS DE RÉGLAGE DE LA PRESSION BRAS DE PRESSION VIS DE LA POIGNÉE HappyFabric HappyFabric.de HappyFabric.de... - Page 88 Image détaillée Dos de la presse INTERRUPTEUR MARCHE/ARRÊT FUSIBLE 4 A CONNEXION PAR CÂBLE D‘ALIMENTATION Image détaillée Connexions des plaques chauffantes RACCORDEMENT DE LA PLAQUE CHAUFFANTE INFÉRIEURE RACCORDEMENT DE LA PLAQUE CHAUFFANTE SUPÉRIEURE Image détaillée Connexion pour les aimants IMAGE DÉTAILLÉE CONNEXION POUR LES AIMANTS...
-
Page 89: Panneau De Contrôle
PLUS Il sert à augmenter la température OU le temps. Attention: Tant qu‘une des lumières sur le côté droit de l‘écran est allumée, vous êtes en mode réglage. La presse ne chauffe pas dans ce mode ! HappyFabric HappyFabric.de HappyFabric.de... - Page 90 221 °C est la température la plus élevée que vous pouvez régler et qui s‘affiche sur l‘écran. Lorsque vous utilisez la HappyPress avec la plaque chauffante inférieure, la TEMP est de 130°C et la plaque chauffante supérieure est réglée sur 120°C. Avec un temps de pression d‘environ 5 secondes.
-
Page 91: 232 Message D'erreur
Si un jour apparaît le Message d‘erreur 232 sur l‘écran d‘affichage, veuillez vérifier les branchements de la/des plaque(s) chauffante(s). Si tout est correctement branché,et que le message d‘erreur reste , veuillez vous adresser au Service client. www.happyfabric.com HappyFabric HappyFabric.de HappyFabric.de... -
Page 92: Mise En Service
à la tension de fonctionnement de 220 ≈ 240 Volt. La prise doit avoir un fusible d‘au moins10 ampères. Allumer Ouvrez la presse. L‘interrupteur ON/OFF se trouve au dos de votre HappyPress 4. Mettez l‘interrupteur sur I. Mettez l‘interrupteur sur I. Si votre HappyPress 4 s‘éteind, redémarrez-la. Appuyez sur l‘interrupteur (O) et ensuite sur ( I ). -
Page 93: Réglage De La Température Et De La Minuterie
Appuyez une quatrième fois sur MODE pour quitter le menu. Quand tous les voyants de réglages sont éteints, la HappyPress 4 chauffera. La température de départ est affichée à l‘écran et la presse chauffe. -
Page 94: Réglage De La Pression
RÉGLAGE DE LA PRESSION Réglage de la pression VIS DE RÉGLAGE DE LA PRESSION Au milieu de la plaque chauffante se trouve une vis de réglage avec laquelle vous pouvez régler la pression. En tournant la vis , vous réglez la hauteur de la plaque chauffante supérieure. -
Page 95: La Pose/Le Transfert
Ne forcez jamais la fermeture de la presse ! • La minuterie décompte automatiquement le temps réglé. Lorsque le temps a expiré, un signal sonore retentit. Si vous avez la HappyPress 4 standard, la minuterie décompte automatiquement le temps préalablement réglé. -
Page 96: Instructions Extensions Facultatives
INSTRUCTIONS EXTENSIONS FACULTATIVES Toutes les extensions peuvent être ajoutées ultérieurement à la HappyPress 4. -
Page 97: Fonction D'auto-Ouverture
Accessoires pour l‘installation de l‘interrupteur magnétique Ecrou de sécurité Interrupteur magnétique Pour sécuriser la avec rondelle en presse lorsqu‘elle caoutchouc n‘est pas utilisée et vis Le compartiment Fixation des aimants avec une pour la connexion Clé Allen. magnétique. HappyFabric HappyFabric.de HappyFabric.de... - Page 98 FONCTION D‘AUTO-OUVERTURE Installation de l‘interrupteur magnétique Guide rapide Remarque: Si la pression est trop faible, l‘aimant ne s‘enclenche pas. Facultatif Pour faciliter la conversion, la plaque chauffante supérieure peut être enlevée (Voir page 114) Si l‘aimant ne soulève pas la plaque, vous pouvez installer un amortisseur fourni.
- Page 99 Eteignez et débranchez toujours la presse avant toute modification ! Pour faciliter la conversion, la plaque chauffante supérieure peut être retirée de la presse. Comme ceci : Étape 1 Débranchez puis fermez votre HappyPress 4. Étape 2 Desserrer à l‘aide d‘une clé Allen, la vis filetée derrière la vis de réglage de la pression.
- Page 100 FONCTION D‘AUTO-OUVERTURE Installation de l‘interrupteur magnétique Étape 4 La plaque chauffante supérieure est maintenant démontée. Ouvrez délicatement le levier de pression. La plaque chauffante supérieure doit être mise de côté. Laissez la plaque inférieure en place. Étape 5 Vous pouvez maintenant enlever le tampon en caoutchouc Étape 6 Placez maintenant l‘interrupteur...
- Page 101 Le câble pour l‘aimant passe par le compartiment (P 105). Ensuite, fixez la prise avec la bague filetée. Étape 9 Maintenant, la HappyPress 4 peut être refermée. Le support doit être lisse sur la partie supérieure de la plaque chauffante. HappyFabric HappyFabric.de...
- Page 102 également être serrée avec la clé Allen pour maintenir la plaque chauffante en position. Étape 12 Maintenant, la HappyPress 4 peut être branchée à l‘électricité et allumée. Pour la sécuriser, lorsqu‘elle n‘est pas utilisée ou en mode transport, serrez...
-
Page 103: Plaque Chauffante A3
, qui maintient la plaque chauffante. La vis en étoile² peut simplement être desserrée à la main. Fiche de connexion de la plaque chauffante supérieure. Accessoires en option Amortisseur pour la plaque chauffante format A3. HappyFabric HappyFabric.de HappyFabric.de... - Page 104 PLAQUE CHAUFFANTE A3 Conversion de la plaque chauffante au format A3 Guide rapide Note: Pour la plaque chauffa,t A3,il faut également installer les amortisseurs fournis. Étape 1 Coupez l‘alimentation électrique. Étape 2 Fermez la presse pour installer la plaque chauffante supérieure. Desserrer les vis du bouton étoile Étape 3 Étape 4...
- Page 105 Installation de la plaque chauffante au format A3 Explication détaillée Débranchez la presse avant chaque modification ! Étape 1 Une fois que l‘HappyPress 4 a été déconnectée de l‘alimentation électrique, fermez-la complètement. Les prochaines étapes sont ainsi plus faciles à mettre en œuvre.
- Page 106 A4 et la mettre de côté. Attention: Avant de tirer, la bague filetée doit être dévissée. Étape 6 Maintenant, la HappyPress 4 peut être fermée. Le support doit être lisse sur la plaque chauffante supérieure.
- Page 107 Étape 9 Le fil de la plaque chauffante supérieure se branche dans la prise de raccordement de droite. Branchez la fiche de connexion connectez avec la bague filetée. La presse peut être rebranchée et remise en chauffe. HappyFabric HappyFabric.de HappyFabric.de...
-
Page 108: Plaque Inférieure A3
PLAQUE INFÉRIEURE A3 Installation de la plaque inférieure au format A3 Pour l‘installation, vous aurez besoin de : Une clé Allen pour les vis , pour installer la plaque inférieure. - Page 109 Étape 5 Placez maintenant la plaque inférieure format A3 sur le socle de la presse et le visser par le bas avec les vis appropriées Étape 6 La presse peut être rebranchée et mise en chauffe. HappyFabric HappyFabric.de HappyFabric.de...
- Page 110 Installation de la plaque inférieure au format A3 Guide détaillé Débranchez toujours la presse de l‘alimentation électrique avant toute modification ! Étape 1 Débranchez la HappyPress 4 ! Étape 2 Sous la plaque de base, se trouvent deux vis . Celles-ci peuvent être desserrées à...
- Page 111 A4 et la mettre de côté. Étape 5 Placez maintenant la plaque inférieure A3 sur la base de la presse et la fixer avec les vis du bas. Étape 6 Maintenant, la HappyPress 4 peut être rebranchée et mise en chauffe. HappyFabric HappyFabric.de HappyFabric.de...
-
Page 112: Plaque De Sol Chauffante
PLAQUE DE SOL CHAUFFANTE Installation de la inférieure chauffante en format A4/A3 Pour l‘installation, vous aurez besoin de : Une clé Allen pour Un tournevis pour la les vis vis Phillips pour la pour installer la plaque inférieure et plaque inférieure. les rails. - Page 113 Étape 11 Vous pouvez maintenant insérer la fiche du connecteur dans le connecteur de gauche et le fixer en tournant la bague filetée. Étape 12 La presse peut être rebranchée et mise en chauffe. HappyFabric HappyFabric.de HappyFabric.de...
- Page 114 ! Pour faciliter la conversion, la plaque chauffante supérieure peut être retirée de la presse. (Voir page 114) Étape 1 Après avoir débranché votre HappyPress 4,vous pouvez la fermer. Étape 2 Sous la plaque inférieure, se trouvent deux vis Celles-ci peuvent desserrées à l‘aide d‘une clé Allen.
- Page 115 Il vaut mieux être deux pour cette étape. Étape 6 Placez en position la structure de base de la plaque chauffante. Fixer le support avec les vis correspondantes par le bas. La presse devra être soulevée. Ce sera plus facile à deux. HappyFabric HappyFabric.de HappyFabric.de...
- Page 116 PLAQUE DE SOL CHAUFFANTE Installation de la inférieure chauffante en format A4/A3 Étape 7 Les trois vis doivent être vissées avec leurs rondelles. Étape 8 Maintenant, reposez la couverture et resserrez les petites vis cruciformes Étape 9 Puis, installez la plaque chauffante inférieure, mais c‘est lourd il vaut mieux être deux pour ne pas échapper la plaque.
- Page 117 Si vous avez enlevé la plaque chauffante supérieure, elle peut maintenant être réinstallée et reconnectée. (Voir page 114) Étape 12 Les deux plaques chauffantes sont fixées et connectées ? La presse peut fonctionner : branchez-la et mettez-la en chauffe. HappyFabric HappyFabric.de HappyFabric.de...
-
Page 118: Données Techniques Et Dimensions
33 cm Taille de la plaque 32,5 cm x 25 cm 40 cm x 30 cm chauffante Poids environ 20 kg environ 25 kg HappyPress avec la plaque chauffante de format A4. HappyPress avec la plaque chauffante de format A3. -
Page 119: Ce-Certification
89/336. En tant qu‘importateur européen, nous déclarons que notre produit : Presse de transfert à chaud pour textiles.: HappyPress dans la version livrée les règlements pertinents suivants dans sa dernière version. Directive CEM (2004/108/CE) et directive sur les chiens détecteurs de mines (93/42/CEE) Application de normes harmonisées :... -
Page 120: Conditions De Garantie
GSE TexPrint Solutions GmbH Téléphone: +49 30 897 47 348 Kablower Weg 89, Fax: +49 30897 47 348 12526 Berlin Web: www.happyfabric.fr Germany E-Mail: contact@happyfabric.fr Conditions de garantie Pour ce dispositif, la société GSE TexPrint Solutions GmbH garantira les clients dans les conditions suivantes : Période de garantie... - Page 121 Si l‘aimant est installé, utilisez la vis papillon fournie. Vous avez d‘autres questions ? Appelez-nous au +33 (0)2 52 46 06 07 ou envoyez-nous un e-mail à contact@happyfabric.fr www.happyfabric.fr | GSE TexPrint Solutions GmbH | Kablower Weg 89 | 12526 Berlin HappyFabric HappyFabric.fr...
Need help?
Do you have a question about the HappyPress and is the answer not in the manual?
Questions and answers