
Subscribe to Our Youtube Channel
Related Manuals for SEH RMK1

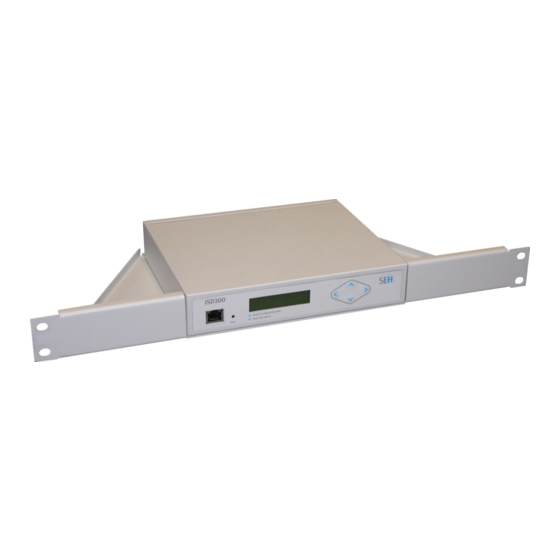
Summary of Contents for SEH RMK1
- Page 1 Rack Mount Kit Type 1 for ISD300 / myUTN-80 Typ 1 für ISD300 / myUTN-80 Installation Guide Einbauanleitung...
-
Page 3: General Information
General Information Allgemeine Information Intended purpose: The Rack Mount Kit Type 1 (RMK1) Verwendungszweck: contains a mounting frame. Das Rack Mount Kit Type 1 (RMK1) The mounting frame is used for beinhaltet einen Einbaurahmen. mounting an ISD300 or myUTN-80 in Der Einbaurahmen wird für die... -
Page 4: Package Contents
Package Contents Lieferumfang Please check the package content Bitte überprüfen Sie den Packungs- before getting started: inhalt, bevor Sie mit dem Einbau beginnen: • 19" mounting frame • 19-Zoll-Einbaurahmen • 3 screws (M3 × 5mm) • 3 Schrauben (M3 × 5mm) •... -
Page 5: Safety Regulations
Note the following safety regulations. Beachten Sie folgende Sicherheits- vorschriften. • The RMK1 may be used for • Das RMK1 darf nur für das ISD300 ISD300 or myUTN-80 only. oder den myUTN-80 verwendet • The RMK1 must not be used for werden. -
Page 6: Installation
Preparation Vorbereitung If you want to install your ISD300 or Falls Sie Ihr ISD300 oder Ihren myUTN-80 into a rack at a later point myUTN-80 nachträglich in einen in time, you have to prepare your Serverschrank einbauen möchten, device. müssen Sie das Gerät vorbereiten. Proceed as follows: Gehen Sie wie folgt vor: 1. - Page 7 ISD300 – Step 1 ISD300 – Schritt 1 Remove all the rubber feet (P1) from Entfernen Sie alle Füße (P1) des the ISD300. ISD300s. Proceed as follows: Gehen Sie wie folgt vor: 1. Place the ISD300 carefully upside 1. Plazieren Sie das ISD300 kopfüber down on a solid surface.
- Page 8 ISD300-Typenschild (P2) durch den frame. Einbaurahmen verdeckt. Transfer all relevant ISD300 data to Übertragen alle relevanten the RMK1 type plate (P3), so that this ISD300-Daten RMK1- information will be visible after Typenschild (P3), um die Daten assembly. jederzeit einsehen zu können.
- Page 9 ISD300 – Step 4 ISD300 – Schritt 4 Position the frame (P5) on the ISD300. Legen Sie den Einbaurahmen (P5) auf das ISD300. The two screw heads remaining in the ISD300 serve as guidance when Die zwei in dem ISD300 verbliebenen aligning the frame to the ISD300.
- Page 10 ISD300– Step 5 ISD300 – Schritt 5 Insert and tighten 2 of the provided Befestigen Sie 2 der mitgelieferten screws (M3 × 5mm) in position (P7). Schrauben (M3 × 5 mm) an Position (P7). Do not use the screws removed in Nutzen Sie nicht die in Schritt 2 step 2! entfernten Schrauben!
- Page 11 ISD300 – Step 6 ISD300 – Schritt 6 Install the ISD300 into the rack. Bauen Sie das ISD300 in den Server- schrank ein. Proceed as follows: Gehen Sie wie folgt vor: 1. Connect the power cord to the 1. Verbinden Sie das ISD300.
- Page 12 myUTN-80 – Step 1 myUTN-80 – Schritt 1 Remove the rubber feet (P1) from the Entfernen Sie alle Füße (P1) des myUTN-80. myUTN-80. Proceed as follows: Gehen Sie wie folgt vor: 1. Place the myUTN-80 carefully 1. Plazieren Sie das myUTN-80 upside down on a solid surface.
- Page 13 Einbaurahmen verdeckt. Transfer all relevant myUTN-80 data Übertragen alle relevanten to the RMK1 type plate (P4), so that myUTN-80 Daten auf das RMK1 this information will be visible after Typenschild (P4), um die Daten assembly. jederzeit einsehen zu können.
- Page 14 myUTN-80 – Step 4 myUTN-80 – Schritt 4 Insert and tighten the 3 screws Befestigen Sie die 3 Schrauben (M3 x 5 mm) in position (P6). (M3 x 5 mm) an Position (P6). myUTN-80 – Step 5 myUTN-80 – Schritt 5 Provide a strain relief for the power Stellen Sie eine Zugentlastung für das cord.
- Page 15 myUTN-80 – Step 6 myUTN-80 – Schritt 6 Install the myUTN-80 into the rack. Bauen Sie den myUTN-80 in den Serverschrank ein. Proceed as follows: Gehen Sie wie folgt vor: 1. Insert the myUTN-80 at the 1. Führen Sie den myUTN-80 an der desired mounting position gewünschten Einbauposition horizontally into the rack.
- Page 16 Information: Sales Contacts and Information: http://www.seh-technology.com/sales © 2015 SEH Computertechnik GmbH All trademarks, registered trademarks, logos and product names are property of their respective owners. The product documentation gives you valuable information about your product. Keep the documentation for further reference during the life cycle of the product.
Need help?
Do you have a question about the RMK1 and is the answer not in the manual?
Questions and answers