Advertisement
Available languages
Available languages
Quick Links
Quickstart – Weather Station WS10
WS10 Quickstart: Connection & First configuration via WiFi
Thank you for choosing our product. With this quickstart sheet, we would like to assist you with
connection, installation and first check of the Weather Station WS10.
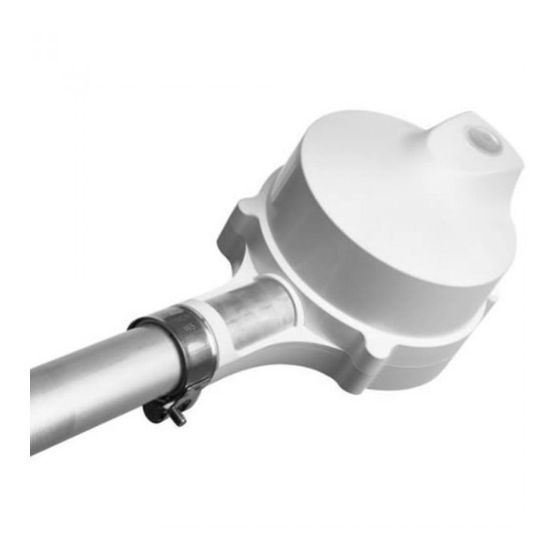
Mounting WS10:
Connection WS10:
Pin assignment
For WiFi connection only Pin 1 and 2 need to be connected
Note: The operation of precipitation radar outside the approved countries is not permitted by law. The
operator acts at his own risk and is responsible for a possible criminal liability itself. Lufft rejects any
liability for the operation of precipitation radar outside the countries approved by Lufft.
G. Lufft Mess- und Regeltechnik GmbH, Fellbach, Germany
1
Tube (Ø 35 mm)
a
Min. Height 2000 mm
WS10
b
Min. Distance 500 mm
2
c
Free space 1000mm
3
PIN
Description
1
+V
in
2
GND
3
RS 485 A (+)
4
RS 485 B (-)
5
Config pin (active high)
Status 03/2018
Configuration via WiFi:
1. WS10 starts in configuration mode
- „AP-mode" WiFi active
2. PC connects with the Access Point of the WS10
- e.g. WS10_UMB_Wifi-013 – Password: <serial number>
3. WS10 sends Broadcast into Network („Here I am")
- contains all Information for Communication
4. WS10 will be recognized automatically from ConfigTool.NET
5. Device configuration can now be started via Config-Tool.NET
Requirements:
-ConfigTool.NET (PC, Android) available via Lufft website or PlayStore
- Cable (not included in delivery)
- Power supply 9-36V (>35W)
For more information please read the official WS10 manual
1
Advertisement

Subscribe to Our Youtube Channel
Related Manuals for Lufft WS10


Summary of Contents for Lufft WS10
- Page 1 Note: The operation of precipitation radar outside the approved countries is not permitted by law. The operator acts at his own risk and is responsible for a possible criminal liability itself. Lufft rejects any For more information please read the official WS10 manual liability for the operation of precipitation radar outside the countries approved by Lufft.
- Page 2 Anmerkung: Der Betrieb des Niederschlagsradar außerhalb der zugelassenen Länder ist rechtlich nicht erlaubt. Der Betreiber handelt auf eigene Gefahr und ist für eine eventuelle Strafbarkeit selbst verantwortlich. Die Firma Lufft lehnt jede Haftung für den Betrieb des Niederschlagsradar außerhalb der Zusätzliche Informationen finden sie im Handbuch von Lufft freigegebenen Ländern ab.
Need help?
Do you have a question about the WS10 and is the answer not in the manual?
Questions and answers