Advertisement
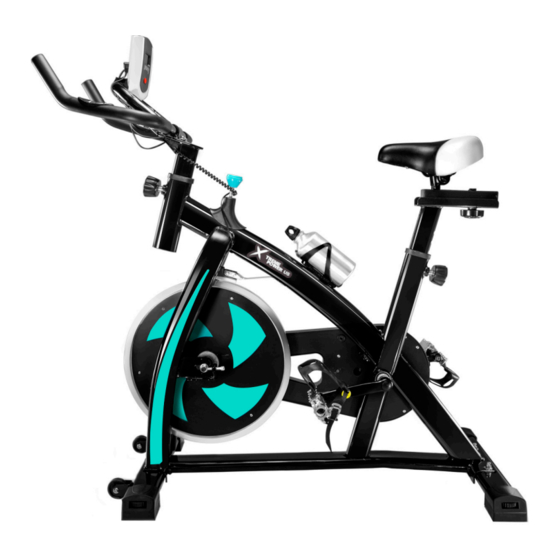
STATIONARY INDOOR CYCLING EXERCISE BIKE
ITEM #96115
OWNER'S MANUAL AND SAFETY INSTRUCTIONS
SAVE THIS MANUAL: KEEP THIS MANUAL FOR SAFETY WARNINGS, PRECAUTIONS, ASSEMBLY,
OPERATING, INSPECTION, MAINTENANCE AND CLEANING PROCEDURES. WRITE THE PRODUCT'S
SERIAL NUMBER ON THE BACK OF THE MANUAL NEAR THE ASSEMBLY DIAGRAM (OR MONTH
AND YEAR OF PURCHASE IF PRODUCT HAS NO NUMBER).
FOR QUESTIONS PLEASE CALL OUR CUSTOMER SUPPORT: (909) 628 0880 MON-FRI 9AM TO 3PM PST
Advertisement
Table of Contents

Summary of Contents for Xtreme Power 96115
- Page 1 STATIONARY INDOOR CYCLING EXERCISE BIKE ITEM #96115 OWNER’S MANUAL AND SAFETY INSTRUCTIONS SAVE THIS MANUAL: KEEP THIS MANUAL FOR SAFETY WARNINGS, PRECAUTIONS, ASSEMBLY, OPERATING, INSPECTION, MAINTENANCE AND CLEANING PROCEDURES. WRITE THE PRODUCT’S SERIAL NUMBER ON THE BACK OF THE MANUAL NEAR THE ASSEMBLY DIAGRAM (OR MONTH AND YEAR OF PURCHASE IF PRODUCT HAS NO NUMBER).
- Page 2 IMPORTANT SAFETY INFORMATION GENERAL SAFETY WARNINGS Before using this exercise bicycle, it is essential that you read the entire user manual, including all warnings and safety instructions. You should also convey all such warnings and instructions to any other person using this exercise bicycle. Retain this user manual for future reference.
- Page 3 IMPORTANT SAFETY INFORMATION WARNINGS AND DISCLAIMERS XtremePowerUS claims no liability for any damage or injury that result from the use of the bicycle by persons who have not read and understood the cautions contained in this manual, or through any misuse of the unit. You are responsible for your safety while operating this bicycle. To receive maximum performance and satisfaction from the bicycle, it is important that you read and understand the safety precautions before using the bicycle.
- Page 4 ASSEMBLY 1. FOOT MOUNTING: Affix the rear wheel base with the provided fixing screws, tighten. FIXING SCREWS FIXING SCREWS 2. CUSHION INSTALLATION STEP 1: Seat adjustment ADJUSTMENT ADJUSTMENT knob mounted on the top and bottom screw holes. Screw TUBE TUBE in 3-5 turns, then lift the seat tube, pull out the knob to adjust the hole, then tighten.
- Page 5 ASSEMBLY 5. HANDRAIL INSTALLATION: Install the handrails onto DIGITAL DIGITAL the adjustment knob. Mount on and line up with three SCREEN SCREEN screw-holes. Screw 3-5 turns, then lift the armrest tube, pull out the knob to adjust the hole, then tighten. HANDLEBAR HANDLEBAR CENTRAL...
- Page 6 OPERATION SCAN: Automatically shows the motion parameters TIME: Timer shows how long rider has exercised SPD: (SPEED) Shows the rider their current speed DIST: (DISTANCE) Shows the rider current mileage distance CAL: (CALORIES) Shows the rider their current calorie consumption ODO: (ODOMETER) Shows total distance travelled by the rider PUL: (PULSE) Displays the riders current heart rate FEATURES...
- Page 7 OPERATION Adjust the seat. When the pedal is at the lowest position, your leg should be almost, but not quite, straight. You shouldn’t have to strain or rock your hips to pedal. Your knees shouldn’t feel crunched when they’re at the top of the pedal stroke. With a recumbent bike, you adjust the seat forward and back, rather than up and down, but the principles are the same.
- Page 8 OPERATION PLEASE READ THE FOLLOWING CAREFULLY THE MANUFACTURER AND/OR DISTRIBUTOR HAS PROVIDED THE PARTS LIST AND ASSEMBLY DIAGRAM IN THIS MANUAL AS A REFERENCE TOOL ONLY. NEITHER THE MANUFACTURER OR DISTRIBUTOR MAKES ANY REPRESENTATION OR WARRANTY OF ANY KIND TO THE BUYER THAT HE OR SHE IS QUALIFIED TO MAKE ANY REPAIRS TO THE PRODUCT, OR THAT HE OR SHE IS QUALIFIED TO REPLACE ANY PARTS OF THE PRODUCT.
Need help?
Do you have a question about the 96115 and is the answer not in the manual?
Questions and answers