Table of Contents
Advertisement
Quick Links
OWNER'S MANUAL "PANTHER"
Radiant Heater: wall or ceiling mounting
model:
2000W
2600W
3200W
AC 220-240V, 2000, 2600, 3200 watts
Read and understand this entire owner's manual, including all safety
information, before plugging in or using this product. Failure to do so could
WARNING
result in fire, electrical shock, or serious personal injury.
Keep this owner's manual for future reference. If you sell or give this product
away, make sure this manual accompanies this product.
Please keep the complete model number (located on the product card) and
CAUTION
the date you have received the product for your records, as well as your
purchase receipt, warranty and service information. Keep these documents in
case of a warranty claim.
Advertisement
Table of Contents

Related Manuals for Noble Heat Panther 2000

Summary of Contents for Noble Heat Panther 2000
- Page 1 OWNER’S MANUAL “PANTHER” Radiant Heater: wall or ceiling mounting model: 2000W 2600W 3200W AC 220-240V, 2000, 2600, 3200 watts Read and understand this entire owner’s manual, including all safety information, before plugging in or using this product. Failure to do so could WARNING result in fire, electrical shock, or serious personal injury.
-
Page 2: Important Safety Information
IMPORTANT SAFETY INFORMATION! WARNING ⚫ Read all instructions before using this radiant heater! ⚫ Use only the voltage specified on the rating plate of the heater. ⚫ DO NOT cover the grilles, block entry or outlet of the airflow by placing the appliance against any surface. - Page 3 ⚫ DO NOT store the heater while it is still hot. ⚫ This appliance should NOT be used by young children or infirm persons without supervision. ⚫ DO NOT install this unit directly under a wall outlet. ⚫ DO NOT use this device with any other programmer, timer, or other device that automatically turns the heater on, as there is a fire hazard if the heater is covered or misplaced.
-
Page 4: Product Instruction
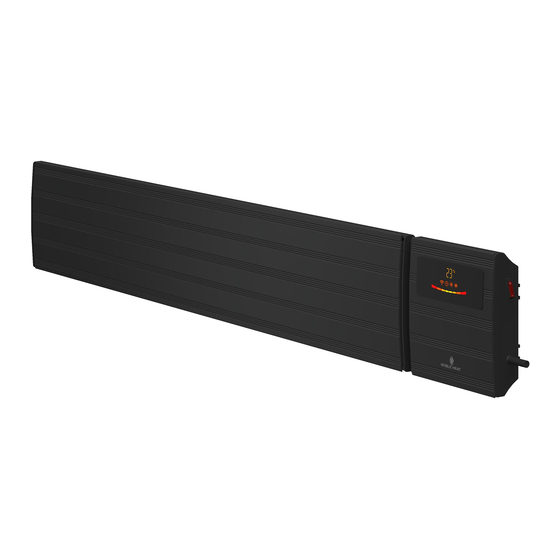
PRODUCT INSTRUCTION Control Box Heating Plate Covering Power Switch Sensor PRODUCT INS PRODUCT SIZE Model Power Length (mm) Width (mm) Height (mm) PANTHER 2000 2000 W 1240 PANTHER 2600 2600 W 1540 PANTHER 3200 3200 W 1840 CIRCUIT DIAGRAM... - Page 5 PRODUCT CONTROL PANEL & OPERATION GUIDE • Before the first use, please read this manual. • Remove the heater from the carton carefully. Please keep the carton for off-season storage. • Install the heater firmly in accordance with the installation instructions. •...
- Page 6 Display screen ON/OFF function The function to switch on the screen: Press “DISPLAY” (number 6), the screen will power off, but indication light will be lighting. Press “DISPLAY” (number 6) again, the screen turns on again. Open window detection In case the temperature reduces 3°C or more within 2 minutes the heater stops working. The LED lights flash and there is a click sound.
- Page 7 INSTALLATION GUIDE L (mm) L1 (mm) Model PANTHER 2000 1240 1007 PANTHER 2600 1540 1307 PANTHER 3200 1840 1607 Step one: Take the 2 threaded mounting brackets and insert them into the rail provided on the unit and secure the mounting brackets with 2 wing screws each. (Figure A)
-
Page 8: Option 1: Ceiling Installation
Option 1: CEILING INSTALLATION Please keep a minimum distance of 20 cm to each side. Option 2: WALL MOUNTED INSTALLATION The ceiling height must be at least 210 cm. The minimum distance to the ceiling must be at least 20 cm and the distance to the ground must be at least 180 cm. -
Page 9: Option 3: Extended Installation
Option 3: EXTENDED INSTALLATION Use suitable mounting material for ceiling suspension. (A1) Insert holder into the rail on the device and secure with 2 wing screws each. (B1) Mount the radial heater only on even ceiling. - Page 10 APP Download 1. Apple and android system users can use the mobile phone by scanning the icon below to download the APP. 2. Download the APP by using the following link: https//smartapp.tuya.com/smartlife APP Operation • Open the Smart Life APP. •...
- Page 11 WARNING 1. Securely fix the heater to the wall or place the heater in the correct position. 2. The heater must be installed so that the controls cannot be touched by persons currently taking a bath or shower. 3. The heater is to be installed so that it is not directly located under a socket-outlet. 4.