Table of Contents
Advertisement
Available languages
Available languages
Quick Links
1. Touchscreen
Beschrijving
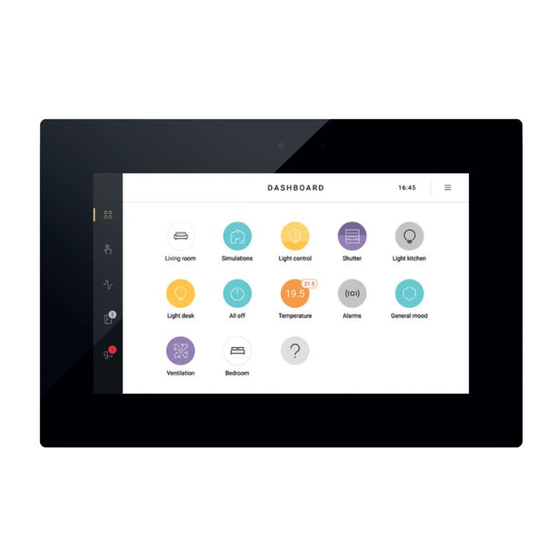
Met dit touchscreen bedien je op een overzichtelijke manier de volledige Niko Home Control installatie vanop één centraal punt: verlichting
schakelen en dimmen, temperatuur regelen, rolluiken en zonwering in de gewenste stand brengen, energieverbruik en toestand van de
installatie monitoren ... Dankzij een ingebouwde lichtsensor past de schermhelderheid zich aan het omgevingslicht aan.
Ook toegangscontrole is mogelijk dankzij de koppeling met de Niko Home Control videobuitenpost (zie
103). Zo kun je binnenkomende oproepen al dan niet beantwoorden en gemiste oproepen bekijken. Een feedbackled toont of je
een oproep hebt gemist, ook wanneer het toestel in slaapstand staat.
Dit nieuwe touchscreen (550-20102) vervangt het touchscreen 2 (550-20101) volledig. In een bestaande Niko Home Control
installatie kan het dit touchscreen zowel vervangen als aanvullen. Zijn bekabelde verbinding met het thuisnetwerk zorgt bovendien voor
een permanente connectie. Let op: we raden aan om, naast smartphones en/of tablets, minstens één touchscreen te voorzien in elke
installatie omdat een bekabeld toestel nu eenmaal betrouwbaarder is dan een mobiel toestel.
Opmerking: de software van het touchscreen kan zowel geupgraded als gedwowngraded worden. Hierdoor kan het touchscreen
probleemloos ingezet worden in zowel Niko Home Control I- als een Niko Home Control II-installaties.
Overzicht
A
F
550-20102
A. Touchscreen
B. Feedbackled
C. Netwerkconnector
D. Voedingsconnector
E. Bevestigingsschroef
F. Resetknop
G. USB-poort
.
B
G
Aanraakscherm
Licht op als je een gemiste oproep hebt
Hier sluit je de twisted-pairkabel aan
Hier sluit je, indien nodig, de 24V-voedingskabel aan (niet nodig bij PoE)
Hier schroef je het touchscreen vast op de montagebeugel met de bijgeleverde inbussleutel.
Met deze knop herstart je het touchscreen.
Hier sluit je een USB-stick aan voor een software-update
Videobuitenpost op pagina
E
Touchscreen
D
C
1
Advertisement
Table of Contents

Related Manuals for Niko 550-20102


Summary of Contents for Niko 550-20102
- Page 1 1. Touchscreen Beschrijving Met dit touchscreen bedien je op een overzichtelijke manier de volledige Niko Home Control installatie vanop één centraal punt: verlichting schakelen en dimmen, temperatuur regelen, rolluiken en zonwering in de gewenste stand brengen, energieverbruik en toestand van de installatie monitoren …...
- Page 2 Hij maakt hiervoor touchscreenprofielen aan in het dashboard van de programmeersoftware (raadpleeg de Niko Home Control software guide op onze website voor meer informatie). Via de menustructuur aan de linkerzijde kan genavigeerd worden tussen: •...
- Page 3 550-20102 D A S H B O A R D 24V DC CONNECTED CONTROLLER Met 24V-voeding * twisted pair-kabel (UTP, FTP of STP) Afmetingen Houd rekening met de afmetingen van de montagebeugel en het touchscreen in volgende afbeeldingen om te bepalen waar op de muur het touchscreen moet komen.
- Page 4 Voor de pluggen boor je 40 mm diep met een boor (met een diameter van 6 mm). In hout heb je de pluggen niet nodig en is het boorgat maar 20 mm diep met een diameter van 3 mm. Om het touchscreen te installeren: 1 Schroef de montageplaat tegen de muur.
- Page 5 3 Bevestig een RJ45-connector op de twisted pair-kabel (UTP, STP of FTP) volgens T568B. 4 Plaats de RJ45-connector en, indien aanwezig, de 24V-voedingskabel in het touchscreen. 5 Hang het touchscreen aan de montageplaat en duw het in één vloeiende beweging tot tegen de muur. Bevestig het touchscreen met bijgeleverde inbussleutel Touchscreen...
- Page 6 Alle aangemaakte acties worden automatisch aan het touchscreen gekoppeld. • Geef in het touchsreenprofiel aan welke ruimtes en acties je vanop dit touchscreen wilt bedienen. Raadpleeg de Niko Home Control software guide op onze website voor meer informatie over het aanmaken van touchscreenprofielen.
-
Page 7: Problemen Oplossen
Het touchscreen onderhouden Gebruik een zachte droge of licht vochtige doek om het touchscreen te reinigen. Gebruik geen detergenten of reinigingsmiddelen. Problemen oplossen Probleem Mogelijke oorzaak Oplossing Er verschijnt niets op het scherm. Communicatiefout Controleer of netwerkcommunicatie mogelijk is tussen het touchscreen en de connected controller. - Page 8 • afmetingen: 124 x 192 x 20 mm (HxBxD) • schermgrootte: 7” • schermresolutie: 1024 x 600 • gewicht: 570 g (exclusief connectoren en schroeven) PoE-voeding • geschikt voor touchscreen (550-20102) en videobuitenpost (550-22001 en 550-22002) • type IEEE 802.3af • ingangsspanning: 96 - 264 Vac • uitgangsspanning: 48 V • uitgangsvermogen: 15,4 W •...
-
Page 9: Écran Tactile
Description Cet écran tactile vous permet de commander de manière claire l’ensemble de l’installation Niko Home Control, depuis un point central : allumer et éteindre l’éclairage ou faire varier son intensité, régler la température, mettre les volets roulants et les stores dans la position souhaitée, suivre la consommation d’énergie et le statut de l’installation, …... -
Page 10: Installation
• l'accès • les communications Consultez le manuel utilisateurs Niko Home Control pour plus d'informations sur chacun de ces onglets. Installation • Connectez l'écran tactile au port RJ45 1, 2 ou 3 de l'unité de contrôle connectée (ou à l'aide d'un switch). Utilisez pour ce faire un câble à... - Page 11 550-20102 D A S H B O A R D 24V DC CONNECTED CONTROLLER Avec alimentation 24 V * câble à paire torsadée (UTP, FTP ou STP) Dimensions Tenez compte des dimensions de l'étrier de montage et de l'écran tactile indiquées sur les illustrations suivantes afin de déterminer l'endroit du mur où...
- Page 12 Percez des trous de 40 mm de profondeur à l'aide d'une perceuse (mèche de 6 mm de diamètre) pour placer les chevilles. Dans le bois, les chevilles ne sont pas nécessaires et un trou de 3 mm de diamètre et 20 mm de profondeur suffit. Pour installer l'écran tactile : 1 Vissez la plaque de montage au mur.
- Page 13 3 Fixez un connecteur RJ45 au câble à paire torsadée (UTP, STP ou FTP) conformément à la norme T568B. 4 Placez le connecteur RJ45 et, le cas échéant, le câble d'alimentation 24 V dans l'écran tactile. 5 Accrochez l'écran tactile à la plaque de montage et, d'un mouvement souple, poussez-le contre le mur. Fixez l'écran tactile à...
- Page 14 • Indiquez dans le profil d'écran tactile quelles pièces et quelles actions vous souhaitez commander depuis cet écran tactile. Pour plus d'informations sur la création de profils d'écran tactile, consultez le guide du logiciel Niko Home Control sur notre site internet.
- Page 15 Entretien de l'écran tactile Pour nettoyer l'écran tactile, utilisez un chiffon doux sec ou légèrement humide. N’utilisez pas de détergents ni de produits de nettoyage. Résolution des problèmes Problème Cause possible Solution Rien n'apparaît à l'écran. Erreur de communication Assurez-vous que la communication en réseau est possible entre l'écran tactile et l'unité...
-
Page 16: Données Techniques
• résolution de l’écran : 1024 x 600 • poids : 570 g (hors connecteurs et vis) Alimentation PoE • convient à l'écran tactile (550-20102) et au poste extérieur vidéo (550-22001 et 550-22002) • type IEEE 802.3af • tension d'entrée : 96 - 264 Vac • tension de sortie : 48 V •... - Page 17 … Thanks to a built-in light sensor, the screen brightness adapts to the ambient light. Thanks to the connection to the Niko Home Control external video unit, access control is also possible from now on (see...
-
Page 18: Operation
• The touchscreen can be supplied with power using Power over Ethernet (PoE) via the same twisted pair cable, for which you use the Niko PoE power supply (550-00502). Alternatively, you can provide a separate power supply cable, which you connect to a separate 24 Vdc power supply module in the electrical cabinet. In that case, you will need a 24 V power supply cable such as an SVV, JYSTY or TPVF cable in addition to the twisted pair cable. - Page 19 550-20102 D A S H B O A R D 24V DC CONNECTED CONTROLLER With 24V power * twisted pair cable (UTP, FTP or STP) Dimensions Take into account the dimensions of the mounting bracket and the touchscreen in the images below to determine the exact location of the touchscreen on the wall.
- Page 20 • If you are using a PoE power supply, you do not need a separate 24V power supply cable. • Only use the Niko PoE power supply type IEEE802.3af. • The green screw connector supplied (24V power supply) is suitable for a maximum copper diameter of 1.5 mm².
- Page 21 3 Mount an RJ45 connector on the twisted pair cable (UTP, STP or FTP) according to T568B. 4 Place the RJ45 connector and, if applicable, the 24V power supply cable, to the touchscreen. 5 Hang the touchscreen onto the mounting plate and press it down against the wall in one smooth motion. Tighten the touchscreen using the Allen key supplied.
-
Page 22: Programming The Touchscreen
All created actions are automatically linked to the touchscreen. • Indicate in the touchscreen profile, which rooms and actions you wish to control via this touchscreen. Consult the Niko Home Control software guide on our website for more information on creating touchscreen profiles. Initial activation The touchscreen is immediately operational after connection. -
Page 23: Touchscreen Maintenance
Touchscreen maintenance Use a soft dry or slightly damp cloth to clean the touchscreen. Do not use detergents or other cleaning agents. Troubleshooting Nothing is displayed on the screen. Communication error Check whether network communication is possible between the touchscreen and the connected controller. - Page 24 • screen resolution: 1024 x 600 • weight: 570 g (excluding connectors and screws) PoE power supply • suitable for touchscreen (550-20102) and external video unit (550-22001 and 550-22002) • type IEEE 802.3af • input voltage: 96 - 264 Vac •...
- Page 25 Anzeige-LED zeigt, ob Sie einen Anruf verpasst haben, auch dann, wenn sich das Gerät im Stand-by-Modus befindet. Dieser neue Touchscreen (550-20102) ersetzt den Touchscreen 2 (550-20101) vollständig. In einer bestehenden Niko Home Control- Installationsanlage kann er diesen Touchscreen sowohl ersetzen als auch ergänzen. Seine Kabelverbindung mit dem Heimnetzwerk sorgt darüber hinaus für eine ständige Verbindung.
-
Page 26: Funktionsweise
• Der Touchscreen kann mittels PoE (Power over Ethernet) über dasselbe Kabel mit verdrillter Leitung mit Spannung versorgt werden, wobei Sie das Niko PoE-Netzteil (550-00502) benötigen. Sie können natürlich auch eine gesonderte Versorgungsleitung verlegen, die Sie an ein separates 24 Vdc-Netzteil im Schaltschrank anschließen. In dem Fall benötigen Sie neben dem Kabel mit verdrillter Leitung auch eine 24 V-Versorgungsleitung (z. - Page 27 550-20102 D A S H B O A R D 24V DC CONNECTED CONTROLLER Mit 24 Vdc-Netzteil *Twisted-Pair-Kabel (UTP, FTP bzw. STP) Abmessungen Berücksichtigen Sie für eine Bestimmung des Touchscreen-Einbauorts an der Wand die in den folgenden Abbildungen dargestellten Abmessungen von Befestigungshalter und Touchscreen.
- Page 28 Bohren Sie für die Dübel mit einem 6 mm-Bohrer jeweils 40 mm tiefe Löcher. Bei einer Befestigung auf Holz benötigen Sie keine Dübel. In dem Fall bohren Sie 3 mm-Löcher einer Tiefe von 20 mm. So installieren Sie den Touchscreen: 1 Schrauben Sie die Montageplatte an die Wand.
- Page 29 3 Befestigen Sie einen RJ45-Stecker am Kabel mit verdrillter Leitung (UTP, STP oder FTP), gemäß T568B. 4 Schließen Sie den RJ45-Stecker und gegebenenfalls die 24 V-Versorgungsleitung am Touchscreen an. 5 Hängen Sie den Touchscreen an der Montageplatte ein und drücken Sie diesen in einer einzigen durchgehenden Bewegung bis gegen die Wand.
- Page 30 Alle erstellten Aktionen werden automatisch mit dem Touchscreen verbunden. • Geben Sie im Touchscreen-Profil an, welche Räume und Aktionen von diesem Touchscreen aus bedient werden sollen. Ziehen Sie den Niko Home Controle-Softwareguide auf unserer Website zurate für mehr Informationen über die Erstellung von Touchscreen-Profilen. Inbetriebnahme Der Touchscreen ist unmittelbar nach dem Anschluss betriebsbereit.
-
Page 31: Problemlösung
Touchscreen pflegen Verwenden Sie für die Reinigung des Touchscreens ein weiches, trockenes bzw. leicht feuchtes Tuch. Benutzen Sie keine Zusätze oder Reinigungsmittel! Problemlösung Problem Mögliche Ursache Lösung Der Bildschirm zeigt nichts an. Kommunikationsfehler Überprüfen Sie, ob zwischen Touchscreen und Connected Controller eine Netzwerkkommunikation möglich ist. - Page 32 • Abmessungen: 124 x 192 x 20 mm (HxBxT) • Bildschirmgröße: 7” • Bildschirmauflösung: 1024 x 600 • Gewicht: 570 g (ohne Dübel und Schrauben) PoE-Netzteil • geeignet für Touchscreen (550-20102) und Video-Außensprechstelle (550-22001 und 550-22002) • Typ IEEE 802.3af • Eingangsspannung: 96 - 264 Vac • Ausgangsspannung: 48 V • Ausgangsleistung: 15,4 W •...
- Page 33 … Vďaka zabudovanému svetelnému snímaču sa jas obrazovky prispôsobí okolitému svetlu. Vďaka pripojeniu k vonkajšej video jednotke Niko Home Control budete odteraz mať k dispozícii aj vstupové systémy (viď. Vonkajšia video jednotka na strane 103).
- Page 34 Používateľ rozhodne, ktoré miestnosti a ktoré ovládacie prvky sa zobrazujú na ovládacom paneli každej dotykovej obrazovky. Zobrazia sa iba funkcie alebo miestnosti, ktoré sú relevantné pre daný ovládací bod. Profily dotykovej obrazovky sa vytvárajú v ovládacom paneli programovacieho softvéru (ďalšie informácie nájdete v softvérovom návode Niko Home Control na našej webovej stránke).
- Page 35 550-20102 D A S H B O A R D 24V DC CONNECTED CONTROLLER S 24V napájaním krútená dvojlinka (UTP, FTP alebo STP) Rozmery Vezmite do úvahy rozmery montážnej svorky a dotykovej obrazovky na nižšie uvedených obrázkoch, aby ste mohli určiť...
- Page 36 • Ak používate zdroj napájania pre dotykovú obrazovku typu PoE, nepotrebujete samostatný 24V napájací kábel. • Používajte len Niko napájací zdroj pre dotykovú obrazovku PoE typu IEEE802.3af. • Pribalený zelený skrutkový konektor (24 V napájanie) je vhodný pre medený vodič s maximálnym priemerom 1,5 mm².
- Page 37 3 V súlade s T568B namontujte konektor RJ45 na krútenú dvojlinku (UTP, STP alebo FTP). 4 K dotykovej obrazovke pripojte konektor RJ45 a v prípade potreby aj 24V napájací kábel. 5 Dotykovú obrazovku namontujte na montážnu svorku a jedným plynulým pohybom ju zatlačte na stenu. Utiahnite dotykovú...
- Page 38 Všetky vytvorené akcie sú automaticky spojené s dotykovou obrazovkou. • V profile dotykovej obrazovky nastavte, ktoré miestnosti a akcie chcete ovládať pomocou tejto dotykovej obrazovky. Ďalšie informácie o vytváraní profilov dotykovej obrazovky nájdete v softvérovej príručke Niko Home Control na našej webovej stránke. Prvotná aktivácia Dotyková...
-
Page 39: Odstraňovanie Problémov
Údržba dotykovej obrazovky Na čistenie dotykovej obrazovky použite mäkkú a suchú alebo mierne navlhčenú handričku. Nepoužívajte abrazívne čistiace prostriedky alebo iné čistiace prostriedky. Odstraňovanie problémov Na obrazovke sa nič nezobrazuje. Chyba v komunikácii Skontrolujte, či je možná sieťová komunikácia medzi dotykovou obrazovkou a connected controllerom. -
Page 40: Technické Údaje
• rozlíšenie obrazovky: 1024 x 600 • hmotnosť: 570 g (bez konektorov a skrutiek) Napájací zdroj pre dotykovú obrazovku PoE • vhodný pre dotykovú obrazovku (550-20102) a externé video jednotky (550-22001 a 550-22002) • typ IEEE 802.3af • vstupné napätie: 96 - 264 Vac •...
Need help?
Do you have a question about the 550-20102 and is the answer not in the manual?
Questions and answers