Table of Contents
Advertisement
Quick Links
Advertisement
Table of Contents

Summary of Contents for NATI Speedway 50188
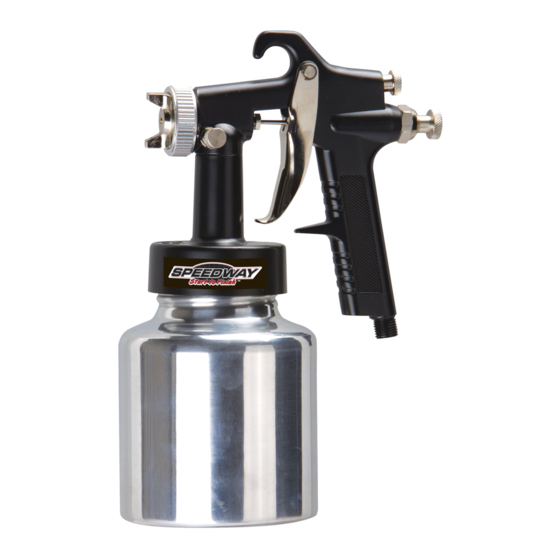
- Page 1 LVLP Paint Spray gun Model: 50188 *Actual product may vary slightly 50188 04/2017...
-
Page 2: Specifications
Important Operating Instructions CALIFORNIA PROPOSITION 65 WARNING: You can create dust when you cut, sand, drill or grind materials such as wood, paint, metal, concrete, cement, or other masonry. This dust often contains chemicals known to cause cancer, birth defects, or other reproductive harm. -
Page 3: General Safety Instructions
Important Operating Instructions GENERAL SAFETY INSTRUCTIONS • Keep the work area clean and well lit. Cluttered and dark areas increase the risk of electric shock, fire, and injury to persons. • Do not operate the tool in explosive atmospheres, such as in the presence of flammable liquids, gases, or dust. - Page 4 Important Operating Instructions GENERAL SAFETY INSTRUCTIONS • Risk of electric shock. This tool is not provided with an insulated gripping surface. Contact with a “live” wire will also make exposed metal parts of the tool “live” and shock the operator. •...
-
Page 5: Specific Safety Instructions
Important Operating Instructions GENERAL SAFETY INSTRUCTIONS • Tool service must be performed only by qualified repair personnel. • When servicing a tool, use only identical replacement parts. Use only authorized parts. • Use only the lubricants supplied with the tool or specified by the manufacturer. •... -
Page 6: Vibration Precautions
Important Operating Instructions VIBRATION PRECAUTIONS This tool vibrates during use. Repeated or long-term exposure to vibration may cause temporary or permanent physical injury, particularly to the hands, arms, and shoulders. To reduce the risk of vibration-related injury: 1. Anyone using vibrating tools regularly or for an extended period of time should first be examined by a doctor and then have regular medical check-ups to ensure medical problems are not being caused or worsened from use. - Page 7 Important Operating Instructions controls the air supply even if the air hose is ruptured. The shut-off valve should be a ball valve because it can be closed quickly. Note: if an automatic oiler system is not used, add a few drops of pneumatic tool oil to the airline connection before operation.
-
Page 8: Work Area Set-Up
Important Operating Instructions WARNING: Read the ENTIRE important operating instructions before set-up or use of this product. Inspect tool before use, looking for damaged, loose, and missing parts. If any problems are found, do not use the tool until it has been repaired. WORK AREA SET-UP 1. - Page 9 Important Operating Instructions 4. Start the air compressor and set the regulator to needed pressure. Do not exceed maximum air pressure. 5. Test the consistency by spraying on a piece of scrap material. If it appears too thick, add a very small amount of thinner (not included) and mix thoroughly.
-
Page 10: Spraying Technique
Important Operating Instructions Fluid adjustment 1. Turn the fluid knob clockwise until it is fully closed. 2. After setting up a piece of scrap material, squeeze the trigger in short bursts while turning the fluid knob counterclockwise to set the amount of fluid. If spray is too fine: Reduce the air pressure or allow more paint to come out by opening the fluid knob. - Page 11 Important Operating Instructions CAUTION: Do not stop when spraying. Spraying materials will start to set and dry as soon as they come in contact with the air. They will cause a permanent clog if not cleared immediately. If discontinuing spraying for more than half an hour, turn off the air supply, disconnect paint cup from gun body, and thoroughly rinse the cup and gun body following the paint manufacturer’s recommendation for cleaning, solvent type, and disposing of used solvent.
-
Page 12: Storage And Maintenance
Important Operating Instructions STORAGE & MAINTENANCE WARNING: Procedures not specifically explained in this manual must be performed only by a qualified technician. To prevent serious injury from accidental operation, turn off the tool, detach the air supply, safely discharge any residual air pressure in the tool, and release the trigger before performing any inspection, maintenance, or cleaning procedures. - Page 13 Important Operating Instructions CLEANING Solvent solution Follow the paint manufacturer’s recommendations for cleaning, solvent type, and disposing of solvent. IMPORTANT: Do not use mineral spirits on latex paints or the mixture will congeal, making it very difficult to remove. WARNING: To prevent fire, if a flammable solvent needs to be used, adhere to the following: •...
- Page 14 Important Operating Instructions 7. Use appropriate solvent to wipe down the spray gun body. 8. Lubricate spray gun after cleaning. A non-silicon oil or light lubricant may be used on threaded connections before storing. Solution disposal After cleaning, dispose of cleaning solution according to the solution manufacturer’s directions and local hazardous waste standards.
- Page 15 Air Supply Set-up...
-
Page 16: Troubleshooting Guide
Important Operating Instructions TROUBLESHOOTING GUIDE Symptom Possible Cause(s) Corrective Action Pattern adjustment knob Open pattern adjustment knob partially closed more Heavy Thin paint according to the center The paint is too thick manufacturer’s instructions pattern Increase air pressure within the The air pressure is too low operating air pressure High air pressure... - Page 17 Important Operating Instructions TROUBLESHOOTING GUIDE Symptom Possible Cause(s) Corrective Action Low paint level Refill Cup tipped Hold upright Sputtering Clogged air vent Clean air vent hole spray Loose fluid inlet connection Tighten fluid inlet connection Loose/damaged fluid tip/seat Adjust or replace fluid tip No pressure at spray gun Check air hoses Fluid knob not open enough...
-
Page 18: Warranty
To receive service under warranty, the original manufacturer part must be returned for examination by an authorized service center. Shipping and handling charges may apply. If a defect is found, NATI will either repair or replace the product at its discretion. - Page 19 PARTS LIST LVLP Paint Spray Gun Model: 50188 88050188 02/2014...
- Page 20 PARTS LIST Model: 50188 LVLP Paint Spray Gun Description Description Nozzle Lock Ring Fluid Needle Valve Mount Air Nozzle Fluid Needle Valve Spring Nozzle Inner Ring Fluid Needle Valve Adjuster Spray Nozzle Fluid Control Knob Nozzle Washer Nozzle Packing Fitting Housing Trigger Trigger Pin Snap Ring...
Need help?
Do you have a question about the Speedway 50188 and is the answer not in the manual?
Questions and answers