
Subscribe to Our Youtube Channel
Related Manuals for Clarke CPBS1


Summary of Contents for Clarke CPBS1
- Page 1 PAVING BLOCK SPLITTER Model No: CPBS1 Part No: 3400900 OPERATING & MAINTENANCE INSTRUCTIONS GC01/12...
-
Page 2: Table Of Contents
Technical Specification ............... 10 INTRODUCTION Thank you for purchasing this CLARKE CPBS1 paving block splitter. Upon receipt, any damage or deficiency should be reported to your CLARKE dealer immediately. Before attempting to operate the tool, it is essential that you read this manual thoroughly and carefully follow all instructions given. -
Page 3: Guarantee
GUARANTEE This CLARKE product is guaranteed against faulty manufacture for a period of 12 months from the date of purchase. Please keep your receipt as proof of purchase. This guarantee is invalid if the product is found to have been abused or tampered with in any way, or not used for the purpose for which it was intended. -
Page 4: Components
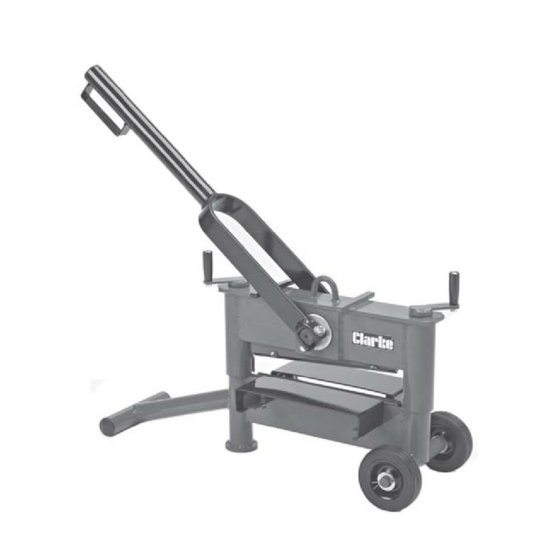
COMPONENTS The CPBS1 paving block splitter consists of the following main components Main Handle Height Adjustment Handle Upper Blade Lower Blade Support Table Movable Handle Support Bar The following tools are required for assembly and adjustment; 2 x 19 mm Spanners, 1 x 14 mm Spanner, 1 x large Screwdriver... -
Page 5: Assembly
CONTENTS When unpacking the product, check for damage or omissions etc. Any found should be reported to your CLARKE dealer where the product was originally purchased. Do not discard the packaging until the product is assembled. The following items are supplied loose:... -
Page 6: Operation
OPERATION 1. Raise the handle all the way up. Turn both height adjustment handles at the same time and by the same amount to open the blades far enough for the block to be inserted. 2. Place the block in the centre of the blades and adjust its position to the required cut line. - Page 7 UNDERCUTTING Because this tool splits, rather than cuts, there will be a clean straight edge at the top and bottom of the block and a rough broken face between. The spring-loaded tables offer the ability to create an undercut when splitting.
-
Page 8: Maintenance
MAINTENANCE Always inspect the tool before use, and ensure it is in top condition. BLADE REPLACEMENT Each hardened blade has four cutting edges to provide longer life and can be rotated in order to use a sharper blade. To remove the blades or change the cutting side of the blade, remove the large blade fixing screws securing the top or bottom... -
Page 9: Parts Diagram And Parts List
PARTS DIAGRAM For parts & Servicing, please contact your nearest dealer, or CLARKE International, on one of the following numbers. PARTS & SERVICE TEL: 020 8988 7400 PARTS & SERVICE FAX: 020 8558 3622 e-mail as follows: PARTS: Parts@clarkeinternational.com SERVICE: Service@clarkeinternational.com... -
Page 10: Technical Specification
TECHNICAL SPECIFICATION t i s Please note that the details and specifications contained herein, are correct at the time of going to print. However, CLARKE International reserve the right to change specifications at any time without prior notice. - Page 11 NOTES _________________________________________________________________________ _________________________________________________________________________ _________________________________________________________________________ _________________________________________________________________________ _________________________________________________________________________ _________________________________________________________________________ _________________________________________________________________________ _________________________________________________________________________ _________________________________________________________________________ _________________________________________________________________________ _________________________________________________________________________ _________________________________________________________________________ _________________________________________________________________________ _________________________________________________________________________...
Need help?
Do you have a question about the CPBS1 and is the answer not in the manual?
Questions and answers