Table of Contents
Advertisement
Quick Links
Advertisement
Table of Contents

Related Manuals for IRISBOND DUO

Summary of Contents for IRISBOND DUO
- Page 1 User Manual www.irisbond.com...
-
Page 2: Table Of Contents
Description of Components ....................4 Assembly Options ........................5 How to Position Irisbond Duo When Using a Laptop ............6 How to Attach Irisbond Duo to a Desktop Computer Screen ..........12 How to Attach Irisbond Duo to a Tablet ................14 Installing the EasyClick Software ................ -
Page 3: Welcome To Irisbond
Individuals with Amyotrophic Lateral Sclerosis (ALS) or Cerebral Palsy using Irisbond can access a variety of apps installed on the computer. Irisbond gives the user a window to the world, allowing them to communicate, share experiences and knowledge, watch movies, read, listen to audiobooks, play...there really is no limit! -
Page 4: Irisbond Duo Eyetracker
The information is then processed by the computer via the Irisbond Primma software (once installed on the computer). This allows the user’s eye movements to be translated into onscreen positioning coordinates for the mouse. -
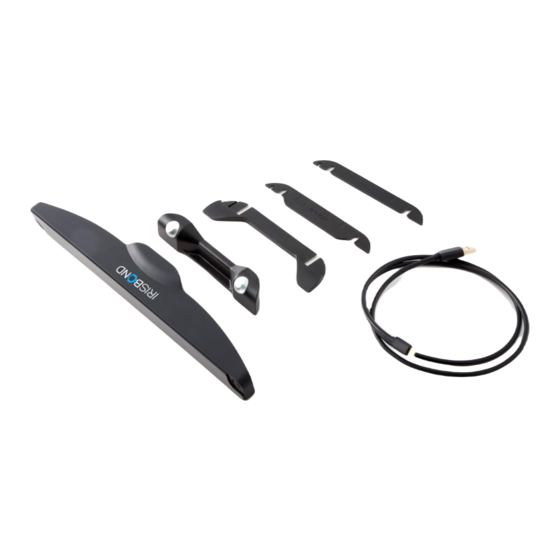
Page 5: Description Of Components
Support The eyetracker support holds the device in place. Cable The cable enables a connection between the computer and the eyetracker. Mounts The mounts allow you to use the Irisbond system on various surfaces. www.irisbond.com Page 4... -
Page 6: Assembly Options
User Manual IRISBOND DUO Positioning Assembly Options The Irisbond Duo system is designed to be fully adaptable for use with laptops, Desktop PCs and tablets: 1. Laptop Attached to a flat surface on the laptop. Placed in front of the laptop. -
Page 7: How To Position Irisbond Duo When Using A Laptop
Positioning How to Position Irisbond Duo When Using a Laptop When using a laptop, the Irisbond eyetracker can be positioned in three ways: 1. Attached to the laptop in the space between the screen and the keyboard 2. Attached to the bottom section of the laptop screen 3. - Page 8 Connect the USB cable to the Irisbond eyetracker. Attach the support to the Irisbond eyetracker by bringing together the metal contacts on the back of the Irisbond device and the magnets on the support. When bringing these into contact, be sure that both tabs are facing downwards.
- Page 9 User Manual IRISBOND DUO Positioning Slot the support (now holding the Irisbond eyetracker) in the mount attached to the laptop. WARNING The strip on the mount is made of a strong adhesive material. We recommend carefully considering where to place the mount before attaching to the computer as the adhesive is semi-permanent.
- Page 10 Positioning Attach the support to the Irisbond eyetracker by bringing together the metal contacts on the back of the Irisbond device and the magnets on the support. When bringing these into contact, be sure that the tabs are facing upwards.
- Page 11 User Manual IRISBOND DUO Positioning Option C. Placed on a table in front of the laptop. Instructions: Another way of positioning the eyetracker is to place it in front of the screen on the rest designed for using the device on tables. The tabletop rest creates a larger surface area for the eyetracker support and allows the user to securely position the eyetracker on a flat surface.
- Page 12 User Manual IRISBOND DUO Positioning 2. Slot the support (holding the Irisbond eyetracker) into the tabletop rest. Finally, place the eyetracker in front of the laptop. www.irisbond.com Page 11...
-
Page 13: How To Attach Irisbond Duo To A Desktop Computer Screen
8 hours before attaching the eyetracker support to the mount. 3. Attach the support to the Irisbond eyetracker by bringing together the metal contacts on the back of the Irisbond device and the magnets on the support. When bringing these into contact, be sure that the tabs are facing upwards. - Page 14 User Manual IRISBOND DUO Positioning Slot the support (now holding the Irisbond eyetracker) in the mount attached to the monitor WARNING The strip on the mount is made of a strong adhesive material. We recommend carefully considering where to place the mount before attaching to the computer as the adhesive is semi-permanent.
-
Page 15: How To Attach Irisbond Duo To A Tablet
How to Attach Irisbond Duo to a Tablet To attach the Irisbond Duo Eyetracker to a tablet, a special adaptor is required. Irisbond is compatible with tablets with a 12 to 15’’ screen and have a Windows operating system. - Page 16 IRISBOND DUO Positioning Instructions: 1. Remove the screws in the center of both magnetic contacts on the back of the Irisbond Duo Eyetracker. 2. Take the special adaptor for tablets and the two screws; place the adaptor on the back of the Irisbond Duo device as illustrated in the images below.
- Page 17 User Manual IRISBOND DUO Positioning Special adaptor for tablets Fixing the adaptor to the eyetracker 3. Attach the adaptor fixed to the eyetracker to the tablet cradle by using the four screws (or as otherwise specified according to the cradle model). Complete the below steps:...
- Page 18 User Manual IRISBOND DUO Positioning 4. Insert the tablet in the cradle. 5. Finally, take the articulated arm supporting the tablet and clamp it to a wheelchair or surface. The system of joints which allows the arm to support the tablet offers the user endless accessibility options.
-
Page 19: Installing The Easyclick Software
Before you can control your computer using your eyes you need to install the software downloading it from https://www.irisbond.com/en/support-and-training/download/. This must be done before connecting the Irisbond eyetracker to your computer. The software is compatible with computers and portable devices which have a Windows operating system (Vista, 7, 8 and 10). - Page 20 If it does not start automatically, you may find the installer on the Downloads folder of your computer and execute it manually. Select the language of the application on the dropdown menu and click OK. Accept the License Agreement and click on Install: www.irisbond.com Page 19...
- Page 21 The installation will start. You will see the installation progress on the green bar: If it is the first Irisbond application installed on your computer, the next window may appear. Select the option Always trust software from “Point Grey Research Inc.” if it is not checked and press Install: www.irisbond.com...
- Page 22 Desktop: Double click on this icon to start the application. WARNING! If this message appears, verify that the Irisbond DUO is correctly connected to the computer. EasyClick cannot start if it does not detect the device. www.irisbond.com Page 21...
-
Page 23: Main Menu
On the other hand, users are those who have a complete domain of the computer and need a complete access to it. They are totally autonomous users and do not need assistance to use the application. www.irisbond.com Page 22... -
Page 24: Beginner Mode
Beginner Mode If you select the Beginner option, the tool bar will appear. It is the main menu of EasyClick Beginner: www.irisbond.com Page 23... - Page 25 Position It refers to the position of the user according to the Irisbond DUO. If you click it, this window will open: With this guide, you will be able to check the user position by avatar or video image.
- Page 26 This option is useful for therapies and when the user needs to rest if the assistant thinks it is necessary. Click As the previous button, this allows the assistant to stop the click option. When it is disabled, the user will only be able to move the mouse, without left clicking. www.irisbond.com Page 25...
- Page 27 Minimize This button minimizes the toolbar to the Windows taskbar. This helps the user to focus on the activity without the bar diverting its attention. www.irisbond.com Page 26...
- Page 28 Close The Close button displays a confirmation window to completely close the program: www.irisbond.com Page 27...
-
Page 29: Pro Mode
First, hit the Settings button to apply some initial parameters for the correct use of the program: 1.1.1.1. Settings In this window, you will be able to configure the users, calibrate the camera and customize different aspects of the application. www.irisbond.com Page 28... - Page 30 It is possible to increase or decrease the time in 0.1 seconds, to move the selector across the bar points, or to set the default value. Create user: it opens a new window to insert the new user’s name. Just insert it • and click Close www.irisbond.com Page 29...
- Page 31 Here is where you will calibrate the camera for the current user. It is recommended to lock the usage of the gaze in this window by clicking the Lock button, on the top right of the window, to not disturb during the positioning and calibration. www.irisbond.com Page 30...
- Page 32 After, click on the Avatar button to adjust the distance from the eyes to the camera. Just move closer or stay away until the two points of the image turn steadily green. Try to maintain them in the middle of the black window, as in the image below. www.irisbond.com Page 31...
- Page 33 (using a touch screen or with a keyboard). The Default calibration button removes the current calibration and applies the default one. www.irisbond.com Page 32...
- Page 34 (left or right) or both eyes. Smooth: select the smooth level for the mouse movement. Five levels are available: Very low, Low, Normal, High and Very high. www.irisbond.com Page 33...
- Page 35 Calibration Calibration speed: select the speed at which the calibration point will move. Calibration target: select the size of the calibration point and its colour. Calibration background: select the colour of the background during the calibration process. www.irisbond.com Page 34...
- Page 36 It is possible to also change the colour and shape of the activation progress. Mouse sound: if On is selected, a sound will be heard in each click. www.irisbond.com Page 35...
- Page 37 Desktop bar Desktop bar size: select the size of the desktop bar by default for the current user. Desktop bar location: select the location of the desktop bar by default for the current user. www.irisbond.com Page 36...
- Page 38 Hebrew. The change will be applied once you leave this window. Switch to Here, you will be able to change the user mode from to Beginner. This option is not clickable by the gaze, as the Beginner mode needs an assistant. www.irisbond.com Page 37...
-
Page 39: Desktop Bar
Desktop bar will appear again. Double left click By clicking this button, the Desktop Bar will disappear, and a round-pointer will help the user to focus the click. Once the user has clicked, the Desktop bar will appear again. www.irisbond.com Page 38... - Page 40 The first click is to select the item to move or the first point of a multiple selection. The second click is to select the location to drop the item or the last point of a multiple selection. www.irisbond.com Page 39...
- Page 41 If the calibration accuracy is lost because of head movements, this button will readjust the calibration by one-point calibration. Settings It opens the Settings Window. Pause It pauses the gaze control. It is reactivated by clicking again the Pause button. www.irisbond.com Page 40...
-
Page 42: Certifications
User Manual Certifications Certifications The Irisbond eyetracker complies with relevant European Guidelines and Directives and has been tested by a certified laboratory in accordance with the following standard(s): • Electromagnetic compatibility* • Standard UNE-EN 55024:2010 and UNE-EN 55024:2010 Information Technology Equipment. Characteristics of radio interference. -
Page 43: Troubleshooting
The cable should not be connected to USB ports on the front of computer towers. • Check that you are using the USB cable originally supplied with the Irisbond eyetracker. • Always be careful when using USB extension cables as they can cause this problem also. -
Page 44: Open Source Library Licenses
User Manual Open source license Open Source Library Licenses The Irisbond system uses certain open code libraries in order to run. According to the regulations set out in the collective license agreements of the Open Source Initiative (OSI) (http://opensource.org/licenses/), please see below the list of references and license agreements: * OpenCV v2.4.3 (http://opencv.org/)
Need help?
Do you have a question about the DUO and is the answer not in the manual?
Questions and answers