
Summary of Contents for T.O.M TE990
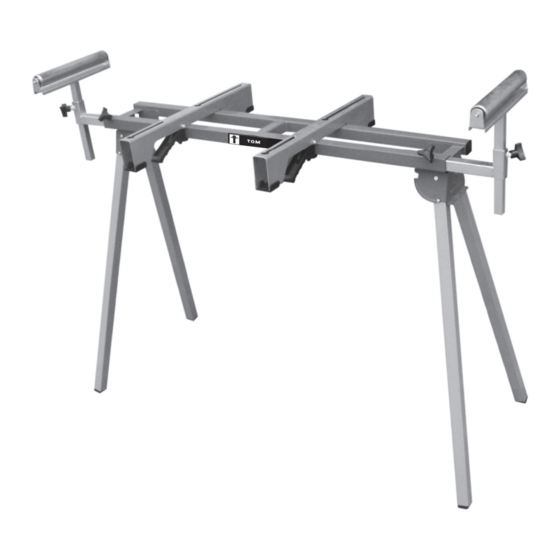
- Page 1 ETABLI PORTATIF PORTABLE WORK STAND EINSTELLBARER KLAPP-TISCH TE990 Manuel d’utilisation Operating instructions Bedienungsanleitung...
- Page 3 ManUEL D’UTiLisaTiOn SOMMAIRE français --------------------------------------------------------------------------------------------------------------------------- cOnSIgnES gEnERAlES dE SEcuRItE ----------------------------------------------------------------------------- PROtEctIOn POuR l’EnVIROnnEMEnt ----------------------------------------------------------------- 5 dEScRIPtIF dE l’APPAREIl ---------------------------------------------------------------------------------- 6 InStRuctIOn dE MOntAgE -------------------------------------------------------------------------------- 7 EnglISh ---------------------------------------------------------------------------------------------------------------------------------- gEnERAl SAFEty RulES ----------------------------------------------------------------------------------------------------- AddItIOnAl SAFEty RulES FOR tAblE SAw ----------------------------------------------------------------- SyMbOlS -------------------------------------------------------------------------------------------------------------------------------- InStAllAtIOn ------------------------------------------------------------------------------------------------------------------------- ATTENTION...
- Page 4 PrOTECTiOn DE L’EnVirOnnEMEnT le symbole de la poubelle sur roues barrée d’une croix signifie que ce produit doit faire l’objet d’une collecte sélective en fin de vie au sein de l’union européenne. cette mesure s’applique non seulement à votre appareil mais également à toute autre accessoire marqué...
- Page 5 insTrUCTiOns DE MOnTagE Visserie et pièces lire complètement toutes les instructions d’assemblage avant de commencer à assembler. Consulter la liste des pièces à la page 7 pour connaître le nom et voir des illustrations des pièces. Certains composants peuvent être pré assemblées usine.
- Page 6 procédure d’installation et de repliage 1. déposer la scie du support. 2. Escamoter les extensions pour réduire la taille du chevalet. 3. Appuyer sur le bouton pression de chaque patte pour les replier sous la partie supérieure du chevalet jusqu’à ce que le bouton pression s’enclenche en position fermée.
- Page 7 OPEraTing insTrUCTiOns cOntEnt EngLisH ------------------------------------------------------------------------------------------------------------------------------- gEnERAl SAFEty InStRuctIOnS ------------------------------------------------------------------------------------- EnVIROnMEnt PROtEctIOn --------------------------------------------------------------------------------11 dEScRIPtIOn ------------------------------------------------------------------------------------------------------ 12 ASSEMbly InStRuctIOnS -------------------------------------------------------------------------------- 13 EnglISh ---------------------------------------------------------------------------------------------------------------------------------- gEnERAl SAFEty RulES ----------------------------------------------------------------------------------------------------- AddItIOnAl SAFEty RulES FOR tAblE SAw ----------------------------------------------------------------- SyMbOlS -------------------------------------------------------------------------------------------------------------------------------- InStAllAtIOn ------------------------------------------------------------------------------------------------------------------------- wArNINg PROduct SPEcIFIcAtIOnS ------------------------------------------------------------------------------------------------- ASSEMbly And AdjuStMEntS ------------------------------------------------------------------------------------------ SEttIng thE tOOl...
- Page 8 EnVirOnMEnT PrOTECTiOn the crossed-out wheeled bin means that within the European union the product must be taken to separate collection at the product end-of-life. this applies to your device but also to any accessories marked with this symbol. do not dispose of these products as unsorted municipal waste.
- Page 9 assEMbLy insTrUCTiOns Visserie et pièces read all assembly instructions completely before attempting assembly. see parts list on page 2 for names and pictures of parts. identify all components and hardware. 1. Install leg as shown in Figure 1 to top Frame and secure with 1/4» - 20 x 1-3/4» bolt and 1/4»...
- Page 10 set-up / knockdown procedure 1. Remove the saw from the work stand. 2. collapse the Extension Supports to minimum size. 3. depress the snap button on each leg and fold the leg under the top until the snap button pops into the closed position. Figure 11.
- Page 11 bEDiEnUngsanLEiTUng InhAltSVERZEIchnIS DEUTsCH ----------------------------------------------------------------------------------------------------------------------------- AllgEMEInE SIchERhEItShInwEISEwEISE -------------------------------------------------------------------- uMwEltSchutZMASSnAhMEn ----------------------------------------------------------------------------17 gERÄtE-ElEMEntE -------------------------------------------------------------------------------------------- 18 MOntAgE ---------------------------------------------------------------------------------------------------------- 19 Eg-KOnFORMItÄtSERKlÄRung -------------------------------------------------------------------------- 21 lIStE dES PIècES --------------------------------------------------------------------------------------------- 30 VuE éclAtéE ---------------------------------------------------------------------------------------------------- 31 cOnFORMIté Et gARAntIE ------------------------------------------------------------------------------- 32 EnglISh ---------------------------------------------------------------------------------------------------------------------------------- gEnERAl SAFEty RulES ----------------------------------------------------------------------------------------------------- AddItIOnAl SAFEty RulES FOR tAblE SAw ----------------------------------------------------------------- SyMbOlS --------------------------------------------------------------------------------------------------------------------------------...
- Page 12 UMWELTsCHUTZMassnaHMEn UMWELTsCHUTZMassnaHMEn gEräTE-ELEMEnTE ALS EXTRA...
- Page 13 MOnTagEanWEisUngEn Abbildung 1 lesen sie vor der montage alle montageanweisungen vollständig durch. nehmen sie die teileliste auf seite 7 zur hand und schauen sie sich die bezeichnungen und die abbildungen der teile an. bestimmte teile können werkseitig vormontiert sein. 1. befestigen Sie das bein (b) am oberen Rahmen (A) mit der 6 mm Schraube (g) und der Sicherungsmutter (h) , wie in Abbildung 1 dargestellt.
- Page 14 Abbildung 6 Abbildung 7 Abbildung 8 aufbau- und abbauverfahren 1. nehmen Sie die Säge vom untergestell ab. 2. Fahren Sie die Verlängerungen ein, um die Abmessungen des gestells zu verkleinern. 3. drücken Sie zum Einklappen der beine auf den druckknopf jedes beins, bis dieser in der verriegelten Position einrastet.
- Page 15 DECLArATION OF CE CONFOrMITY nous soussignés, déclarons que l’établi hiermit erklären wir, die unterzeichneten, we the undersigned hereby declare that te990 répond aux exigences des direc- dass die einstellbarer klapp-tisch te990 the portable work stand te990 meets tives européennes : den europäischen Richtlinien : 2002/95/Ec...
Need help?
Do you have a question about the TE990 and is the answer not in the manual?
Questions and answers