Table of Contents
Advertisement
Quick Links
Original Installation, Care and Maintenance
BB-PEP Pump
These instructions should be read thoroughly by specialized personnel prior to pump
installation, operation, maintenance, assembly, or disassembly.
Zenith Pumps
1710 Airport Rd.
Monroe, NC 28110
USA
Phone: 1.704.289.6511
E-mail:
CustomerCare@ColfaxCorp.com
Internet:
http://www.zenithpumps.com
Document No. MAN-PEPB-ICM-ENGLISH
Document Rev. 1.2
WARNING
Advertisement
Table of Contents

Related Manuals for Zenith BB-PEP Series

Summary of Contents for Zenith BB-PEP Series
- Page 1 Original Installation, Care and Maintenance BB-PEP Pump Zenith Pumps 1710 Airport Rd. Monroe, NC 28110 Phone: 1.704.289.6511 E-mail: CustomerCare@ColfaxCorp.com Internet: http://www.zenithpumps.com Document No. MAN-PEPB-ICM-ENGLISH Document Rev. 1.2 WARNING These instructions should be read thoroughly by specialized personnel prior to pump...
-
Page 2: Table Of Contents
READ THIS ENTIRE PAGE BEFORE PROCEEDING FOR SAFETY OF PERSONNEL AND TO PREVENT DAMAGE TO EQUIPMENT, THE FOLLOWING NOMENCLATURE HAS BEEN USED IN THIS MANUAL: DANGER Failure to observe the precautions noted in this box can result in severe bodily injury or loss of life. -
Page 3: Overview And Disclaimer
A Thermocouple well (1/8-27 NPT) is located on the rear cover plate of the pump. A Zenith Rheoseal assembly secured to the front cover plate prevents leakage around the shaft, using both dynamic and static types of sealing mechanisms. A Rheoseal consists of a helical groove on the inner diameter, a backup seal counter bore and gland. -
Page 4: Specifications
4500 (310) 4500 (310) 600 (950*) * With special fasteners and seals Never operate with fluids that are outside of the original design constraints, if there is any question contact Zenith Pumps immediately. CAUTION ATTENTION Operating conditions, such as speed, fluid viscosity, temperature, inlet pressure, discharge pressure, filtration, duty cycle, drive type, mounting, etc. -
Page 5: Dimensional Diagram
F. DIMENSIONAL DIAGRAM PUMP APPROX "X" "Y" "D" CAPACITY WEIGHT CC/REV 0.16 1.61 3.11 0.125 1.61 3.11 0.250 1.61 3.11 0.375 2.40 3.90 0.750 2.40 3.90 0.750 2.40 3.90 1.000... -
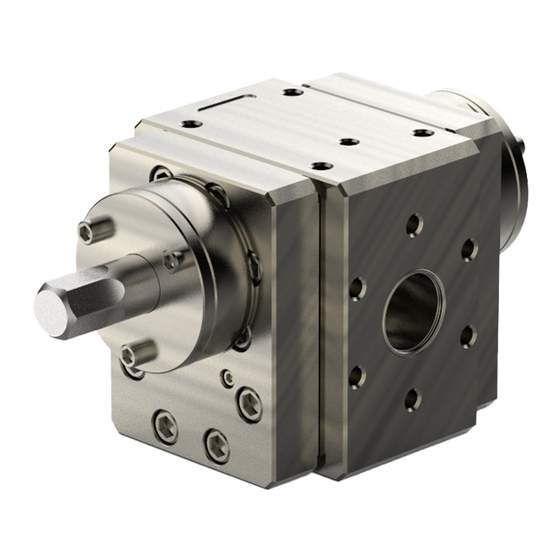
Page 6: Pump Model Identification
3.11 0.375 10.1 3.90 0.750 13.0 3.90 0.750 13.3 3.90 1.000 13.7 G. PUMP MODEL IDENTIFICATION This instruction manual covers the Zenith BB-PEP pumps. The model of each pump is identified on the pump’s laser etching. See below for reference. -
Page 7: Pump And Part Ordering Instructions
1/4 the recommended torque value, then to 1/2, to 3/4 and finally to their full recommended torque value as shown below. If the flanges are not supplied by Zenith, make certain that their mating faces are flat, with no pilots that protrude into the pump. -
Page 8: Cleaning Pump For Disassembly
Further, he can predict the service life of the pump, and schedule downtime accordingly. As with any other Zenith pump, BB-PEP Series pumps may be returned to Zenith for complete rehabilitation as necessary. This procedure may be desirable if only a few pumps are involved. Zenith offers a contract service program to repair and maintain your pumps. - Page 9 Apply even pressure on both sides of the plate when removing it in this manner. NOTE: If the rear plate cannot be removed, please return the pump to Zenith Pumps. Remove gear plate along with B-bearings, driving gear, shaft, driven gear, shaft.
-
Page 10: Inspection Of Parts
11. Remove Rheo seal, or packing housing, depending on your pump type. L. INSPECTION OF PARTS After the parts have been cleaned, they should be inspected for nicks and burrs and stubborn residue. The gears and the edges of the center plate gear pockets are the most likely areas to be damaged because of the sharp edges. An illuminated magnifier facilitates the examination. -
Page 11: Assembly Drawing
M. ASSEMBLY DRAWING ITEM NO. PART NAME ASSEMBLY, GEAR/SHAFT ASSEMBLY, GEAR/ARBOR B-BEARING LIP SEAL HOUSING KEY, ROUND PLATE, REAR PLATE, GEAR PLATE, FRONT SEAL, RHEO RH C-RING LIP SEAL SHCS 1/4-20 X .750 ALLOY SHCS 3/8-16 X 4.00 ALLOY... -
Page 12: Reassembly Of Pump
8. Insert the smaller diameter end of the arbor into the smaller B-bearing bore. Align the shaft and arbor gears with meshed teeth so that both gear faces rest against the face of the B-bearing and the “Zenith” logo etching on the B-bearing is clearly visible on the opposite face. - Page 13 10. Place lubricant onto the shaft end. Holding the assembly by the B-bearings, carefully install the shaft through the front cover plate and seal assembly. Ensure that the seal nose pilots into the B-bearing and that the B-bearing face rests flush with the front plate. CAUTION ATTENTION Make sure there are no sharp corners or raised surfaces on the driving end of the drive shaft that...
-
Page 14: Bolt Torque
O. BOLT TORQUE... -
Page 15: Troubleshooting
P. TROUBLESHOOTING... - Page 16 Zenith Pumps 1710 Airport Road Monroe, NC 28110 USA Tel: 704.289.6511 zenithpumps.com 2014 Zenith Pumps All rights reserved...
Need help?
Do you have a question about the BB-PEP Series and is the answer not in the manual?
Questions and answers