
Subscribe to Our Youtube Channel
Related Manuals for Martin Yale Count AccuCreaser

Summary of Contents for Martin Yale Count AccuCreaser
- Page 1 ACCUCREASER TOUCH Serial Number ___________________________ Date ___________________________________...
- Page 2 Page left blank intentionally...
-
Page 3: Table Of Contents
TABLE OF CONTENTS INTRODUCTION ......................5 ELECTRICAL REQUIREMENTS AND SPECIFICATIONS ............5 SAFETY PROCEDURES/CARE & MAINTENANCE .............. 6 COMPONENT IDENTIFICATION ..................7 SETTING UP ACCUCREASER..................8 DELIVERY TRAY ASSEMBLY..................8 PAPER STOP ASSEMBLY .................... 9 MACHINE CONTROLS....................10 PUMP CONTROLS......................10 TOUCH SCREEN CONTROLLER..................11 PERF MODE ...................... - Page 4 MICRO ADJUSTING THE CREASE POSITION ..............18 BATCH COUNTER......................19 SETTING THE AUTOMATIC FEEDER................20 HEIGHT ADJUSTMENT CALIPER .................. 20 LOADING THE FEEDER ....................21 CHECKING THE SENSOR ....................22 PERF SHAFT & STRIKE PLATE ..................22 REMOVING THE PERF SHAFT TO CHANGE CONFIGURATIONS ........23 PERFORATING AND SETTING PERF BLADE ..............24-25 SCORING AND SETTING SCORE BLADE ................26 FOLDING DIRECTION OF PAPER .................
-
Page 5: Introduction
ELECTRICAL REQUIREMENTS AND SPECIFICATIONS Power Requirement: 110v, 60 HZ, AC, or International 230v, 50/60HZ, AC 20 amp line required for models with pump Circuit Protection: 3 AMP Circuit Breaker, 3 AMP Fuse OPERATING SPEEDS MODE 8.5 X 11 Sheet (est) Perf Mode: 12,000 Crease... -
Page 6: Safety Procedures/Care & Maintenance
SAFETY PROCEDURES BEFORE USE: Read through the owner’s manual. Follow instructions CAREFULLY. • NEVER use a wet area. Electric shock could occur. • • Use a GROUNDED outlet and a GROUNDED circuit. Do no use ungrounded equipment on the same circuit. Always use a dedicated line. -
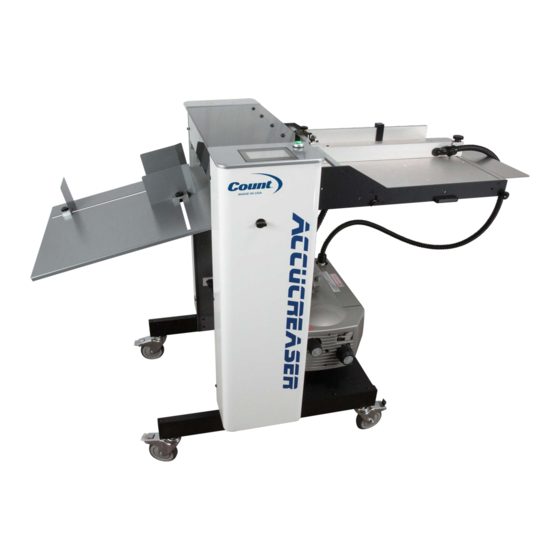
Page 7: Component Identification
COMPONENT IDENTIFICATION Power Switch Touch Screen Perf and Score Assemblies Crease Bar Paper Stop Delivery Tray Pump with Vacuum Valve REFERENCES Touch Screen Pg. 11 Delivery Tray Pg. 8 Pump with Vacuum Pg. 10 Valve Perf and Score Pg. 24-26... -
Page 8: Setting Up Accucreaser
SETTING UP YOUR ACCUCREASER This machine is 99% ready to go when it arrives on your dock. There are only a few items that need to be put into position before it is ready to use. Those 2 items are below: DELIVERY TRAY ASSEMBLY INSTALLING THE DELIVERY TRAY... -
Page 9: Paper Stop Assembly
PAPER STOP ASSEMBLIES INSTALLING THE PAPER STOPS Inside the box should be 3 paper stops (2 will have a bend & 1 will be straight). Place the straight paper stop in place. This is the back paper stop. (See Diagram) Place the 2 paper stops in position as show below. -
Page 10: Machine Controls
MACHINE CONTROLS There is one switch on the Accucreaser the main power. Everything else is controlled by the Touch Screen. MAIN POWER On the operator side cover at the top on the right side is the main power button . This is the on and off power for the machine. -
Page 11: Touch Screen Controller
TOUCH SCREEN CONTROLLER THE TOUCH SCREEN CONSISTS OF FOUR SECTIONS: 1. Count Logo and Service Access 2. Perf Mode 3. Feeder Mode 4. Crease mode Touch Screen Operation When the machine is turned on the display may take up to 7 seconds for the home screen to display. -
Page 12: Perf Mode
PERF MODE From the home screen press the perf mode button the perf mode screen will be displayed. Home: Takes you back to the home screen. Counter Reset: Resets the displayed counter to 0. Jog Left and Right: Slowly advances the rollers left or right. Batch Counter: Allows for stopping the machine after a batch number is reached. -
Page 13: Feeder Mode
FEEDER MODE Feed mode is the mode to run your Accucreaser Touch as a feeder into our CountCoat UV Coater. It runs much slower than the other modes giving the sheets enough spacing to move through the UV coater. Home: Takes you back to the home screen. -
Page 14: Transport And Vacuum Operation Controls
TRANSPORT AND VACUUM OPERATION The Run Button will start the Transport in any given mode. When pressed it will also turn the air portion of the pressure pump on. Press it again to stop the transport and turn of the pump. Each Mode has a timeout feature to preserve the life of the machine. -
Page 15: Programming For Crease Mode
PROGRAMMING FOR CREASE MODE Half Fold: Press the Crease Mode Button > Half > Start Measuring > Physically Run a sheet through the machine for the sensor to measure > Accept > Run > Feed. EXAMPLE: Tri-Fold: Press the Crease Mode Button > Tri-Fold > Start Measuring > Physically Run a sheet through the machine for the sensor to measure >... -
Page 16: Gate Fold
Gate Fold: Press the Crease Mode Button > More > Gate > Start Measuring > Physically Run a sheet through the machine for the sensor to measure > Accept > Run > Feed. EXAMPLE: Double Gate Fold: Press the Crease Mode Button > More > Double Gate > Start Measuring >... -
Page 17: Perfect Bind Single Hinge
Perfect Bind Single Hinge: Press the Crease Mode Button > More > Perfect Binding Score > Enter The Book Thickness > Single Hinge > Start Measuring > Physically Run a sheet through the machine for the sensor to measure > Accept > Run > Feed. EXAMPLE: Perfect Bind No Hinge: Press the Crease Mode Button >... -
Page 18: Saving/Recalling Custom Jobs
Saving Custom Crease Jobs: Press the Crease Mode Button > Custom > Enter In Distance For each Crease in mm > Save > Select Position to save in 1, 2, 3, or 4. Recalling Custom Crease Jobs: Press the Crease Mode Button > Custom > Recall >... -
Page 19: Batch Counter
Batch Counter: Press the Batch Counter button from the run screen in any mode and it will take you to the Batch Count Screen. Press the Enter Batch Amount Button to enter in the number you want to run per batch. Press the Reset Batch Button to start from 0. -
Page 20: Setting The Automatic Feeder
SETTING THE AUTOMATIC FEEDER For efficient Auto-feeding, the setting of the caliper to the vacuum wheel is very important. Use a piece of the stock to be run as a “feeler gauge”. Place a sheet under the feed wheels, turn the feed wheel adjustment screw (Counterclockwise to raise, clockwise to lower) so that the paper can slip freely under the wheels. -
Page 21: Loading The Feeder
LOADING THE FEEDER Take the paper and load the feed tray. DO NOT OVER LOAD. The weight and size for the stock you are running will determine how much can be loaded in the feed rails. The paper should sit snug between the caliper and back stop. Do not pinch the paper as it will affect the feeding consistency. -
Page 22: Checking The Sensor
CHECKING THE SENSORS 1. Turn machine power on and allow screen to turn on 2. There should be 2 lights on the sensor; a green indicating power is getting to the sensor and orange that is the reflecting signal. If both lights are not on there is a problem and must be fixed before you are able to run. -
Page 23: Removing The Perf Shaft To Change Configurations
REMOVING THE PERF SHAFT (Changing the position of the lower assemblies) Turn the power off and unplug the machine. You may want to remove the upper assemblies before you begin to get them out of the way as the rollers are spring loaded and will give pressure on the lower rollers. -
Page 24: Perforating And Setting Perf Blade
PERFORATING AND SCORING Your Accucreaser Touch will come equipped with 1 Perf and 1 Score assembly standard. Up to 4 perf or score assemblies can be used at the same time. Perf and Score assemblies require the corresponding Perf or Score lower hub assembly in order to function properly. - Page 25 Setting the Perf Blade When locating the perf blade to where you would like to perf you must make sure that you can move the lower assembly and upper assembly to the location you want to perf. This may require moving the rubber gripper wheels or other upper and lower assemblies.
-
Page 26: Scoring And Setting Score Blade
SCORING Just as in setting the perforation on your machine setting the score may require you to move around gripper wheels and other assemblies in order to set up your score in the proper location. The score upper assembly will look similar to the perf upper assembly without a safety guard covering the blade. -
Page 27: Folding Direction Of Paper
FOLDING DIRECTION OF PAPER There is a correct and incorrect way to fold a creased paper. Following the diagram below will show you the correct direction the paper should be folded. CHANGING THE LOWER CREASE DIE The Lower crease die can easily be changed to accommodate thicker stocks by removing the non-operator side cover, slide the bar out and flip it over to use the wider die channel. -
Page 28: Troubleshooting
TROUBLE SHOOTING POWER DOES NOT TURN ON • 1. Check circuit breaker on rear panel. 2. Check outlet for power. TRANSPORT “LOCKS UP” AFTER CREASING • 1. Turn the crease bar over to wide groove. 2. Increase pressure of forwarding rollers by turn the shaft clockwise to increase the pressure. - Page 29 COUNT print finishing equipment is a product of Martin Yale Industries, LLC. 251 Wedcor Avenue, Wabash, Indiana 46992 260-563-0641 | Fax: 260-563-4575 | www.martinyale.com Rev. 2 1/2019...
Need help?
Do you have a question about the Count AccuCreaser and is the answer not in the manual?
Questions and answers