
Summary of Contents for helvenco AERO 1000
- Page 1 Owners manual Version 1.4/2019 This version replaces the previous versions with lower numbers. helvenco AG Buchmattstrasse 46, 3400 Burgdorf, Switzerland www.helvenco.com info@helvenco.com / +41 34 426 66 66...
- Page 2 Index Page Important terms System installation System dimensions Engine preparation Wiring diagram Fuel pump installation 12-14 Exchange of PTO pulley Clutch drum position 16-18 Exchange of propeller pulley Belt tension 20-21 EFI installation guide 22-23 Start-up 24-25 Maintenance & Oil change Speed Conversion table &...
-
Page 3: Important Terms
AG doesn’t assume any responsibility for damages caused by poor servicing or wrong assembly. Any modification on the standard AERO product made by any party other than helvenco AG can make the product dangerous to be used and is on own risk. -
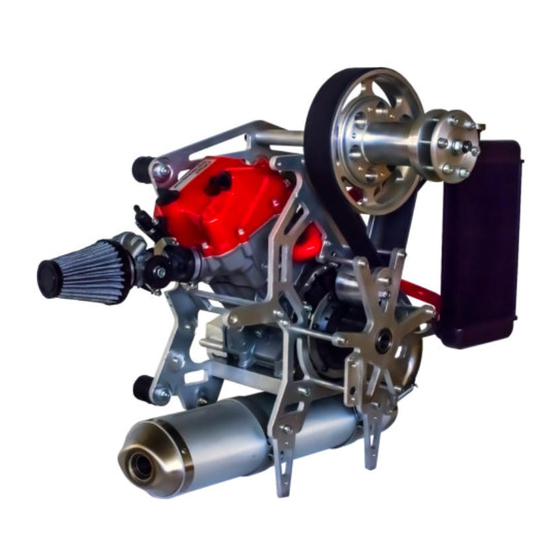
Page 4: System Installation
System installation The system comes with 8 pre-installed silent blocks on the front plate. These are the fixation points to install the AERO1000 system on your vehicle! You can change the position of the silent blocks on the front plate. Below you find the dimension sheet! The OEM must use an optional backup system (Ex. -
Page 5: System Dimensions
System dimensions... -
Page 6: Engine Preparation
Engine preparation Remove all plugs: -Intake port -Exhaust port -Breather tube... - Page 7 Engine preparation Place the system on the table as shown. Install the 2 feet and the exhaust manifold. Screw on the 2 self-locking M6 nuts. Just tighten them a little bit so you can still turn the manifold by hand. Tighten them correctly after installation of the exhaust muffler.
- Page 8 Engine preparation Install the exhaust muffler. Connect the 2 cradles with the silent blocks below the engine mounts and push the manifold into the exhaust muffler. Tighten all 4x M6 lock-nuts Add the 2 exhaust springs Finally tighten the 2 M6 lock-nuts at the engine exhaust port.
- Page 9 Engine preparation Install the other 2 feet. Now you can place the engine upright. Once the engine is installed on the frame you can remove the feet. We have prepared installation points for the start/stop switch, the starter relais and the ECU. You see them on the photos above. They are not installed! Depending to the installation setup you have the choice to go to our positions or to your own installation.
-
Page 10: Wiring Diagram
Wiring diagram... -
Page 11: Fuel Pump Installation
Fuel pump installation The fuel pump isn’t self-bleeding! Pump and all fuel hoses must be filled with fuel before running. Else the pump gets damaged. The pump must be installed below the fuel tank in the shown orientation! To avoid engine stall, Port C must be higher or equal level with Port B! Only use the quick release connectors that came along with the fuel pump. - Page 12 Exchange of PTO pulley Unbolt the M8 self-locking nut (Don’t remove) Remove the M8 self-locking nut at the back of engine back plate.
- Page 13 Exchange of PTO pulley Release the belt tension by moving the belt tensioner lever. Remove the circlip and the distance shim from the PTO shaft. Remove all 6x M6 screws from the PTO support plate. ATTENTION! Hold the distance sleeves when remove the 6x M6 screws else the will drop! At re-installation of the PTO plate:...
- Page 14 Exchange of PTO pulley Remove the circlip and the distance shim from the PTO shaft. Remove the pulley and add the new one. ATTENTION! For correct belt alignment mount the offset at the pulley to engine side. Always put anti-seize grease copper grease on the PTO shaft before adding the pulley and PTO...
- Page 15 Clutch drum position For correct alignment of the clutch drum use a screw driver and pull out the PTO shaft as shown. It should easily move ± 0,5mm / 0,02 inches. Now you can add the distance shim and the circlip.
- Page 16 Exchange of propeller pulley Remove the clip, unbolt the M12 self- locking nut. Remove washer and the black pressure bush. Now it is possible to remove the complete propeller hub from the shaft by pulling.
- Page 17 Exchange of propeller pulley Remove the circlip and the distance shim on the back of the propeller hub. Attention! Circlip is curved; the circlip must give an axial force to the shim! (If wrong assembled the circlip is loose) Push the propeller pulley away from the hub.
- Page 18 Exchange of propeller pulley Push the propeller hub back on the propeller shaft. Use white grease to lubricate the inner ring of the oil seal before mounting. ATTENTION: Don’t forget to install the black distance sleeve into the hub before adding the shim and the M12 self- locking nut.
-
Page 19: Belt Tension
Belt tension Place the M8 self-locking nut at the back of engine back plate. Don’t tighten it yet. Use a screw driver and place it into the tensioner lever as shown. Push the lever down to tighten the belt. (The tension is OK when the belt in the center between both pulleys can be twisted between 90°... - Page 20 EFI installation guide Push the throttle body on the intake port and tighten the clamp. (Use the clamp from the carb rubber) Put on the air filter on the throttle body and use the supplied hose to connect the engine breather tube with the air filter.
- Page 21 EFI installation guide Connect the generator stator to the wiring harness. It’s absolutely necessary to have a full equipped generator containing all 16 magnets. (Otherwise the battery will not charge what will cause the engine to stop) Connect the injector nozzle, throttle position sensor, MAP sensor and the ignition coil to the wiring loom.
- Page 22 Start-up OIL: Fill in 0,9l / 0,23 gal Break-in: helvenco W-001 racing oil 0W30 Note: To avoid overfill, it is better to start with 0,7l / 0,18 gal and add oil after first idle run when necessary. See service plan...
- Page 23 Start-up Slightly too much oil in the engine isn’t a problem; in this case the engine will eject some oil by the breather tube into the air filter. Although excess amounts of oil must be removed! Practical: if the oil is hot, the oil level should never pass the upper edge of the oil inspection glass.
-
Page 24: Maintenance & Oil Change
Maintenance & Oil change The maintenance of the ’’AERO1000” is substantial for the lifespan of it. If maintenance is carried out incorrectly or insufficiently the longevity of the engine might be reduced; therefore a basic mechanic knowledge is required. So if there are points which are not clear, always contact your local dealer. 1. - Page 25 Check the condition of the exhaust system (springs and • cradles) • Oil change ZDDP rich (break-in) oil type helvenco W-001 • Oil change 0,9l Mobil1 FS 0W-40 full synthetic engine oil Oil filter cleaning •...
- Page 26 Speed Conversion table Engine rpm Aera of maximum Propeller pulley PTO pulley Ratio 7000 7500 8000 8500 9000 9500 10000 Torque 4,20 1667 1786 1905 2024 2143 2262 2381 52,5 4,00 1750 1875 2000 2125 2250 2375 2500 3,82 1833 1964 2095 2226 2357 2488 2619 58,25 3,61...
- Page 27 AG. (So even if it ran only 10 minutes, past 6 months goodwill requests will be invalid). Once the goodwill request is accepted we can go to the next step. Here it must be clear that only helvenco AG is authorised to recognize an assembling or material defect and this in all cases.
- Page 28 Signature: Dealer: Engine number: This document must be sent to helvenco AG within 5 days following the date of purchase. By absence of this act, no goodwill or warranty request will be granted. helvenco AG, Buchmattstrasse 46, 3400 Burgdorf, Switzerland Phone.
Need help?
Do you have a question about the AERO 1000 and is the answer not in the manual?
Questions and answers
what anti freeze to use? mixture 50/50?