Table of Contents
Advertisement
Quick Links
Advertisement
Table of Contents

Related Manuals for DeFelsko PosiTector RTR Series

Summary of Contents for DeFelsko PosiTector RTR Series
- Page 1 Replica Tape Reader Full Guide v. 1.2...
-
Page 2: Table Of Contents
Table of Contents Table of Contents Introduction ............Quick Start ............PosiTector Body ..........Probes ..............Certification ............Press-O-Film Replica Tape ......... How to Measure ..........Cleaning the Probe Opening (Anvils) ....12 Calibration & Verification of Accuracy ....13 Menu Operation .......... - Page 3 Memory Management ......... 22 Standard Models ........... 22 Advanced Models .......... 23 Annotate ............24 Display ............25 Summaries ............. 26 Screen Capture ..........26 Save SDF ............27 Accessing Stored Measurement Data ....28 PosiSoft.net ............ 28 PosiSoft 4.0 Desktop Software ...... 28 PosiTector App ..........
-
Page 4: Introduction
Introduction Introduction The PosiTector Replica Tape Reader (RTR) is a hand-held electronic instrument that measures burnished Testex Press-O- Film replica tape to produce peak-to-valley surface profile height measurements. It consists of a PosiTector body (Standard or Advanced) and probe (RTR-H or RTR-P) PosiTector RTR-P models also measure peak density (P Advanced RTR-P models generate 2D/3D images and SDF Surface Data Files. -
Page 5: Quick Start
Quick Start Quick Start The PosiTector RTR powers-up when the center navigation button is pressed. To preserve battery life, the Gage powers down after approximately 5 minutes of no activity. All settings are retained. NOTE: To ensure best accuracy, the user will be prompted to zero the probe every time the Gage is powered-up. -
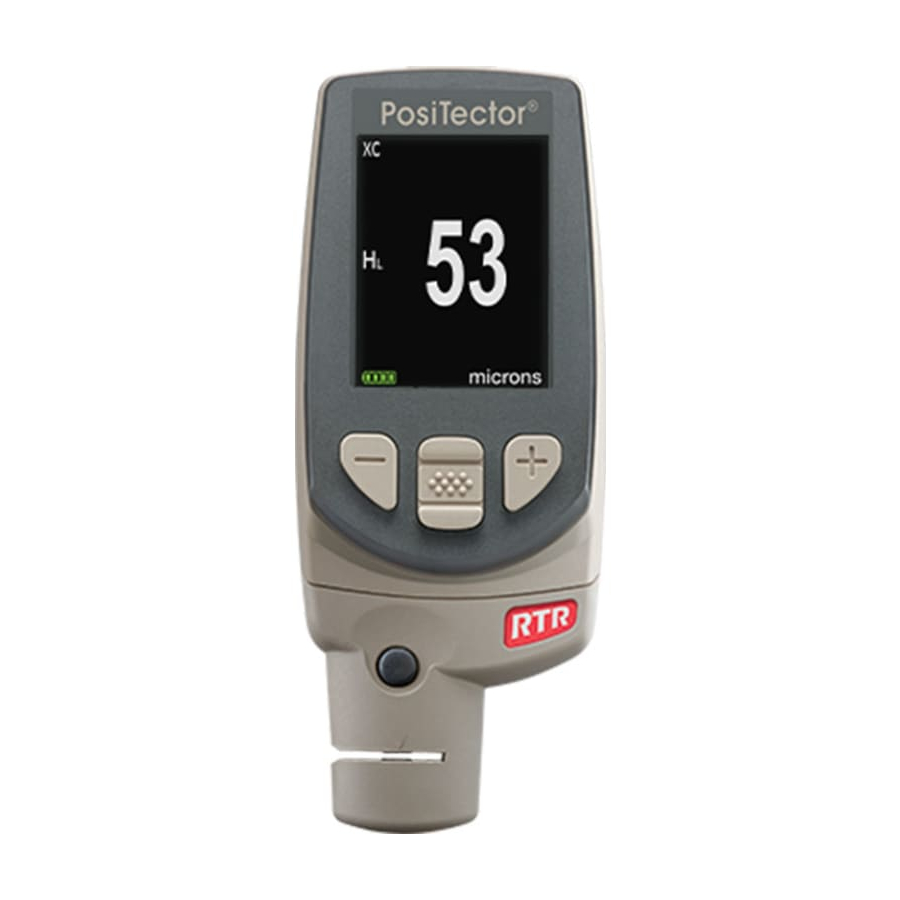
Page 6: Positector Body
PosiTector body PosiTector body PosiTector bodies accept all interchangeable probes including surface profile (RTR/SPG), coating thickness (6000/200), environmental (DPM), Shore Hardness (SHD), soluble salt (SST), and ultrasonic wall thickness (UTG) probes. USB Port connected probe type is displayed during Display power-up probe connector Updates: Keep your PosiTector current with software updates... -
Page 7: Probes
The PosiTector body accepts a wide variety of probe types including magnetic, eddy current and ultrasonic coating thickness, surface profile, Shore hardness durometer, salt contamination and ultrasonic wall thickness probes. See www.defelsko.com/probes PosiTector bodies accept all PosiTector DPM, 6000, 200, SPG, RTR, SST, SHD and UTG probes... -
Page 8: Certification
PosiTector RTR probes include a Certificate of Calibration. For organizations with re-certification requirements, instruments may be returned at regular intervals for calibration. DeFelsko recommends that customers establish calibration intervals based upon their own experience and work environment. Based on our product knowledge, data and customer feedback, a one year calibration interval from either the date of calibration, date of purchase, or date of receipt is a typical starting point. - Page 9 Why is surface profle measurement important? Steel surfaces are frequently cleaned by abrasive impact prior to the application of protective coatings. The resultant surface profile must be accurately assessed to ensure compliance with job or contract specifications. In the protective coatings industry, replica tape is widely used for quantifying surface profile.
-
Page 10: Press-O-Film Replica Tape
Press-O-Film Replica Tape Press-O-Film Replica Tape Press-O-Film provides a simple way to obtain an impression of a surface for analysis. It consists of a layer of crushable plastic micro foam affixed 50.8 µm mil) incompressible polyester film. When compressed against a roughened surface, the foam collapses and acquires an accurate impression, or reverse replica, of the surface. -
Page 11: How To Measure
4. Measure Prepare the test surface Locate a representative site for measurement. Clean the surface to be tested. DeFelsko recommends the use of the included putty to remove dust, debris, or residual blast media from the surface. Firmly press the putty onto the surface using your fingers, and remove. - Page 12 Prepare the Gage With the Gage powered-down, clean the measurement surfaces using the included cleaning card. Swipe the card through the opening a few times while firmly pressing both probe buttons to remove dust particles and residual tape adhesive. NOTE: Cleaning the anvils (pg.
- Page 13 Measure Insert the burnished replica tape into the measurement opening. Ensure the tape is properly positioned so that the burnished region is centered within the opening in the probe with the adhesive (sticky) side down. To position the tape, move the tape to the back of the probe and align the two dots (printed on replica tape) with arrows on both sides of the measurement opening.
- Page 14 PosiTector RTR-P models It is important to clean the anvils before each measurement when obtaining peak density (P ) and generating surface images. 1. Ensure tape is properly positioned. a) Firmly press both probe buttons simultaneously and hold until the Gage beeps and the arrows point outward. b) Remove your fingers from the tape and release both probe buttons (do not hold or remove tape from the gage).
-
Page 15: Cleaning The Probe Opening (Anvils)
Cleaning the probe opening (anvils) The probe contains two measuring surfaces (anvils) that can become contaminated with dust particles and residual tape adhesive. It is therefore recommended to clean the probe regularly with the included cleaning card. Cleaning is essential prior to performing a probe zero (pg. -
Page 16: Calibration & Verification Of Accuracy
Calibration & Verification of Accuracy Calibration & Verification of Accuracy Calibration Gage calibration is typically performed by the manufacturer or accredited lab. All probes include a Certificate of Calibration. Verification of Accuracy Ensure that the probe has been cleaned with the included cleaning card (pg. -
Page 17: Menu Operation
Menu Operation Menu Operation Gage functions are menu controlled. To access the Menu, power-up the Gage, then press the center navigation button. Below is a sample menu for a PosiTector RTR H Advanced model: Some buttons have a tick box to their right to indicate current status. -
Page 18: Cal Settings Menu
Cal Settings Menu Cal Settings Menu Zero The probe should be zeroed regularly to ensure best accuracy. While the user will be required to zero the probe every time the Gage is powered-up. The Zero menu item allows the procedure to be performed at more regular intervals. -
Page 19: Linearize
Linearize This is the default measurement mode. Linearize mode is ON when this box is ticked and the "H " appears on the display. An undesirable characteristic of replica tape is that measurements made with analog spring micrometers are most accurate near the middle of each grade's range and least accurate at the outer ends of each grade's range. -
Page 20: Setup Menu
During measurement, if the linearized measurement falls outside of the selected tape grade's range, the Gage will suggest a more suitable tape grade to perform the measurement. Setup Menu Setup Menu Reset Reset (menu reset) restores factory settings and returns the Gage to a known condition. -
Page 21: Gage Info
Gage Info Displays gage body/probe details including serial numbers, PosiSoft.net registration key, remaining memory capacity for storage of readings, date and time and software packages. For security purposes, the serial number and registration key are required to add the Gage to your PosiSoft.net account. Peak Density (RTR-P only) When selected, the Gage will measure and display peak density... - Page 22 NOTE: Cleaning the anvils is especially important when using the PosiTector RTR-P to measure peak density (P ) and generate surface images. (RTR-P Advanced models only) Displays a two-dimensional (2D) black and white image of the replicated surface. When Memory is on, this thumbnail image is stored with each reading for inclusion into inspection reports.
- Page 23 Below is an example of a PosiTector generated SDF opened in Gwyddion - a free and open source software image rendering software. www.gwyddion.net Garnet 30/60 Grit blast cleaned surface More examples are available at: www.defelsko.com/rtr/rtr_surface_data_file.htm SDF Specifications Range: 125 um Field of view: 4x4 mm Image size: 1024x1024x12bit Lateral sampling interval: 3.8 um...
-
Page 24: Sound
The battery state indicator icon is calibrated for the selected battery type. No damage will occur if the wrong battery type is selected. NOTE: DeFelsko recommends the use of eneloop (NiMH) rechargeable batteries. Language Converts displayed and printed words to the selected language. -
Page 25: Memory Management
Memory Management Memory Management The PosiTector RTR has internal memory storage for recording measurement data. Stored measurements can be reviewed on-screen or accessed via computers, tablets and smart phones. Measurements are date and time-stamped. Button functions with Memory ON: Create a new batch Scroll through display (Advanced only) modes (Advanced only) -
Page 26: Advanced Models
Advanced models store 100,000 readings in up to 1,000 batches. 2D/3D images are stored if checked within the Setup menu. The Memory Menu includes the following options... New Batch Closes any currently opened batch and creates a new batch name using the lowest available number. -
Page 27: Annotate
Delete Removes a batch completely from memory. The name is deleted and all measurements are erased. View Scroll using the Up or Down buttons through information, statistical summary, and a list of each reading in the currently opened batch. Press to exit. -
Page 29: Display
(Advanced models only) Displays a summary of all stored batches including the name, probe type, number of readings and type. In the following example, Batch 3 (B3) indicates an “F” 6000 coating thickness probe was used to record a total of “6” readings in “PA2” mode. S c r e e n C a p t u r e Press both (-)(+) buttons at any time to capture and save an... -
Page 30: Save Sdf
Save SDF (RTR-P Advanced models only) Stores a Surface Data File (SDF) to the USB Drive. This provides a means to perform a more detailed analysis of the surface using third party image rendering/analysis software such as Gwyddion or MountainsMap. Select Save SDF within the Memory menu. -
Page 31: Accessing Stored Measurement Data
Accessing Stored Measurement Data Accessing Stored Measurement Data DeFelsko offers the following free solutions for viewing, analyzing and reporting data: PosiSoft USB Drive - Connect the Gage to a PC/Mac using the supplied USB cable. View and print readings and graphs using universal PC/Mac web browsers or file explorers. -
Page 32: Connect Menu
(Advanced models only) Allows connection to your local wireless network or mobile hot spot. Ideal for using your network’s internet connection for synchronizing stored measurements with PosiSoft.net (pg.28). See www.defelsko.com/wifi Enable Turns WiFi functionality ON. When selected, the icon will appear on the display. - Page 33 The PosiTector is now visible to all WiFi enabled devices. Simply connect your devices WiFi to the new PosiTector Access point. All PosiTectors are uniquely identified by their respective gage body serial numbers. AP Channel - Default Channel: 6 For most users the default channel will not have to be altered. If you are experiencing poor connection or are unable to connect, try another channel.
-
Page 34: Usb
Advanced gage bodies have the ability to serial stream live readings from the USB port The following document links will help operators use this feature: PosiTector Advanced USB Serial Streaming Instructions -- http://www.defelsko.com/usb/PosiTectorAdvanced-USBserial.pdf Required driver (referenced in above document) -- http://www.defelsko.com/usb/gserial.zip Retrieving stored screen captures: The last 10 screen captures stored in memory can be accessed by navi- gating to the “screen capture”... -
Page 35: Sync.net Now
Sync .net Now The below WiFi, USB and Bluetooth menus contain a Sync .net Now option. When selected, the Gage immediately synchronizes stored measurement data via its respective communication method (internet connection required). Alternatively, select Auto Sync .net from within the USB connect menu to automatically synchronize upon connection to a PC. -
Page 36: Bluetooth
Allows individual readings to be sent to a computer, printer or compatible device as they are taken using Bluetooth wireless technology. See www.defelsko.com/bluetooth Pairing The instrument and receiving device must be paired before stored or streamed datasets can be transmitted. For pairing instructions, see http://www.defelsko.com/bluetooth... -
Page 37: Updates
Updates Determines if a software update is available for your Gage. If an update is available, a prompt will appear allowing the user to choose to perform the update at this time or not. To perform an update the Gage must be connected to an internet connected computer with PosiSoft Desktop (pg. - Page 38 Begin by entering the Connect > Bluetooth menu. Turn Bluetooth PosiTector “Pair” printer. See: www.defelsko.com/bluetooth Streaming: In the Connect > Bluetooth menu, select the Stream tick box. All readings will now be simultaneously displayed on the LCD and sent to the printer.
-
Page 39: Technical Data
Technical Data Technical Data Conforms to: ASTM D4417, ISO 8503-5, NACE RP0287, SSPC-PA 17, SP6, SP10, SP11-87T and others Weight: (without batteries) Measuring Range: 140 g (4.9 oz) 20 – 115 um (0.8 – 4.5 mils) Resolution: Accuracy (H): 1 um (0.1 mil) +/- 5 um (+/- 0.2 mil) Temperature Range: Anvil Pressure:... -
Page 40: Returning For Service
Limited Warranty, Sole Remedy Limited Warranty, Sole Remedy and Limited Liability and Limited Liability DeFelsko's sole warranty, remedy, and liability are the express limited warranty, remedy, and limited liability that are set forth on its website: www.defelsko.com/terms...
Need help?
Do you have a question about the PosiTector RTR Series and is the answer not in the manual?
Questions and answers