
Summary of Contents for UFactory Vision Camera Kit
- Page 1 Vision Camera Kit Us er Guida nce S H E N Z H E N U F A C T O R Y C O . , LT D . V 2 . 2...
-
Page 2: Table Of Contents
Contents Vision Kit User Manual 1 List of Materials 1.1 Hardware 1.2 Software 2 System structure 3 Installation Tutorial 3.1 Hardware Installation Tutorial 3.1.1 Kit Installation Tutorial 3.1.2 Wiring Tutorial 3.2 Software Installation Tutorial 3.2.1 uArm controller & firmware writing tutorial 3.2.2 uArm swift pro Firmware Recovery 3.3 OpenMv tracking code writing 3.3.1 Adjusting Tracking Color... -
Page 3: Vision Kit User Manual
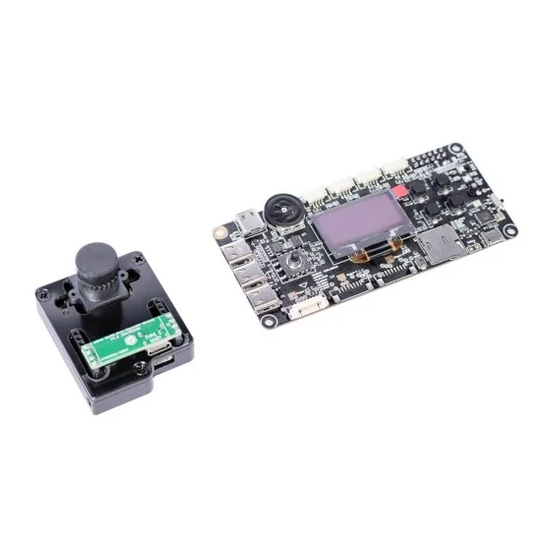
Vision Kit User Manual 1 List of Materials 1.1 Hardware 1.Target object * 3 2.USB cable *1 3.USB Type C cable*2 4.uArm 30P bottom expansion board * 1 6.DC Power Supply 3-in-1 cable * 1 5.OpenMv Kit* 1 7.OpenMv mounting bracket (with M3 screws)*1 8.uArm Controller* 1 1.2 Software 1.Arduino IDE... -
Page 4: System Structure
2. System Structure OpenMv USART2 uArm Swift Pro uArm controller 3 Installation Tutorial 3.1 Hardware installation tutorial 3.1.1 Visual Kit Installation Tutorial 1 Attach the vacuum cup to the arm. 2 Attach the OpenMv mounting bracket to the end of the arm with M3 screws as shown below . OpenMv mounting bracket M3 screws... - Page 5 3.Tighten the screws on the end of the uArm by hand.
-
Page 6: Wiring Tutorial
3.1.2 Wiring Tutorial Wiring as shown below Open Mv uArm Controller Power Cable uArm Power Cable 3.2 Software installation tutorial 3.2.1 uArm controller & uArm swift pro firmware writing tutorial uArm Controller firmware writing The uArm Controller firmware has been written before leaving the factory. To rewrite the firmware, please refer to the following steps. - Page 7 (3) Download XLoader xloader.russemotto.com/ (4) Download the hex-controller-vision.ino.hex http://bit.ly/2NPbOY1 click the link http://bit.ly/2XCfh0C to learn how to download single directory from GitHub. (5) Open XLoader and select your controller's COM port from the drop down menu on the lower left. (6)...
-
Page 8: Uarm Swift Pro Firmware Recovery
Studio. If you want to control uArm with the uArm Studio, please restore the firmware as follows: Connect uArm Swift Pro to your computer, open XLoader ( ), and load http://xloader.russemotto.com/ SWIFTPRO3.2.0.hex ( ). Click the http://download.ufactory.cc/firmware/SWIFTPRO3.2.0.hex?attname= "Upload" button to upload the code to uArm Swift Pro. -
Page 9: Openmv Tracking Code Writing
3.3 OpenMv tracking code writing All OpenMv Kits have been written with the tracking code before leaving the factory. If you need to rewrite the tracking code, please refer to the following steps. (1) Download OpenMv tracking code Open the color_tracking_test.py https://bit.ly/2Ea18Mq (2) Connect OpenMv to the computer with a USB cable USB MICRO... - Page 10 (4) Rotate the OpenMv lens to adjust the focal length (5) Save the code to OpenMv...
-
Page 11: Adjusting Tracking Color
3.3.1 Adjusting the Tracking color The current code tracks the red cube by default, and the color to be tracked can be adjusted according to actual needs. The adjustment method is as follows: Char color_sel=0, tracking yellow objects; Char color_sel=1, tracking red objects; Char color_sel=2, track green objects. - Page 12 Click button A to enter the mode selection interface. buttonA: redcude buttonB:greencube buttonC:yellowcube buttonD:offsetmode buttonA-C is the selection of the grip module, corresponding to different color squares, but- tonD is the offset setting mode. After confirming the desired color of the object, click the cor- responding button to enter the grip mode.
- Page 13 When an object is found, oled will enter the grip mode and display the locations of x and y. handing cube x: 134 y: 65 buttonD:choose cube If you find that the gripping location of uArm grab is inconsistent with the placement location, you can adjust the offset metric with the joystick in the offset mode.Hold down the button D until the oled displays the following picture and then enter offset mode offest mode...
- Page 14 If the object is behind the suction cup when grabbing, adjust the camera up. If the object is in front of the suction cup when grabbing, adjust the camera down. Old Visual Camera Kit User Manual: http://bit.ly/uArmVisionCameraKitENv1-7...
- Page 15 Ufactoty2013 UFACTORY_UF UFACTORY w ww.ufactor y.cc Website: Em ai l : in fo@u factor y.cc Ad dress: 2F, B uil ding M-6, Ma Qu e Li n g I n du s tri al Z on e , Nan shan Dis trict, Shenz h en , G u a ng do n g, P.R . Ch i n a...
Need help?
Do you have a question about the Vision Camera Kit and is the answer not in the manual?
Questions and answers