
Related Manuals for SND ACME-4

Summary of Contents for SND ACME-4
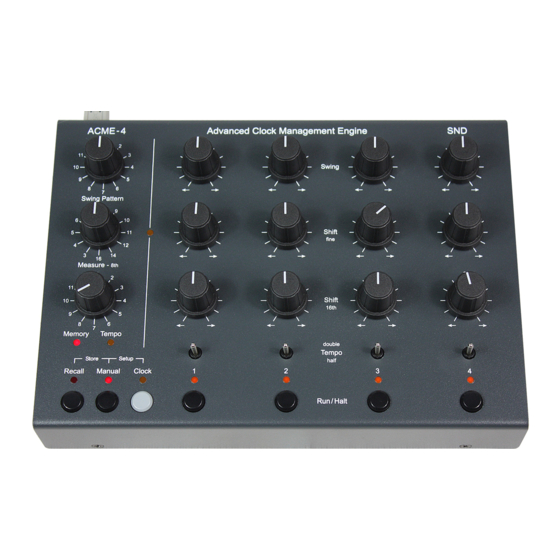
- Page 1 ACME-4 Advanced Clock Management Engine operating instructions August 2nd, 2015...
-
Page 2: Table Of Contents
Contents 1 Introduction 2 Quick Reference 3 Connections 3.1 Inputs ..........3.1.1 USB / Power . - Page 3 Contents 8.3.2 Permanent Offset ........8.3.3 MPC Mode .
-
Page 4: Introduction
In order to implement all these functions in real-time, clock signals have to be “tiwsted” massively. Some of the many devices that can be connected to the ACME-4 can handle more “clock twisting” than others. The editor software allows adjusting some parameters of the ACME-4 to match the limits of the devices connected. -
Page 5: Quick Reference
2 Quick Reference If you can’t wait to get your new ACME-4 going this is the place to start. Clicking on the keywords will lead you to more detailed information. First you have to connect a power source to the ACME-4. Then you have to decide on a clock source. -
Page 6: Connections
3.1 Inputs 3.1.1 USB / Power The ACME-4 is powered through its USB port. Its consumption is fairly low, so going through a USB hub is not a problem. When connected to a computer the USB port also allows communcation between both devices. -
Page 7: Outputs
Note! DIN-sync and analog clocks - unlike Midi connections - do not provide what is called “galvanic separation” between devices, and thus are prone to cause ground loops. In the ACME-4 special provisions have been made to prevent that from happening. -
Page 8: Master Section
4 Master Section The master section on the left side of the ACME-4 contains all the controls that are common to all clock channels. Here one selects the swing pattern, the measure, the operating mode, and controls internal clock generator. -
Page 9: Measure
4.2 Measure This control is used to select the measure, which needs to be set for the ACME-4 to start at the right moment. It always starts with a lead-in of one bar, otherwise it would not be possible to shift clock channels ahead in time (sorry, we did not succed in building a time-travel device ...). -
Page 10: Recall
4 Master Section 4.5 Recall The Recall mode is used to store and recall all settings in 12 memory locations. 4.5.1 Store Preset Storing to memory can be done in either manual or recall mode. Select the desired memory location with the Memory/Tempo control, the Recall LED will flash. -
Page 11: Setup
Recall. Note! After leaving the setup mode the ACME-4 is always in manual mode. Make sure the all the Shift fine controls are returned to their center positions, unless you wish to shift a channel in... -
Page 12: Latency Compensation
4.6.1 Latency Compensation For all slaves connected to the ACME-4 to be right “on top of each other” when their Shift fine controls are set to zero, the setup mode allows to select a permanent offset for each clock channel. When in setup mode the Shift fine controls are used to set this offset within a range of +/- 30mS. -
Page 13: Clock Sources
5.1 Analog Clock Input At its audio input the ACME-4 expects to see a clock signal based on 16th steps. This signal can come from one of our clock generating plugins or from a special sample file being played by a DAW, both available on our website. -
Page 14: Internal Clock Generator
The internal clock generator is the most accurate of the clock sources. Using a special “catch 22” the ACME-4 is able to generate the internal clock without any jitter at all. To our knowledge the ACME-4 is the only device in the world to generate 100% jitter-free midi clocks. -
Page 15: Clock Channels
6 Clock Channels 6.1 Swing The Swing controls allow to adjust for each clock channel individually, in which direction and how strong the swing is applied. Turning the control clock-wise will delay all the 16th-steps, that are marked in the swing pattern currently in use. Turning the control ccw will cause these steps to be played earlier. -
Page 16: Shift Fine
6 Clock Channels 6.2 Shift ne The Shift fine controls allow each clock channel to be time-shifted up to a 32nd note in very fine steps. Turning the control clock-wise will delay the channel, turning it ccw will shift it ahead. -
Page 17: Shift 16Th
6 Clock Channels 6.3 Shift 16th The Shift 16th controls allow each clock channel to be time-shifted in 16th-note steps. The max- imum shift range forward (ahead) depends on the selected measure. For mesures below maximum shift forward is one bar. For all other measures the forward range is . -
Page 18: Double / Half Tempo
flashing channel LEDs indicate “armed” channels that will run when the master clock is started. Note! Make sure that the measure of the ACME-4, the master clock source, and all devices con- nected are the same, otherwise channels may be still in sync but off-beat when turned off and on. -
Page 19: Midi
7.1 Midi Interface When connected to a computer the ACME-4 will log in as a USB audio device with 5 Midi output ports and 1 Midi input port. Output ports 1 through 4 correspond to the 4 output channels of the ACME-4. -
Page 20: Editor
first, to be found at www.s-n-d.com/acme- 4/downloads.html. Should the program not find the ACME-4, you will be asked to select the Midi ports yourself. But this should happen only with Windows XP, where the Midi ports of the ACME-4 are not listed by name but show up as USB audio device, unknown vendor. -
Page 21: Swing Pattern Editor
Note! Step 1 cannot be moved by the swing function, and thus cannot be selected. Use Send to transfer the pattern you’ve just edited to the ACME-4 and save it there. Should you change your mind after editing a pattern, you can recouperate the original pattern from the ACME-4 by pressing Receive. -
Page 22: Setup Editor
5. Now stop the ACME-4 and increase the Clock Pulse Width by one. 6. Restart the ACME-4. Should the 2 machines still be out of sync, go back to the step above. Note! Be careful when setting the Clock Pulse Width. With this parameter it is possible to get everything to a point where nothing is in sync anymore. -
Page 23: Permanent Offset
1. Choose the appropriate mode for your sequencer. 8.3.8 Sending and Receiving Setups After having set all parameters press Send to send them to the ACME-4 and store them there. Press Receive to load all setup parameters from the ACME-4 into the editor. This will be done automatically when starting the program. -
Page 24: Appendix
ACME-4 won’t start when using the analog clock input 1. Is the clock cable connected properly? 2. Have you selected the same audio ouput on your clock track as the one the ACME-4 is con- nected to? 3. Is the output level of your clock track high enough? The ACME-4 expects pulses of at least 0.7 volts. -
Page 25: Default Swing Patterns
9 Appendix 9.2 Default Swing Patterns... -
Page 26: Midi Implementation
9 Appendix 9.3 Midi Implementation Function Data Typ Value Swing Channel 1 LSB Controller 0 .. 127 Swing Channel 1 MSB Controller 0 .. 7 Swing Channel 2 LSB Controller 0 .. 127 Swing Channel 2 MSB Controller 0 .. 7 Swing Channel 3 LSB Controller 0 .. - Page 27 9 Appendix Function Data Typ Global Swing Pattern 0 ProgChange Global Swing Pattern 1 ProgChange Global Swing Pattern 2 ProgChange Global Swing Pattern 3 ProgChange Global Swing Pattern 4 ProgChange Global Swing Pattern 5 ProgChange Global Swing Pattern 6 ProgChange Global Swing Pattern 7 ProgChange Global Swing Pattern 8...
-
Page 28: Software Updates
Individual Swing Pat. 12 Ch 4 ProgChange 9.4 Software Updates New firmware can be transfered into the ACME-4 via USB. If you register with an email with “ACME-4 updates” in the subject line you will be automatically informed about software updates as they become available.
Need help?
Do you have a question about the ACME-4 and is the answer not in the manual?
Questions and answers