Advertisement
Quick Links
Advertisement

Related Manuals for NU Skin AGELOC GALVANIC SPA


Summary of Contents for NU Skin AGELOC GALVANIC SPA
- Page 1 ® AGELOC ® GALVANIC SPA ® Owner ’ s Manual...
-
Page 3: Table Of Contents
Table of Contents page Introduction Before You Begin ageLOC Galvanic Spa Contents ® ® ageLOC Galvanic Spa Features ® ® ageLOC Galvanic Spa Display ® ® How To Use Galvanic Spa Facial Gels with ageLOC ® ® Tru Face Line Corrector ®... - Page 4 ® UnLOC visible youth-renewing benefits in 5 minutes or less. ageLOC Galvanic Spa is our most powerful beauty device, designed to help deliver charged treatment products that visibly improve skin. This versatile device, with its interchangeable attachments and unique products, improves the appearance of lines, wrinkles, and radiance;...
-
Page 5: Before You Begin
Galvanic Spa is not intended for use by per- sons (including children) with reduced physical, sen- sory or mental capabilities, or lack of experience and knowledge. -
Page 6: Contents
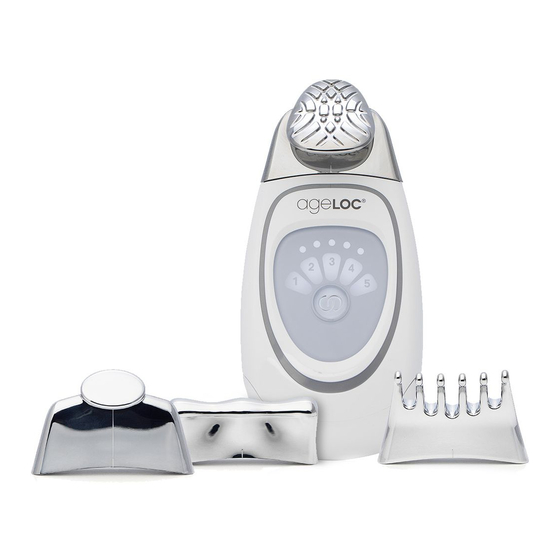
ageLOC Galvanic Spa ® ® Contents Owner ’ s Manual ageLOC Galvanic Spa Device ® ® Quick Start Guide ageLOC Face Conductor ® Spot Treatment Conductor Body Conductor Scalp Conductor Two AAA Batteries ® AGELOC ® GALVANIC SPA ® Owner ’... - Page 7 Treatment products designed for use with ageLOC ® Galvanic Spa ® are sold separately.
-
Page 8: Features
ageLOC Galvanic Spa ® ® Features Conductor Attachment Receptor Conductor Release Button Display Selection Button Chrome Panel Battery Compartment Conductor Positioning Indicator (small etch) Note: Remove protective plastic film from both sides of the device before use. - Page 9 Galvanic Spa Display Numbers 1, 2, 3, 4, or 5 indicate the treatment number and corresponding product (see below). The five dots indicate corresponding treatment length. If the batteries are low, each time the device is turned on an amber battery symbol will appear in the bottom of the display and the device will beep.
-
Page 10: How To Use
’ t connect, make sure it is facing the right direction and is positioned correctly. Don ’ t force the conductor, as this may damage it. ageLOC Galvanic Spa won ’ t work if a conductor head isn ’ t firmly attached. - Page 11 Select Treatment: Press the selection button until the correct treatment number is lit (Figure 3 ) . Activate Galvanic Current: Your fingers must be touching the chrome panel on the back of the device while the conductor Figure 3 touches your skin. We recommend you thoroughly wet your hands with water or NaPCA Moisture Mist to improve conductivity.
- Page 12 Pre-treat Setting Treatment Setting Conductor Use this treatment three-times each week for visibly rejuve- nating results. Preparation: Use after a Nu Skin ® cleanser of your choice. Attach the ageLOC® Face Conductor to the device (Figure 1). GS 1 Figure 1...
- Page 13 4: When your galvanic treatment is step over, the device will emit a long beep followed by two short beeps and auto- matically turn off. Remove any remaining gel from your skin and the device with a damp towel (Figure 4). Now it ’ s time for Figure 4 the treatment phase.
-
Page 14: Tru Face
Use this treatment morning and night to target and soften the appearance of lines and wrinkles around your nose, mouth, eyes, and forehead. GS 3 Preparation: Use after a Nu Skin ® cleanser and toner of your choice. Attach the Spot Treatment Conductor to the device (Figure 1). - Page 15 The device will beep once, twice, or three times to indicate that it has automatically adjusted to your skin. After this, your galvanic treatment has begun, and the device will beep every 10 seconds to indicate the unit is on and working, and every 5 seconds when your treatment is almost complete.
- Page 16 ageLOC Body Shaping Gel ® Setting Conductor Use this treatment three times each week to visibly contour, firm, and smooth skin on arms, legs, abdomen, and buttocks. GS 4 Preparation: Attach the Body Conductor to the device (Figure 1). 1: Use on clean skin. Apply an ample step amount of ageLOC®...
- Page 17 4: When your galvanic treatment step is over, the device will emit a long beep followed by two short beeps and automatically turn off. Repeat steps 1 through 3 for each targeted area. When all treatments are done, remove any remaining product from Figure 4 your skin and the device with a damp towel (Figure 4).
-
Page 18: Ageloc ® Nutriol
ageLOC Nutriol ® ® Intensive Scalp & Hair Serum Setting Conductor Use this effortless ritual morning and night to help invigorate the scalp day after day and make hair look and feel divine. GS 5 Preparation: Use on towel-dried or dry hair. - Page 19 3: Thoroughly wet hands with step NaPCA Moisture Mist or water. Hold the device with a moistened hand while touching the chrome plate on the back. Touch the conductor directly to the scalp and move from the front of your hairline backward, keeping in constant contact with the scalp (Figure 6).
- Page 20 Use this intense, luxurious treatment anytime to give you instantly refreshed, hydrated, visibly renewed, and plump-looking skin. GS 5 Preparation: Use after a Nu Skin ® cleanser and toner of your choice. Attach the ageLOC® Face Conductor to the device (Figure 1).
- Page 21 3: Thoroughly wet hands with NaPCA step Moisture Mist or water. Hold the device with a moistened hand while touching the chrome plate on the back and begin to slowly glide the conductor head over the mask (Figure 7). Figure 7 The device will beep once, twice, or three times to indicate that it has automatically adjusted to your skin.
- Page 22 GS 5 Preparation: Use after a Nu Skin ® cleanser and toner of your choice. Attach the Spot Treatment Conductor to the device (Figure 1).
- Page 23 3: Thoroughly wet hands with NaPCA step Moisture Mist or water. Hold the device with a moistened hand while touching the chrome plate on the back and begin to slowly glide the conductor head over the mask (Figure 6). Figure 6 The device will beep once, twice, or three times to indicate that has automatically adjusted to your skin.
- Page 24 Important Maintenance and Warranty Information Cleaning Your Device and Conductors: After finishing a galvanic treatment, remove the conductor from the device and use a damp cloth to clean off any excess product (Figure 1). Dry the device thoroughly and store in a dry Figure 1 place without a conductor attached.
- Page 25 This warranty does not cover damage to the product as a result of misuse or accident. If the product becomes defective within the two-year warranty period, please call your local Nu Skin office to arrange for a replacement. Protected by US patent numbers 6.766.199; 7.305.269;...
- Page 28 MANUFACTURED BY NSE PRODUCTS, INC. 75 WEST CENTER STREET, PROVO, UT 84601 ©2019 NSE PRODUCTS, INC. NUSKIN.COM 1-800-487-1000 94510858/3...
Need help?
Do you have a question about the AGELOC GALVANIC SPA and is the answer not in the manual?
Questions and answers