Advertisement
Quick Links
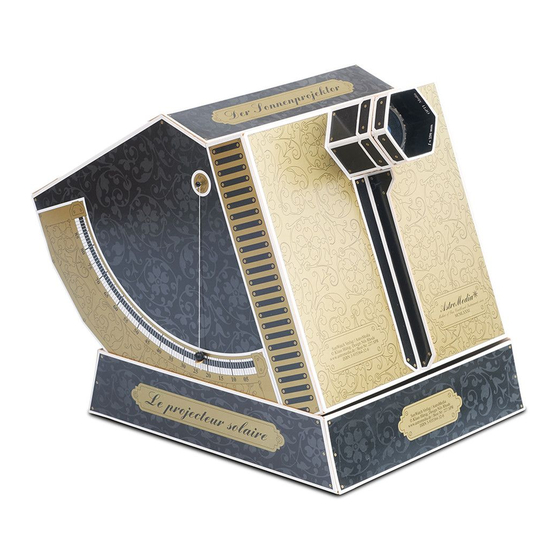
The Solar Projector
Cardboard kit for a projector that allows for safe observation of the Sun.
Two convex mirrors:
f = -10.2mm
f = -14.0mm
Quadrant
Dobson mount
adjustable from 0º to 90º
AstroMedia
KLAUS HÜNIG
Size of the projected image: 55mm or 75mm
Comfortable
observation from
above
Revised Version: Andreas Schröer
©Klaus Hünig / Andreas Schröer, Sunwatch, 23730 Neustadt, Germany
AstroMedia UK -
www.AstroMediaShop.co.uk
227.SPR
Plane mirror
Achromatic lens:
f = 250mm
Variable blinds
Sturdy 275g
cardboard
✵
Advertisement

Subscribe to Our Youtube Channel
Summary of Contents for AstroMedia Solar Projector
- Page 1 227.SPR KLAUS HÜNIG The Solar Projector Cardboard kit for a projector that allows for safe observation of the Sun. Size of the projected image: 55mm or 75mm Comfortable Plane mirror observation from above Achromatic lens: f = 250mm Variable blinds Two convex mirrors: f = -10.2mm...
- Page 2 Read each step from the beginning to the end before commencing and allow yourself a few hours for the construction (depending on experience). The more care you take, the better your Solar Projector will work and look.
- Page 3 Seitenwand [A2] auf die gleich lange Klebe- Objekt The Optical System shape allows the Solar Projector to be set lasche, die sich (von vorne gesehen) rechts this crown of small tags. This is best done letzte Abschnitt der Vorderwand, die Planspie- steht u an der Vorderwand [A3] befindet.
- Page 4 ßen Rückseite unten so auf Ihre Arbeitsfläche, ein Loch in den Mittelpunkt der kleinen Kreise, Innens bottom of the Solar Projector it has to be slip case with the white back side down there is a quadrant, a quarter circle with a...
-
Page 5: Frequently Asked Questions
1. Place the objective in the objective guide and put the cassette in the slipcase. 2. Place the Solar Projector in the Dobsonian base and put it up to the Sun so that the little bright point from the objective hits the convex mirror, somewhat above its centre. - Page 6 Merkur und Venus um die Sonne liegen Kontrast des Bildes. Ähnliche Experimente 7. How can I tell if what Iʼm seeing is a sun spot or a piece of dust in the optical system? Move the Solar Projector a bit nicht gefährlicher als ein Stück sonnen- innerhalb der Bahn der Bahn Erde.
Need help?
Do you have a question about the Solar Projector and is the answer not in the manual?
Questions and answers