Advertisement
Table of Contents
- 1 Table of Contents
- 2 General Safety Instructions
- 3 Your Freestanding Cooker
- 4 Operating Instructions
- 5 Cooking Guidelines
- 6 Cleaning & Maintenance
- 7 Installation Instructions
- 8 Electrical Connection
- 9 Gas Connection
- 10 Attach Your Receipt
- 11 Purchase Details
- 12 Warranty Information
- 13 1300 11 4357 | E. Support@Residentiagroup.com.au
- Download this manual
Advertisement
Table of Contents

Related Manuals for Solt GGSUC907S

Summary of Contents for Solt GGSUC907S
- Page 1 MODEL GGSUC907S V 1.0 | 1020 User Manual 90cm Dual Fuel Freestanding Cooker...
- Page 2 Welcome Congratulations on purchasing your new Freestanding Cooker! The Sôlt brand is proudly distributed within Australia by Residentia Group Pty Ltd. Please refer to the warranty card at the rear of this manual Residentia Group — for information regarding your product’s parts and labour Head Office.
-
Page 3: Table Of Contents
2 Welcome Contents 4 General Safety Instructions 7 Your Freestanding Cooker 10 Operating Instructions 13 Cooking Guidelines 14 Cleaning & Maintenance 21 Installation Instructions 29 Electrical Connection 30 Gas Connection 36 Attach Your Receipt 37 Purchase Details 38 Warranty Information Customer Care Sôlt recommends the use of original spare parts. -
Page 4: General Safety Instructions
General Safety Instructions IMPORTANT SAFETY INSTRUCTIONS • Cables: Do not allow electrical fittings or cables to Read carefully and keep for future reference come into contact with areas on the appliance that gets hot. Read this manual thoroughly before first use, even if •... - Page 5 room or drying clothes. This appliance must not be never line the base of your oven with aluminium foil- used as a space heater. the trapped heat can irreversibly damage the enamel • No external timer: The appliance is not intended and may even cause a fire.
- Page 6 General Safety Instructions (Continued) CAUTION: Hot! DECLARATION OF CONFORMITY • Do not touch hot surfaces: This appliance complies with the following Australian/ The heating elements and other European Directives: accessible parts including inside • 2006/95/CE General regulations / Low tension the oven cavity and on the •...
-
Page 7: Your Freestanding Cooker
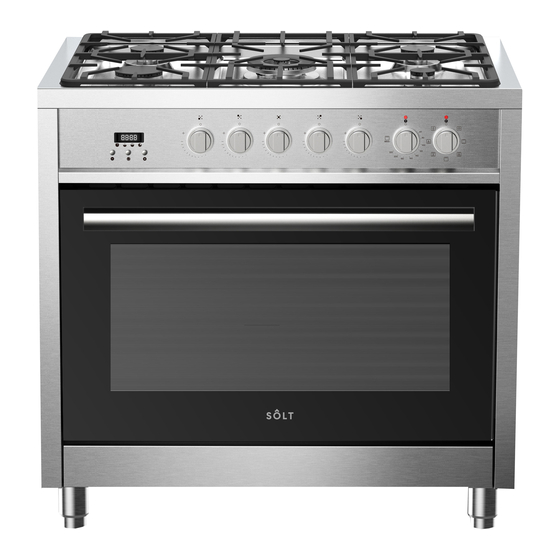
Your Freestanding Cooker GGSUC907S Digital Timer Gas Burner Knobs Oven Function Selector Knob Oven Temperature Knob DIGITAL TIMER PANEL LED Display Plus Button ( + ) Function Button Minus Button ( – ) The images and diagrams in this user manual is for reference only. Your Freestanding Cooker may appear differently. - Page 8 Your Freestanding Cooker (Continued) COOKING FUNCTIONS Light Roast (Fan Grill) This will activate the two internal lights. No heating Fan combined with the upper element and grill elements will be activated. element. This function uses the intense heat from the two upper elements for top browning and the fan to ensure even cooking of the food.
- Page 9 CLOCK/TIMER DISPLAY AND CONTROLS Timer The digital countdown timer can be set up to 23 hours Your freestanding oven features a digital display, 24 hour and 59 minutes. clock/timer, with 3 buttons. The time will be displayed in 24 hours. When power is first connected the screen will To set the timer, press the function button repeatedly display “AUTO”.
-
Page 10: Operating Instructions
Operating Instructions FIRST USE Conditioning the oven It is important to condition your oven before using it IMPORTANT! Before first use: for cooking and baking. Conditioning will burn off any Remove all packaging and protective films manufacturing residues and ensure that you get the best results right from the start. - Page 11 GAS COOKTOP – INSTRUCTIONS FOR USE Description of the main parts of the gas cooktop Cast Iron Trivets Burner Caps Burner Head Flame Spreader Flame Safety Device DESCRIPTION OF SYMBOLS Description of the burner areas of the gas cooktop Front Left Burner Middle Wok Burner Front Right Burner Rear Left Burner...
- Page 12 Operating Instructions (Continued) IGNITION AND OPERATION OF THE BURNERS For correct use of the cooktop To light the burner, press the control knob fully down and For lower gas consumption and better efficiency, use hold the knob down before rotating anti-clockwise to only flat bottomed pans of dimensions suitable for the the High Flame position.
-
Page 13: Cooking Guidelines
Cooking Guidelines Baking Grilling • For best results when baking, always preheat your • This is a healthier alternative to frying. oven to the desired temperature. The temperature • Always grill with the oven door completely shut. indicator light will switch off to indicate that the set •... -
Page 14: Cleaning & Maintenance
Cleaning & Maintenance Important! Cleaning Don'ts Do not use steam cleaners on your appliance. • Do not use aerosol cleaners until the cooker has completely cooled. The propellant substance in these Important! cleaners could catch fire in the presence of heat. Before any cleaning or maintenance operation, use the •... - Page 15 Cleaning Chart Component / Part Cleaning Method Important Notes • Always read the label to make 1. Soften any stubborn stains under sure your stainless steel cleaner a hot soapy cloth. does not contain chlorine 2. Clean with a solution of mild Door frame exterior, compounds as these are corrosive detergent and hot water, then...
- Page 16 Cleaning & Maintenance (Continued) Cleaning Chart (Continued) Component / Part Cleaning Method Important Notes Do not clean these parts. Grill elements — They self-clean during normal use. • Do not use oven cleaners or any other harsh/abrasive cleaners, cloths, scouring pads, steel wool or sharp metal scrapers to clean the oven door glass.
- Page 17 Cleaning Chart (Continued) Component / Part Cleaning Method Important Notes 1. Check that the burner is turned • Keep the notches of the flame OFF and allow it to cool. spreaders clear. Soiling may clog 2. Lift off the burner cap and brass these and cause ignition problems.
- Page 18 18 page 18 page Cleaning & Maintenance (Continued) How to remove the side racks Check the oven is cool and switched off. Removing the oven door Removing the chrome side racks Open the oven door. Important! Switch the oven off at the isolating switch Important! Switch the oven off at the isolating switch Remove all shelves for either the oven (Fig.
- Page 19 Cleaning the burner parts Replacing the burner parts • You can remove and clean these parts with hot • Carefully replace the burner parts as per the soapy water or non-abrasive detergents. Clean spills following illustrations. regularly before they become burnt on. Do not wash •...
- Page 20 Cleaning & Maintenance (Continued) If a burner does not light Replacing an oven bulb Turn the control dial to O (OFF) and wait at Important! Use a 25W, 220-240V 50Hz least one minute before trying again, to all the E14 halogen bulb for replacement. Do not use gas to disperse.
-
Page 21: Installation Instructions
Installation Instructions PRIOR TO INSTALLATION Unpacking and product handling • Thoroughly inspect the freestanding oven to ensure there is no damage from shipping or moving. If any damage is detected, please call the shipper and initiate a damage claim. The distributor of InAlto is not responsible for any shipping damage. •... - Page 22 Installation Instructions (Continued) FREESTANDING OVEN CLEARANCES Important Notes: Overhead Clearances In no case shall the clearances between the highest part of the cooker be less than 650mm or for an overhead exhaust fan 750 mm. All other downward facing combustible surfaces less than 650 mm above the cooker surface shall be protected for the full width of the cooking surface...
- Page 23 FITTING THE OPTIONAL BACKGUARD strain to be put on to the gas connection). Depending on your model, you may have an optional backguard included. For a built-in installation, where your oven is installed between cabinets on a plinth, we suggest securing your If you wish to install the optional backguard: oven through both sides of the cupboards into the sides •...
- Page 24 Installation Instructions (Continued) INCORRECT CHAIN INSTALLATION WARNING: Accidental Tipping Chains are provided as a preventative measure against accidental tipping. These chains must be fitted as part Incorrect Installation of the installers compliance. Failure for your installer to fit chains in accordance with the relevant installation Accidental Tipping code will make the installation of your freestanding cooker non compliant and classed as an illegal installation.
- Page 25 CORRECT CHAIN INSTALLATION In order to prevent the oven from tipping forward as shown on the previous page, ensure that both chains provided with the oven are used. View the example below: On the left side of the oven, a 16mm drill bit was drilled through the cabinetry into the adjacent cabinet. Correct Chain Installation Because of the 16mm board at the rear of the cabinet, the hole has not been drilled hard up against the wall.
- Page 26 Installation Instructions (Continued) LOCATION OF GAS POINT AND ELECTRICAL SUPPLY FITTING THE ADJUSTABLE FEET The adjustable feet must be fitted to the base of the freestanding oven before use. Rest the rear of the freestanding oven on a piece of the packaging (i.e. the polystyrene) exposing the base for the fitting of the feet.
- Page 27 LEVELLING THE FREESTANDING OVEN • The feet have built in adjustment and the lower section can be twisted clockwise or anti- clockwise to raise or lower the freestanding oven. vel of the appliance can be adjusted by rotating the feet located •...
- Page 28 This page is intentionally left blank...
-
Page 29: Electrical Connection
Electrical Connection IMPORTANT! This freestanding oven must be connected • This cooker must be connected to a suitable double to the mains power supply only by a suitably qualified pole control unit adjacent to the cooker. No diversity person. This freestanding oven must be earthed. can be applied to this control unit. -
Page 30: Gas Connection
Adjust to obtain a test point pres Gas Connection IMPORTANT! Check the correct pos gas regulator must be oriented towar IMPORTANT! The connection must be performed by an GAS CONNECTION SPECIFICATION authorised person according to the relevant standards. IMPORTANT! Check the correct positioning of the gas •... - Page 31 ULPG Ensure the supply pressure is regulated to 2.75 kPa, with all the burners operating at highest setting. GAS CONNECTION FLAME TESTING GAS CONNECTION The operation of the appliance must be tested when IMPORTANT! The connection must be performed by an installation is completed, including ensuring the burners IMPORTANT! The connection must be performed by an authorised person according to the authorised person according to the relevant standards.
- Page 32 Gas Connection (Continued) CONVERSION TO ULPG • This freestanding oven can be used with Natural Gas or ULPG. It is shipped from the factory adjusted for use with Natural gas. • Any conversion required must be performed by an authorised person or service agent. •...
- Page 33 The images and diagrams in this user manual is for reference only. Your Freestanding Cooker may appear differently.
- Page 34 Gas Connection (Continued) REPLACING THE COOKTOP BURNER INJECTORS To convert the burners to suit a different gas type from that which it was set (refer to the gas type label inside the warming compartment door), follow these steps: Remove the pan supports (or trivets), remove the burner caps and the flame spreaders. 2.
- Page 35 [Need updated drawing from Arda that is relevant to the Arda burners] ADJUSTING THE MINIMUM BURNER SETTINGS Adjusting the cooktop burner minimums The flame has been regulated by the factory. When the injectors have been replaced or there are special mains pressure conditions, it may be necessary to regulate the minimum flame again.
-
Page 36: Attach Your Receipt
Attach your receipt to this page... -
Page 37: Purchase Details
Purchase Details For future reference, please record the following information which can be found on the rating plate and the date of purchase which can be found on your sales invoice. STORE DETAILS STORE NAME ADDRESS TELEPHONE PURCHASE DATE PRODUCT DETAILS MODEL NO. -
Page 38: Warranty Information
Warranty Information WARRANTY TERMS & CONDITIONS IN THIS WARRANTY OVENS (FREESTANDING COOKERS) ‘acceptable quality’ as referred to in clause 10 of this warranty has the same meaning referred to in the This document sets out the terms and conditions of the ACL;... - Page 39 You will bear the cost of transportation, travel and For Appliances and services provided by Residentia delivery of the Appliance to and from Residentia Group in Australia, the Appliances come with a Group or its ASR. If you reside outside of the service guarantee by Residentia Group that cannot be area, you will bear the cost of: excluded under the Australian Consumer Law.
-
Page 40: 1300 11 4357 | E. Support@Residentiagroup.com.au
An initiative by Residentia Group T. 1300 11 4357 E. support@residentiagroup.com.au www.solt.house...
Need help?
Do you have a question about the GGSUC907S and is the answer not in the manual?
Questions and answers