Advertisement
Quick Links
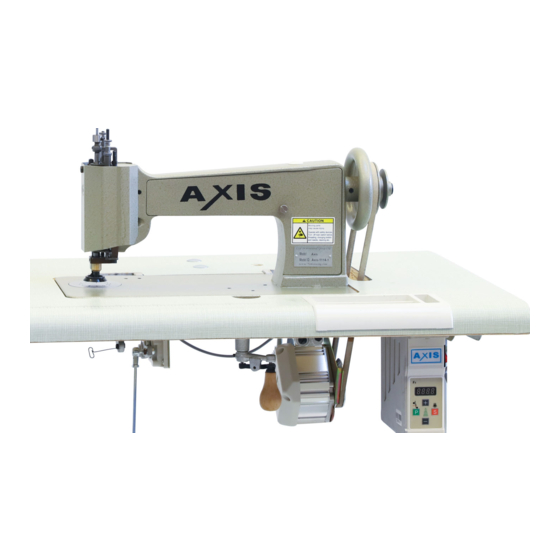
Axis 1114-1 Chainstitch Embroidery Machine
If you are facing an operation problem, please describe your
situation via our contact info below! Thank you!
Let Us Assist You!
Email:tom@tomsewing.com
●
Video Call
●
Whatsapp:
●
WeChat
●
Service time: Mon. - Sun.8:00 – 20:00 UTC+8
●
1
Assembly and Usage Guide
+8618967602717
: Tomsewing
Advertisement

Summary of Contents for Axis 1114-1
- Page 1 Axis 1114-1 Chainstitch Embroidery Machine Assembly and Usage Guide If you are facing an operation problem, please describe your situation via our contact info below! Thank you! Let Us Assist You! Email:tom@tomsewing.com ● Video Call ● Whatsapp: +8618967602717 ● WeChat : Tomsewing ●...
- Page 2 Assembly and Adjustment Step 1: Install the metal hinge using hardware provided...
- Page 3 Step 2: Install the handle crank using the hardware provided. The screw of needle bar holder and needle hook and handle crank should be in the “6 clock direction”, or facing user. This is an important step to properly setting up the machine! See pictures on next page below for reference! Picture below displays where to unscrew to adjust position of needle hook.
- Page 4 Picture bellows showing needle hook in 6 o clock position (facing same direction as handle crank)
- Page 5 Step 3: When setting up the machine handle wheel, it should run clockwise! Belt should run smoothly with no obstructions! Tighten belt until it is secure, but do not over tighten! If belt is too loose, adjustments can be made to reach ideal setting.
- Page 6 During operation, If the handle crank is pushed up, the stop motion rocker will be holding its place. Pulling down the handle crank and pressing foot pedal will allow you to begin stitching!
- Page 7 Picture below shows the stop motion rocker when it is pushed up/not ready to stitch. Get comfortable pulling and pushing handle crank, while looking at the inside of the machine to get a better understanding! And always keep your machine well oiled!
- Page 8 As shown below, with the handle crank pulled down, The Stop Motion will be released and machine will be ready to stitch! Pushing down on your foot pedal will begin stitching...
- Page 9 Pictured below, you can see stop motion rocker pulled down and ready to stitch!
- Page 11 Automobile Engine Oil. In my experience, I have found that automobile engine oil works better for me than alternatives. You can also use lily white sewing oil! Both of these products can easily be found online or in a shop local to you. It is crucial to oil machine properly before each use! Refer to manual to see list of all spots to be oiled! Pictures above and below display two very important spots that should be oiled...
- Page 13 Usage Step 1: Threading To thread machine, feed thread through first entry point shown below, then secure it down to prepare thread/feed it into the machine...
- Page 14 Thread should be fastened into wheel and secured under pin as shown below.
- Page 15 Pull a little bit of thread through loop to create a tiny bit of tension. this will allow wire threader to easily grab thread into machine!
- Page 16 Step 2: Thread wire shown below To thread machine, rotate the handle crank and look at the needle plate closely until you see a hole/opening to insert wire threader into machine to grab thread and pull back through. Pictures below display process of finding hole in needle plate/ threading machine.
- Page 19 Once you have found and lined up the proper hole in the needle plate, Insert the thread wire into the needle plate hole carefully, and then hook up the thread from end of tension spring as shown below...
- Page 20 Pictured above, you can see wire threader coming through bottom of machine to grab thread and pull it back up.
- Page 21 While holding the thread slightly with your left hand, at the same time, turn the handle wheel shown below with your right hand. this will drive needle downward to catch the thread and pull it up. Make sure machine is OFF and foot is not on foot pedal while threading machine!
- Page 23 The needle will pull up the thread as shown above, and you will need to use tweezers to pull the thread out of the needle hole.
- Page 24 Lifting up presser foot will make it easier to pull thread under it...
- Page 25 Once thread is correctly fed through machine and pulled aside/under presser foot, it looks like the picture below. Now machine is properly threaded and ready to stitch!
- Page 26 Switch on the motor, press down foot pedal, and rotate the handle crank direction to stitch as your desire! It is recommended to start on denim/jean fabric to practice. Using a lower weight thread will produce thicker and more textured stitching.
- Page 27 Using your tweezers, insert them into the middle of threads when the needle raised at the top. This is essentially undoing the loop from the needle hook and keeping tweezers inside of that hole...
- Page 28 Pulling the fabric/loop out a bit with your tweezers will open the loop, making it easier to secure and tie off. Example shown below.
- Page 29 Trim the end of the thread, and tie off the end of the stitch as shown in the series of pictures below.
- Page 30 Pull out the Thread-end...
- Page 31 Trimmer the Thread-end...
- Page 33 Stitch secure! If you have any other questions or concerns, feel free to contact me using the contact info provided above. Please leave us a review on Amazon, as it helps us greatly! We hope you have many hours of fun and create beautfiul works using this...
Need help?
Do you have a question about the 1114-1 and is the answer not in the manual?
Questions and answers