Table of Contents
Advertisement
Quick Links
Advertisement
Table of Contents

Summary of Contents for Audison APM
- Page 1 OWNER’S MANUAL rev. 1.0 audison.com...
-
Page 2: Table Of Contents
5. SOFTWARE AND DRIVERS INSTALLATION ..............................12 5.1 PC SOFTWARE AND DRIVER INSTALLATION WIZARD .........................12 5.2 UNINSTALLING BIT TUNE SOFTWARE and DRIVER ..........................19 6. APM / bit Tune DESKTOP ....................................20 6.1 SOFTWARE START IN APM MODE................................21 6.2 APM TARGET MODE .....................................22 6.2.1 CONNECTION STATUS MENU ................................22... -
Page 3: Apm Description
1. APM DESCRIPTION THE PROJECT Audison APM is the result of years of research and development into a complex topic, the evaluation of in-car sound quality. It has always been a challenge for the automotive industry to provide a measurement system dedicated to the objective evaluation of the sound quality, intended to support and not replace the subjective evaluation that remains one of the most amazing human qualities. -
Page 4: Precautionary Notes
1. In order to use the APM measurement tools, you must install the software on a personal computer running Windows XP, Windows Vista or Windows 7/8/10, with a 1.5 GHz processor or higher, 1 GB of RAM and a graphics card with minimum resolution of 1024 x 600 pixels. -
Page 5: Packaging Contents
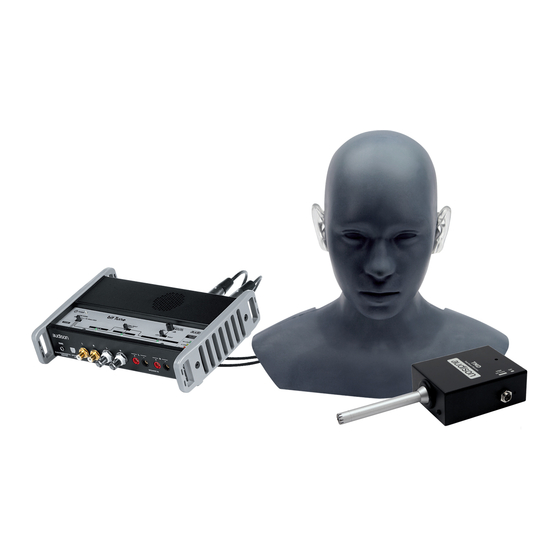
APM / OWNER’S MANUAL PACKAGING CONTENTS - Dummy Head - TMD + omnidirectional microphone - 3-Poles connection cable (3 m) - 5-Poles connection cable (3 m) - ABS Carrying Case - CD ROM, containing: SETUP CD 2.0 APM Software TEST SIGNALS Track_01.sine sweep... -
Page 6: Dimensions
APM / OWNER’S MANUAL 2. DIMENSIONS DUMMY HEAD DIMENSIONS 170 mm / 6.69 in. 200 mm / 7.87 in. 350 mm / 13.77 in. 130 mm / 5.11 in. 80 mm / 3.1 in. Total Music Distortion... -
Page 7: Descrizione
4. LPM: 3 poles XLR Mini Connector, to be connected using the specific cable to the bit Tune LPM socket (see sect. 4.3) 5. ON: Blue led, APM measurement set is turned on. 6. Bracket to fix the Dummy Head to the HSM microphone bracket provided in the bit Tune packaging. -
Page 8: Tmd
APM / OWNER’S MANUAL FRONT VIEW REAR VIEW Total Music Distortion Total Music Distortion Total Music Distortion Total Music Distortion 1. ON: Blue Led, indicates the TMD measuring set power on. 2. HSM bit Tune: Mini XLR 5 poles connector, to be connected via dedicated cable to the bit Tune HSM socket (see sect. -
Page 9: Connections
APM / OWNER’S MANUAL 4. CONNECTIONS POWER SUPPLY AND TURN ON 1. POWER SUPPLY VIA 12V DC PLUG IN 2. POWER SUPPLY VIA NETWORK ADAPTER Remark: the bit Tune is protected internally by a 2° The universal adapter 110 - 220 VAC is provided Cilyndrical fuse located inside the product. -
Page 10: Personal Computer
APM / OWNER’S MANUAL PERSONAL COMPUTER 1. PERSONAL COMPUTER E bit Tune 2. PERSONAL COMPUTER bit Tune + Audison bit USB CABLE USB CABLE PROVIDED PROVIDED VOLUME VOLUME POWER POWER MONITOR MONITOR LINE NOISE MIN • • MAX LINE NOISE MIN •... -
Page 11: Tmd Connection
APM / OWNER’S MANUAL TMD CONNECTION bit Tune 5 pole Connector cable VOLUME POWER MONITOR MIN • • MAX LINE NOISE LOAD SIMULATOR SEGNAL INPUT PC ANALYZER SPEAKER IN SELECT LEFT RIGHT NO LOAD PROBE PRE IN SPK IN 47 OHM... -
Page 12: Software And Drivers Installation
5. SOFTWARE AND DRIVERS INSTALLATION PC SOFTWARE AND DRIVER INSTALLATION WIZARD Insert the “APM Setup CD 1.0” in the CD-ROM player of the PC that you intend to use. Windows XP: go to My Computer in the START menu; Windows Vista: go to My Computer in the START menu;... - Page 13 APM / OWNER’S MANUAL Windows XP: select ACCEPT; Windows Vista: select ACCEPT; Windows 7: select ACCEPT; Windows 8/10: select ACCEPT. Windows XP: select ACCEPT and wait for the installation; Windows Vista: select ACCEPT and wait for the installation; Windows 7: select ACCEPT and wait for the installation;...
- Page 14 APM / OWNER’S MANUAL Windows XP: select I Agree, then NEXT; Windows Vista: select I Agree, then NEXT; Windows 7: select I Agree, then NEXT; Windows 8/10: select I Agree, then NEXT. Windows XP: select NEXT; Windows Vista: select NEXT;...
- Page 15 APM / OWNER’S MANUAL Windows XP: select - Everyone if you have administration rights for the system, so that the program, once installed, can be accessed by all users of the PC. - Just me if you want the program, once installed, to be accessed by the current user only.
- Page 16 APM / OWNER’S MANUAL Windows XP: select NEXT to start the installation of the audio driver, turn the bit Tune on and connect it to the USB port of your PC; Windows Vista: select NEXT to start the installation of the audio driver, turn the bit Tune on and connect it to the USB port of your PC;...
- Page 17 APM / OWNER’S MANUAL Windows XP: select NEXT to complete the installation of the audio driver and then select FINISH; Windows Vista: select NEXT to complete the installation of the audio driver and then select FINISH; Windows 7: select NEXT to complete the installation of the audio driver and then select FINISH;...
- Page 18 APM / OWNER’S MANUAL The system will install the XMOS interface drivers. If the procedure is successful, the system will notify that the driver installation is complete. Windows XP: click “Finish”; Windows Vista: will not ask for confirmation, drivers will be installed automatically;...
-
Page 19: Uninstalling Bit Tune Software And Driver
APM / OWNER’S MANUAL UNINSTALLING BIT TUNE SOFTWARE and DRIVER To uninstall the bit Tune PC software you can use the uninstall command from the menu: Windows XP, Windows Vista, Windows 7 Windows 8/10 Windows XP: click “YES”; Windows Vista: click “YES”;... -
Page 20: Apm / Bit Tune Desktop
APM / OWNER’S MANUAL 6. APM / BIT TUNE DESKTOP In order to use the main APM tools of the bit Tune you must install the software rev 2.1.2 on your PC. see sect. 5 The bit Tune must be connected to the PC and be turned on by setting the measurement selection switch in the PC analyzer position. -
Page 21: Software Start In Apm Mode
It is possible to start the analysis of the audio system by connecting an Audison bit product, or simply analyse an audio system without these. -
Page 22: Apm Target Mode
PC Software window. 6.2.1 CONNECTION STATUS MENU This bar shows the connection information of the bit Tune to the PC, and of a possible bit line Audison device to it. 6.2.2 SESSION NOTE MENU The APM SW provides for the entry of basic user data, the input fields vary depending on the operating mode selected (see point 3). -
Page 23: File" Main Menu
APM / OWNER’S MANUAL 6.2.3 “FILE” MAIN MENU By clicking on the dedicated section a drop-down menu will appear showing the items in the image: 1. New session: it opens a new measurement work session. A new measurement session with the name “APM_session_xy”... - Page 24 APM / OWNER’S MANUAL 5. Registration: the Registration command opens the system browser at the page that allows you to register the product and create your own personal account on the “bit” portal. This must be done only once, after which you can access your account via the Login Account command.
-
Page 25: Tools" Main Menu
2. Real time monitor: it displays the APM SPL meter during the measurement, showing the signal saturation bar and the timer in real time. The status message flashes “In progress !!”. APM Out of Measure, displays all the Real Time information of the SPL meter, and allows offline viewing of results. - Page 26 APM / OWNER’S MANUAL Calculation of the FSA score The azimuth and elevation (°) values, determined by the software during the measurement according to the position of the dummy head microphone, are displayed with a point within the two-dimensional space that represents the virtual stage of the car.
-
Page 27: Total Music Distorsion
1. User Data: replicates the main fields with the related information. 2. Real time monitor: it displays the SPL meter, status and STOP. 3. Points scoring system: it shows the weighing table of the individual APM items that contribute to the MSQR scoring system. - Page 28 APM / OWNER’S MANUAL Calculation of the TMD score The values of total distortion (%) and total alteration (dB) are determined respectively by the weighted average of the partial distortion indexes (high, medium, low range) and by the weighted average of the partial alterations according to the weights of the MSQR.
-
Page 29: Spl Meter
APM / OWNER’S MANUAL 4. SPL METER It has the function of pre-calibrating the source volume in order to obtain a certain level of pressure. The SPL meter display features the following basic functions: Time: Fast/Slow; SPL: dB(A)/dB(C); Functions: Min, Max (peak hold), Hold; Scale for displaying dynamics peaks; play button, stop (hold); reset all button (clears the timer). -
Page 30: Apm" Main Menu
SW reminds the user to save to avoid data loss. 3. LOAD MEASUREMENT: To upload a previously saved *.apm file. This can be loaded in offline, to view the results, or uploaded and then overwritten with a subsequent measurement. If the user is working on... -
Page 31: Apm Rank Calculator
It is a semi-automatic tool, where you can select one or (see point 6.2.9.6) more * sap (session) or * .apm (measure) files type, then generate an automatic ranking based on the Master Sound Quality Race scoring system. The loaded measurement files, generated in Free or Competition mode, are always discriminated by the related parameter in the report. -
Page 32: Settings" Main Menu
1. Connect the bit Tune to the AUX input of the Audison bit processor, as shown in fig. 1 or 2. The calibration operation must be carried out in the least possible noisy environment, with the car engine switched off, air conditioning off, doors and windows tightly closed and radio-frequency devices away from the passenger compartment of the vehicle. - Page 33 APM / OWNER’S MANUAL 2. Click on the Settings menu and select Mic Calibration->TMD MIC Calibration. A window will appear indicating that you are running Track 1 from your player. Play track 1 and then select Start. 3. Place a sound level meter near the TMD microphone and switch the source volume until 80dB SPL is...
- Page 34 3. Turn on the bit Tune - Set the bit Tune function switch to PC ANALYZER. 4. Start the bit Tune software by clicking on the icon on the PC Desktop and start the software in APM mode. - Click on the Settings menu and select Mic Calibration-> Dummy Head Calibration.
-
Page 35: Measurament Wizard / Tools
Audison processor. Select Connect to -> bit Tune to connect the PC Software to the bit Tune. Select Connect to -> Processor to connect the PC Software to an Audison bit processor. 3. DISCONNECT TO: This feature allows you to disconnect from the bit Tune PC Software a previously interfaced Audison processor or the bit Tune itself. -
Page 36: Memory Status
2. OPEN: loads the complete configuration of the bit Tune APM from a file saved during a previous measurement session (i.e.: “APM_session_xy.sap”). This function is useful if you want to view previously saved measures or integrate successive measures of the same race session or calibration. -
Page 37: Measurement Session - Free Mode
7. MEASUREMENT SESSION - FREE MODE To perform this operation it is not necessary to connect an Audison bit processor to the bit Tune. This type of measurement in Free mode allows to perform measurements with all types of audio systems, whether they are active multi-amplified or passive. - Page 38 APM / OWNER’S MANUAL 5. Follow the instructions below: - Insert the CD supplied with the product: •“Setup CD” if the source used is a CD AUDIO player. If the source used does not feature a CD player download the tracks from the CD in mp3 format, to be used with multimedia devices to interface via USB mass storage.
- Page 39 APM / OWNER’S MANUAL During the measurement, a status bar will indicate the status of the measurement. When the measurement is completed successfully, the window shown to the right will be displayed. Press BACK to go back to the previous step.
- Page 40 APM / OWNER’S MANUAL 10. Play track 3 ; Press BACK to go back to the previous step. Press NEXT to continue with the measurement. Press CANCEL to exit. 11. Wait a few minutes for the measurement to be completed. During the measurement a status bar will show the measurement status.
- Page 41 APM / OWNER’S MANUAL Measurement session description: The listening point of the sound scene acquired is displayed. The values of the measurements acquired are displayed. Thanks to the FSA analysis (Front Stage Analysis), the sound front emission can be analysed as if the dashboard of your...
-
Page 42: Fsa
APM / OWNER’S MANUAL 1. Select Free in the PC Software main page. 2. Accurately place the Dummy Head in the vehicle compartment (see sect 3.1) 3. Select FSA. Press BACK to go back to the previous step. Press NEXT to continue with the measurement. -
Page 43: Spl
APM / OWNER’S MANUAL 1. Select Free in the PC Software main page. 2. Accurately place the Dummy Head in the vehicle compartment (see sect 3.1) 3. Select SPL. Press BACK to go back to the previous step. Press NEXT to continue with the measurement. -
Page 44: Measurement Session Competition Mode
APM / OWNER’S MANUAL 8. MEASUREMENT SESSION COMPETITION MODE To perform this operation it is necessary to connect an Audison bit processor to the bit Tune. COMPETITION MODE WIZARD 1. Select Competition on the main PC Software page. Then select the SPL category, using the drop-down menu. - Page 45 APM / OWNER’S MANUAL 5. Follow the instructions below: - Insert the CD supplied with the product: “Setup CD” if the source used is a CD AUDIO player. If the source used does not feature a CD player, download the MP3 tracks CD provided o fron the bit Drive portal, copying them on a USB mass storage.
- Page 46 APM / OWNER’S MANUAL During the measurement, a status bar will indicate the status of the measurement. When the measurement is completed successfully, the window shown to the side will be displayed. Press BACK to go back to the previous step.
- Page 47 APM / OWNER’S MANUAL 10. Play track 3; Press BACK to go back to the previous step. Press NEXT to continue with the measurement. Press CANCEL to exit. 11. Wait a few minutes for the measurement to be completed. During the measurement, a status bar will indicate the status of the measurement.
- Page 48 APM / OWNER’S MANUAL The listening point of the sound scene acquired is displayed. The values of the measurements acquired are displayed. Thanks to the FSA analysis (Front Stage Analysis), the sound front emission can be analysed as if the dashboard of your car was the stage...
-
Page 49: Technical Specifications
APM / OWNER’S MANUAL 9. TECHNICAL SPECIFICATIONS DUMMY HEAD Microphone Type 2 x Electret Condenser Polar Pattern Omni Directional Sensitivity (±3dB)-44dB(6.3mV/Pa) Frequency Response 20Hz~20kHz S/N ratio More than 62dB Impedance Less than 2.2k Ohm Operating Temperature -20 °C~+50 °C Microphone Type... - Page 50 PART OF ELETTROMEDIA 62018 Potenza Picena (MC) Italy T +39 0733 870 870 - F +39 0733 870 880 www.elettromedia.it...
Need help?
Do you have a question about the APM and is the answer not in the manual?
Questions and answers