Table of Contents
Advertisement
Quick Links
SONOSAX
SX-R4+
USER MANUAL
HARDWARE DESCRIPTION
Preliminary
PROFESSIONAL PORTABLE
MULTITRACK RECORDER
Audio equipment manufacturer
SONOSAX SAS S.A.
Ch. de la Naz 38
1052 Le Mont s/Lausanne
Switzerland
Tél: +41 21 651 0101
Fax: +41 21 651 0109
Web:
www.sonosax.ch
Email: sonosax@sonosax.ch
Version: june 2015
Advertisement
Chapters
Table of Contents

Subscribe to Our Youtube Channel
Related Manuals for Sonosax SX-R4+

Summary of Contents for Sonosax SX-R4+
- Page 1 PROFESSIONAL PORTABLE MULTITRACK RECORDER SONOSAX SX-R4+ USER MANUAL HARDWARE DESCRIPTION Preliminary Audio equipment manufacturer SONOSAX SAS S.A. Ch. de la Naz 38 1052 Le Mont s/Lausanne Switzerland Tél: +41 21 651 0101 Fax: +41 21 651 0109 Web: www.sonosax.ch Email: sonosax@sonosax.ch...
-
Page 2: Table Of Contents
Powering peripherals [ DC OUT ] ........................10 3.2.13 On screen powering information......................... 10 SWITCHING ON THE UNIT..........................10 3.3.1 Switching Off the unit............................10 BLOCK DIAGRAM .............................11 SPECIFICATIONS..............................12 SUMMARY OF CHARACTERISTICS ........................12 User manual / Hardware description Page 2 of 12 SONOSAX SX-R4... -
Page 3: Introduction
Congratulations for purchasing your SONOSAX SX-R4+ professional portable audio recorder. Based on a high technology design, it has been manufactured to deliver many years of outstanding performances. As with all SONOSAX products, the SX-R4+ recorder is built without any compromise in quality, using only the best components available and passes severe quality controls. -
Page 4: Safety Instructions
♦ Connect the SX-R4+ Recorder only to the optional external power supply delivered by SONOSAX. Route power supply cords so that they are not likely to be walked on or pinched by items placed on or against them, paying particular attention to cords at plugs, inlets and the point where they exit the console. -
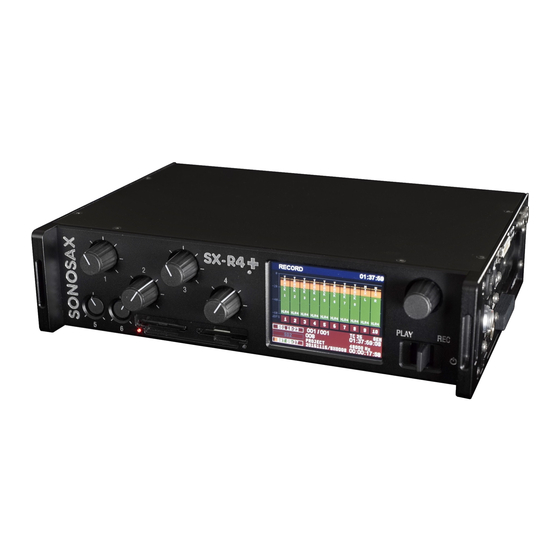
Page 5: Hardware Descriptions
The Led's indicate the status of the SD Cards • Read the User interface manual for further information Color Touch Screen Touch the screen to call and navigate sub-menus User manual / Hardware description Page 5 of 12 SONOSAX SX-R4... -
Page 6: Left Side Panel
The Optional Connector is an optional output either analogue or digital such as: • Audio over Ethernet RJ45. Internal interface to stream multiple audio channels using protocols such as AVB, Ravenna or else (no yet developed). These interfaces are proprietary boards manufactured by SONOSAX. • Analogue balanced XLR-5M. -
Page 7: Right Side Panel
26 pin 3M connector providing 4x AES3 inputs, 2x RS422 Tx/Rx bus, Monitor output and Word Clock Out • Each AES3 input has its own ASRC (Asynchronous Sample Rate Converter) • RS422 Tx/Rx are used to control external units such as SONOSAX SX-AD8+ and the mixing control surface Wiring: see diagram below... -
Page 8: Auxiliary Aes Input/Output [ Aes I/O ]
Pin 4 = not connected • Pin 5 = Smpte In The mating cable connector Lemo 5 pin is available by SONOSAX or by your local dealer under ref part SONOSAX SX-860232 or Lemo FGG.0B.305.CLAD52 3.2.8 Digital inputs [ AES IN ] The [AES IN] 26 pin connector provides 4x independent AES3 inputs (8 audio channels). -
Page 9: Powering The Sx-R4
POWERING THE SX-R4 The SONOSAX SX-R4+ can be powered from a removable "Smart Battery" or from any external power source providing a regulated DC voltage between 9 to 18 Volts. The SX-R4+ features an intelligent power management through the SMBus and provides with detailed on screen informations. -
Page 10: External Powering [ Dc In ]
3.2.12 Powering peripherals [ DC OUT ] The Hirose 4 pin connector supply a DC voltage to power peripheral equipments such as the SONOSAX SX-AD8+ microphone preamplifiers, a SX-M32 mixing console, RF systems or any other equipment requiring a 12VDC. -
Page 11: Block Diagram
4. BLOCK DIAGRAM User manual / Hardware description Page 11 of 12 SONOSAX SX-R4... -
Page 12: Specifications
5. SPECIFICATIONS All specifications mentioned hereafter apply to standard models only. SONOSAX SAS SA reserves the right to modify these characteristics at any time without prior notice. For measures and/or settings the reference is: 0dBu = 0.775V (i.e. +6dBu = 1.55V). - Page 13 USER INTERFACE Firmware version 1.2 Audio equipment manufacturer SONOSAX SAS S.A. Ch. de la Naz 38 1052 Le Mont s/Lausanne Switzerland Tél: +41 21 651 0101 Fax: +41 21 651 0109 Web: www.sonosax.ch / www sonosax.com Email: sonosax@sonosax.ch Version: August 2015...
- Page 14 6.1.1 Set the SX-R4+ as [ACCESS POINT] ........................ 21 6.1.2 SX-R4+ on your web browser..........................22 6.1.3 Set the SX-R4+ as WiFi client ..........................24 APPENDIX................................25 7.1.1 iXML implementation chart ..........................25 SONOSAX SX-R4 User interface V1.2 Page of 26...
-
Page 15: Introduction
1.2 of the SONOSAX SX-R4+. For all information's concerning the hardware, powering information's, connectors diagram, specifications etc please refer to the SONOSAX SX-R4+ User Manual "Hardware Description". 1.1 CONVENTIONS For sake of clarity in reading this manual, please note: •... -
Page 16: Principle Of Operation
The Led's indicate the status of the SD Cards such as: • Blinking: ready to Record • ON: recording in progress • OFF: SD Card not present, not formatted or full Color Touch Screen Touch the screen to call and navigate sub-menus SONOSAX SX-R4 User interface V1.2 Page of 26... -
Page 17: Switching On The Unit
Switching OFF the unit is controlled by the software, accessed via the [MAIN] menu then [POWER]. Touch in the modulometers area Select the [POWER] key Under [GENERAL] Tab Select [POWER OFF] Select [OK] to power off the recorder SONOSAX SX-R4 User interface V1.2 Page of 26... -
Page 18: Main Screen Display
Track nr / highlighted tracks = armed Bargraph of the SD1 Ram buffer Time Code format ,and value Bargraph of the SD2 Ram buffer Sampling rate Power source and voltage Elapsed time SONOSAX SX-R4 User interface V1.2 Page of 26... -
Page 19: Main Menu
- When the XLR is configured as Analogue input, the [LF CUT] key activates an analogue circuitry in the input preamplifier. The [PHASE] and [LEVEL] are controlled by the DSP. - The analogue inputs are protected by an internal RF Filter SONOSAX SX-R4 User interface V1.2 Page... -
Page 20: Xlr Setup - Digital
INPUT menu showing that The AES 1-2 on the 26 pin is available AES 5-6 on the 26 pin is not available XLR3 has taken AES 5-6 XLR4 has taken AES 7-8 SONOSAX SX-R4 User interface V1.2 Page of 26... -
Page 21: Level Setup
On the [XLR SETUP] page press on the [ASSIGN TRACK…] key to call a matrix showing the 16 tracks of the recorder, then select the track(s) on which that input is to be routed. Track number Assigned input Track number Assigned input Un-assigned tracks Return to previous page SONOSAX SX-R4 User interface V1.2 Page of 26... -
Page 22: Aes Input Setup
The [LINE 5-6] and [AUX AES] inputs are configured and settled in exactly the same way as the AES inputs NOTE: By default the [AUX AES] TA3 connector is set as an input. Setting this connector as an output is done in the [OUTPUTS] menu. SONOSAX SX-R4 User interface V1.2 Page of 26... -
Page 23: Outputs
Adjust the ALARM level on the LINE OUT LINE OUT output outputs Enable / disable the REC TONES on Adjust the REC TONE level on the the LINE OUT output LINE OUT outputs Return to LINE OUT page SONOSAX SX-R4 User interface V1.2 Page of 26... -
Page 24: Aux Aes Routing & Setup
MIX2 (Right) to any of the 16 tracks Return to previous Menu NOTE: Press 2 seconds on a [PRESET] key to store the configuration as it appears on screen. Briefly press on a [PRESET] key to recall a configuration. SONOSAX SX-R4 User interface V1.2 Page of 26... -
Page 25: Setup >> Mixing Level
The reference level can be adjusted from 0dBFS to -60dBFS with the encoder wheel. NOTE: a "double wave" symbol is posted on the main screen when the reference tone is enabled. SONOSAX SX-R4 User interface V1.2 Page of 26... -
Page 26: Tracks Monitoring [Headphones]
Adjust the ALARM level on the phones phones output outputs Enable / disable the REC TONES in the phones output Adjust the REC TONE level on the phones outputs Return to PHONES page SONOSAX SX-R4 User interface V1.2 Page of 26... -
Page 27: Metadata
Metadatas can be rapidly edited by using the "on screen short cut"; touching the screen within the metadata area will overlay four data fields showing: SEQUENCE - USER ID - SHOT NR - TAKE NR Touching a field will highlight the corresponding data; use the encoder wheel to rapidly incremented the value. SONOSAX SX-R4 User interface V1.2 Page... -
Page 28: Takes Menu
[METADATA] key to edit the metadata of the played file. 4.9.2 EXIT PLAYER Touch on the modulometer area to call the Main menu, then touch the [EXIT PLAYER] key to return in Recorder mode. SONOSAX SX-R4 User interface V1.2 Page... -
Page 29: Power Informations
Set the "Minimum Voltage" at which the SX-R4+ will either shut down or switch to its internal battery. For example if a12V NimH battery is used, the value would be set at 11,5V to avoid a deep discharge of the battery. SONOSAX SX-R4 User interface V1.2 Page... -
Page 30: Setup
The example above shows that tracks 5 & 6 are not armed; therefore the audio file will contain only 6 tracks tagged as tracks nr 1-2-3-4-7-8 in the metadatas. SONOSAX SX-R4 User interface V1.2... -
Page 31: Track Name
TC value NOTE: When the receiver locks on an external TimeCode, the time difference between the generator and the receiver is posted between the two time code values. SONOSAX SX-R4 User interface V1.2 Page of 26... -
Page 32: Sd Cards
5.5 SD CARDS For data safety and integrity, the SONOSAX SX-R4+ uses UDF file format. Any other file format such as FAT32, NTFS, HFS+ etc will not be recognized by the recorder. All SD cards being used with the SX-R4+ must be formatted as UDF media exclusively with the formatting tool provided in the [SD CARDS];... -
Page 33: System Setup
Note: the function activated by the switches of faders 5 & 6 is not yet implemented [SYSTEM TIME] and [SYSTEM TIME] are set in a similar manner; select a field then use the encoder wheel to set the value. Validate the selection with the key. SONOSAX SX-R4 User interface V1.2 Page of 26... -
Page 34: Wifi Wlan Setup
7 pages 6.1 WIFI WLAN SETUP The SONOSAX SX-R4+ can communicate with a smartphone, a tablet or even a laptop through its integrated WiFi interface; for sake of clarity only "tablet" will be mentioned on following chapters. The WiFi interface enables remote control of functionalities such as Record Start/Stop, track arming, metadatas editing and displaying the modulometers by using the web browser of a tablet. -
Page 35: Sx-R4+ On Your Web Browser
At the time of this release only Safari (MacOS) and Firerfox (Windows or Android) are properly displaying the web page. On web browsers such as Opera, Internet Explorer or Google Chrome the SX-R4+ web pages appears shifted and/or incomplete. SONOSAX SX-R4 User interface V1.2 Page of 26... - Page 36 Once the connection between the web browser and the SX-R4+interface is established, the web page appears as illustrated below. All informations posted in the SX-R4+ main screen are displayed in the webpage. Touching this field calls a pop up window to edit metadata Track arming keys The three tabs on the top of the page, the "record"...
-
Page 37: Set The Sx-R4+ As Wifi Client
Connect your tablet to the WiFi configuration page of the SX-R4+ as follow : • open the WiFi manager of the tablet; all available WiFi network will be listed • locate and select the SX-R4+ network named [SX-R4+_ _SNxxxxxx] • confirm with "connect" to join your SX-R4+ •... -
Page 38: Appendix
= BWF Originator Reference <FILE_SET> <FAMILY_NAME> <FILE_SET> <FILE_SET_INDEX> <TRACK_LIST> <TRACK_LIST> <TRACK_COUNT> <TRACK> <CHANNEL_INDEX> <TRACK> <INTERLEAVE_INDEX> <TRACK> <NAME> <TRACK> <FUNCTION> O = YES X = NO NOTES: Not all Sonosax recorders support track naming and NOTE SONOSAX SX-R4 User interface V1.2 Page of 26... - Page 39 T E C H N I C A L N O T E SONOSAX Audio equipment manufacturer SX-R4+ SAS S.A. Ch. de la Naz 38 SD CARD TESTING PROCEDURE CH-1052 Le Mont-sur-Lausanne Switzerland +41 21 651 01 01 email sonosax@sonosax.ch website www.sonosax.ch...
- Page 40 : www.sonosax.ch The SONOSAX SX-R4 + features a very wide audio bandwidth and an extremely low noise floor; therefore it does not hide or "mask" any parasitic noise that may possibly be induced when connecting peripheral equipments, even if these parasitic noises are below the noise floor of the SX-R4 +.
- Page 41 SX-R4+ (firmware v3.2) AMBISONIC MIC AMBISONIC MODE ACTIVATION Ambisonic mode must be activated in the menu SETUP/SYSTEM/MISC, button 'AMBISONIC'. Once activated, the ambisonic decoder replaces inputs LINE5-6 and AUX AES in the INPUTS menu. AMBISONIC DECODER The Ambisonic decoder transforms format A to format B. Format A must be present in the 4 XLR inputs.
- Page 42 MAIN MENU / INPUTS AUDIO INPUTS XLR1 XLR2 XLR3 XLR4 AES 1-8 PHYSICAL XLR1-4: balanced mic/line or AES/AES42 (max 192k) LINE 5-6 (TA3): balanced line level inputs AUX AES IN (TA3): digital AES (max 96k) AES1-8 (3M accessory): 4x AES3 (8 channels, LINE 5 LINE 6 AUX AES IN max 192k)
- Page 43 MAIN MENU / OUTPUTS AUDIO OUTPUTS OPTION CARD HEADPHONES PHYSICAL HEADPHONES: 2 channel 1/4'' jack and accessory LINE OUT: 2 channels unbalanced line output (TA3) AUX AES OUT: 2 channels digital AES (TA3) OPTION CARD: 2 channels balanced or 4 channels unbalanced or 4 channels AES (XLR5) LINE OUT AUX AES OUT...
- Page 44 SX-R4+ FRONT PANEL ROTARY ENCODER POT1 POT2 POT3 POT4 AMBIENT LIGHT SENSOR LINE5 LINE6 PLAY COLOR TFT DISPLAY TOGGLE SWITCH CARD SLOTS WITH TOUCH SCREEN SD1 LED SD2 LED POTs 1-4 Potentiometers with push-on switches, can be used as input gain or faders. Push-on switches actions (short/long presses) are user-programmable, see SETUP/SYSTEM/PUSH BUTTONS menu.
- Page 45 SX-R4+ MAIN SCREEN AT LEAST ONE INPUT IS PHASE REVERSED TOUCH SCREEN IS LOCKED REFERENCE TONE GENERATOR IS ENABLED RECORDING METADATA WILD TRACK ALARM WIFI (BLINK UNTIL A HOST IS CONNECTED) RECORDER STATUS DATE / TIME METERS AREA TRACK NAME INPUT SOURCE YELLOW WHEN PHASE IS REVERSED...
- Page 46 SETUP / SYSTEM / MISC MENU MISC SYSTEM MENU First power icon button: when enabled, user can power off unit by long pressing REC button in ready state FLIP SCREEN: 180° screen rotation, used for left-handed or if you prefer that way AUTO WORKING DAY: when set, do not ask for a new working day at startup, automatically set it AMBISONIC menu is described into another page BRIGHTNESS...
- Page 47 SETUP / SYSTEM / PUSH BUTTON PUSH BUTTONS The PUSH BUTTONS menu let you select an action to be executed when a button is pressed. There are two press events: short push (first line) and long push (second line), except for LINE 5/6 knobs, where the events are button push in and release.
- Page 48 MAIN MENU / REC TRACKS RECORD TRACKS TRACK ARMING Select track to arm/unarm. Not available during record or playback. Button upper-left button: track name. Button lower-left: track source . TRACK SOURCE Select track source using rotary encoder. Not available during playback. Button lower-left: track name.
- Page 49 ACCESS POINT: enable an access point where wireless client can connect with. Network name (SSID) is SX-R4+__SN where SN is the SX-R4 serial number (written on left panel), no password is required. Once connected to it, open a web browser and use http://192.168.1.1 as URL.
- Page 50 SETUP / SYSTEM MENU SYSTEM SYSTEM MENU PUSH BUTTONS and MISC menus are not described in that page as they have a dedicated one. CONFIG BACKUP/RESTORE Allow to backup & restore current configuration (or part of it) into a SD card. Select CREATE NEW to create a new configuration file, then choose a filename.
- Page 51 MAIN MENU / TAKE LIST TAKE LIST TAKE LIST MENU This menu list all takes found in media SD1 & SD2, last recorded first. Use rotary encoder to scroll up/down. Encoder push: opens the take, stops. PLAY: opens the take, start playback. C: CIRCLED TRACK F: NO GOOD...
- Page 52 SETUP / USER SETTINGS USER SETTINGS USER SETTINGS MENU User settings allows user to store & recall a recorder configuration.There are 8 user settings available. Factory settings (SETUP/SYSTEM/SYSTEM INFO/FACTORY SETTINGS) does not erase user settings. STORE A USER SETTING To store a user setting, apply a long press to the selected user setting button until the message "SETTING STORED"...
- Page 53 SX-R4+ MENUS OVERVIEWS TAKE LIST INPUTS OUTPUTS REC TRACKS METADATA HEADPHONES POWER SETUP USER SETTINGS RECORD SETTINGS METERS SETTINGS POT SETUP TIMECODE WLAN SETUP SD CARDS SETUP / SYSTEM PUSH BUTTONS FILETAG BACKUP/RESTORE SAVE CONFIG SYSTEM INFO SYSTEM DATE LOCAL TIME MISC BRIGHTNESS SX-RC8+...
- Page 54 SX-R4+ AUDIO MONITORING TRACKS OVERVIEW 1 2 3 ..There are 3 main monitoring processes in the SX-R4+: LEFT ..HEADPHONES HEADPHONES, LINE OUT, AUX AES OUT RIGHT LEFT There are 2 additional monitoring processes if the 4-channel ..LINE OUT RIGHT option card is installed.
- Page 55 FORMAT FRAME RATE: 24 FPS LM32 20170621 20170621 FILE TYPE: 32 bits / 48000 POLY BWF RECORDER: Sonosax SX-R4+ v3.1 ATT FILETAG SCENE TAKE TIMECODE LENGTH CREATED NOTE TR 001 / TRACK TRACK TRACK TRACK NG SX0210S4 16:35:47:06 00:00:04 16:35:49...
Need help?
Do you have a question about the SX-R4+ and is the answer not in the manual?
Questions and answers