Table of Contents
Advertisement
Quick Links
Advertisement
Table of Contents

Subscribe to Our Youtube Channel
Summary of Contents for BoX Medical Solutions Meibox
- Page 1 Meibox Meibographer Portable USB Meibography Camera User’s Manual...
-
Page 2: Table Of Contents
Table of Contents ABOUT THIS GUIDE ........................2 1. INTRODUCTION........................3 1.1 F EATURES AND ENEFITS ..........................1.2 U NPACKING THE ACKAGE..........................1.3 S YSTEM EQUIREMENTS ........................... 1.4 P HYSICAL ESCRIPTION ............................ 2. HARDWARE INSTALLATION ..................... 5 2.1 A TTACHING THE AMERA TO THE SLIT LAMP .................... -
Page 3: About This Guide
About This Guide This manual provides instructions and illustrations on how to use your Meibox Meibographer, includes: Chapter 1, Introduction, provides the general information on the camera. Chapter 2, Installation, describes the hardware and software installation procedure for the Meibox. -
Page 4: Introduction
The Meibox was designed with quality, clinical efficiency and durability in mind. Composed of a durable brushed aluminum chasis, the Meibox is unobtrusive and fits perfectly in the flow of any clinic. Mounted on a slit lamp it can be placed in a centralized location as a screening tool or placed in any examination room for easy integration. -
Page 5: System Requirements
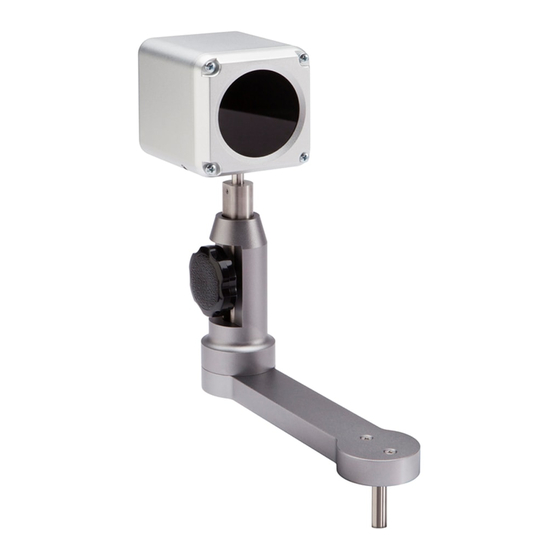
Resolution: 1920x1080 or above Windows 64 bit processing (Recommended minimum outcomes are for optimal performance. Lower specifications have been compatible for the Meibox software, but cannot be guaranteed) 1.4 Physical Description This section describes the externally visible features of the Meibox... - Page 6 1. Base Pin The pin at the base of the Meibox sits in the Ruby lens slot of the slit lamp and drops into the slit lamp creating a platform for you to utilize the Meibox Device. 2. Adjustment Knob The black adjustment knob on the slit lamp is used to calibrate the height of the Meibox in the event that your slit lamp ranges are restricted.
-
Page 7: Hardware Installation
2. Hardware Installation 2.1 Attaching the Camera to the Slit Lamp 1. On your slit lamp find the accessory mounting hole. Sometimes there is a removal cover on the hole. 2. Insert the Slit Lamp Adapter Pin to the Slit Lamp Accessory Mounting Hole. 3. -
Page 8: Setting Up The Camera Software
2.3 Setting up the Camera Software Installing the Setup Wizard Step 1 Visit website www.boxmedicalsolutions.com/store Step 2 Click on Meibox Cloud Imaging Software and proceed to checkout. Enter discount code: CloudMeibox1... - Page 9 Step 3 Register your device by completing the address and forms. Include the email address that you would like to register to the cloud software as this will be used to determine if the account is legitimate periodically. Submit order and you will receive a link to download the software:...
- Page 10 Step 4 Open Meibox Set Up Software and select Yes when prompted to allow this app to make changes on your device by Box Medical Solutions. Step 5 Click Next to accept the default Destination Folder. Step 6 Review and accept the Software Licensing Agreement...
- Page 11 Step 7 Click Next to install all drivers. It is important to have the camera plugged into the computer at this time. Step 8 Select destination for program installation. Recommend using defaulted destination. Click Install.
- Page 12 Step 9 Click Next Step 10 Successful installation, click finish.
- Page 13 Creating an Account Step 1 Create an account and then login to start using the software. Use the email that was registered on the store as this will ensure that the account will not be suspended. Starting new account: Step 1 Create an account and then login to start using the software.
-
Page 14: Image Capture
3. Image Capture Image capture process: Step 1 Add new patient by selecting upper right section: Step 2 Enter patient demographics information: Step 3 Start new session (upper right hand corner) - Page 15 Step 4 Move camera system to 90 degree plane and move beam splitter/tower to 45/135 degree position depending on hand dominance. Do not move beam splitter beyond the 45/135 degree position or the slit lamp can potentially topple. Place cordless mouse on slit lamp table Step 5 Initiate camera capture process by selecting which eyelid you would like to take a picture of by clicking on the camera or capture icon.
- Page 16 Move slit lamp towards patient until eyelids are in good focus. Slit lamp does not have to be on, the focus is seen on the computer monitor. The optimum distance is 150mm from eye to Meibox for best clarity Step 7 Evert eyelids.
-
Page 17: Image Enhancement
4. Image Enhancement Step 1 Click on image you would like to enhance from the summary screen Step 2 Once the image is selected you will have several enhancement options. Scroll bar has multiple images that you can select from the previous patient sessions to allow for quick and easy access for comparison... - Page 18 Contrast: Use contrast bar to adjust for better image capture Enhance: Instant border enhancement of glands Invert: Creates a negative image, glands will now appear black, may help with difficult to see glands Light: Intelligent lighting, select option and click on any area of picture that you would like to see in better detail.
- Page 19 Step 4 Modify and alternate between comparison screen by just selecting which images you would like to compare.
-
Page 20: Frequently Asked Questions
Attachment Questions: Q: How does the Meibox attach to the slit lamp? A: The Meibox has a pin and attaches to the base of the slit lamp where the old Ruby Lens slot would attach. Q: Is the Meibox compatible with any slit lamp? A: The Meibox has been tested with over 35 different slit lamp models and designs including Haag Streit style slit lamps and Zeiss style slit lamps and have always been able to mount. - Page 21 Q: Is the Meibox difficult to install and remove from the slit lamp? A: The Meibox can be installed with one hand since it is dropped directly into the slot. It can just as easily be removed and is attached to your computer via a USB cord.
- Page 23 Power consumption: LED Indicator: Red (Active Capture Phase) Cables: USB A to USB attachment Software Application Software: Meibox Software Operating environment Operating temperature: C ~ 40 Storage temperature: C ~ 50 Humidity: 5% ~ 95%, non-condensing FCC and FDA Class 1 Medical Device...
-
Page 24: Technical Support
Technical Support E-mail: support@boxmedicalsolutions.c Toll Free: 818-736-0078 Web Site: www.boxmedicalsolutions.com * Actual data throughput will vary. Network conditions and environmental factors lower actual data throughput rate. Specifications are subject to change without notice. All products and trademarks are the property of their respective owners. Copyright ©2007 AirLink101®...
Need help?
Do you have a question about the Meibox and is the answer not in the manual?
Questions and answers