Table of Contents
Advertisement
Available languages
Available languages
Quick Links
Advertisement
Table of Contents

Related Manuals for Baby Plus Lucca Center


Summary of Contents for Baby Plus Lucca Center
- Page 1 Reisebett Lucca Center Montage- und Bedienungsanleitung...
- Page 2 1 Aufbau des Reisebettes • Nehmen Sie das Reisebett aus der Tragetasche. Öffnen Sie die Klettverschlüsse und entnehmen Sie die Matratze (Abb. 1). • Stellen Sie das Reisebett aufrecht auf. Drücken Sie den Boden des Reisebetts nicht nach unten (Abb. 2). • Ziehen Sie die kürzeren Seitenteile auseinander bis sie hörbar einrasten (Abb. 3a) Ziehen Sie dann die längeren Seitenteile nach oben bis diese hörbar einrasten (Abb.3b). Überprüfen Sie alle Seitenteile, um sicherzustellen, daß jedes einzelne sicher eingerastet ist. Drücken Sie dann den Boden nach unten bis er hörbar einrastet (Abb. 4) • Legen Sie die Matratze in das Reisebett (Abb. 5). • Befestigen Sie die Matratze, indem Sie die Klettverschlüsse durch die 2 Löcher an beiden Seiten des Reisebettbodens führen und dann schließen. Zusammenklappen des Reisebettes • Nehmen Sie die Matratze aus dem Reisebett (Abb. 6) • Ziehen Sie die Schlaufe am Boden des Reisebettes nach oben, bis der Boden halb hoch- geklappt ist (Abb. 7). • Um die oberen Seitenteile zu entriegeln, suchen Sie die Druckknöpfe an der Unter- seite der oberen Seitenteile. Drücken Sie den Knopf nach oben und drücken Sie dann das entsprechende Seitenteil nach unten. Wiederholen Sie diesen Vorgang an den drei anderen Seitenteilen ebenso. (Abb. 8a und 8b) • Um das Reisebett zusammen zu klappen, ziehen Sie die Schlaufe in der Mitte des Bodens hoch und klappen alle Seitenteile zusammen (Abb. 9). • Falten Sie die Matratze um das Reisebett herum und verschließen dieses mit den Klettveschlüssen (Abb. 10). • Um das Reisebett zu transportieren, stecken Sie dieses wieder in die Tragetasche.
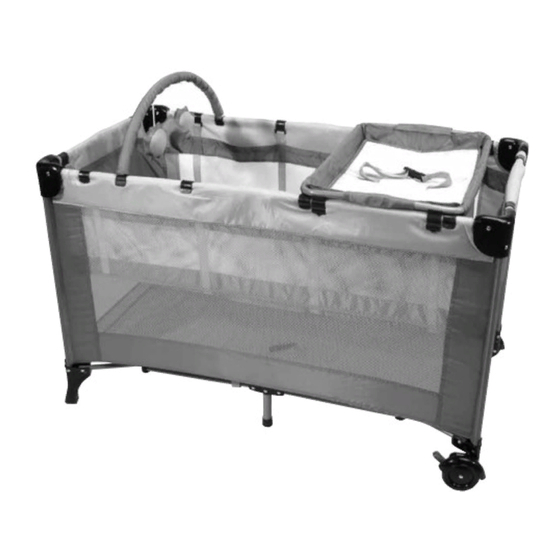
- Page 3 Montage der Wickelauflage • Um die Wickelauflage am Reisebett zu befestigen, müssen Sie zuerst die jeweiligen Haltewinkel mit einer Schraube in die vorgebohrten Löcher an der Unterseite der Wickelauflage befestigt werden. ACHTUNG: Die vier Haltewinkel müssen am Rahmen der Wickelauflage mit den mitgelieferten Schrauben in den dafür vorgesehenen Bohrungen verschraubt werden, ansonsten ist die Sicherheit/Stabilität der Wickelauflage nicht gegeben. Anschließend befestigen Sie die Wickelauflage durch einklicken der Haltewinkel über den Bettrand des Reisebettes (siehe Bild 15). • Um die Wickelauflage am Reisebett zu wieder zu enfernen, ziehen Sie die Plastikhalterung vorsichtig vom Bettrand ab. Feature 1 - Spielbogen: Klippen Sie die beiden Halterungen über den Bettrand an der Stelle an der Sie den Spielbogen gerne befestigen möchten. Um den Spielbogen wieder zu entfernen, ziehen Sie die Halterungen wieder vom Bettrand ab! ACHTUNG: Entfernen Sie den Spielbogen niemals durch ziehen an den Spielfiguren, diese sind dafür nicht gefertigt und können dadurch beschädigt oder auch kaputt gehen. Feature 2 - Spieltunnel: Öffnen Sie den Reißverschluss, um einen zusätzlichen Eingang/Ausgang am Reisebett zu haben. Feature 3 - Rollen: Mithilfe der Rollen kann das Reisebett einfach umgestellt werden. Um das Reisebett zu bewegen, heben Sie es an der Seite mit den festen Standbeinen an, dadurch lassen sich die Rollen bewegen. Die Rollen sind mit einer Bremse ausgestattet. Das Kind darf beim bewegen des Reisebettes nicht darin sitzen oder liegen. Bitte beachten Sie die Sicherheitshinweise und die Anleitung zur Wartung und Pflege!
- Page 5 Feature 2 Feature 3 Feature 1...
- Page 6 A C H T U N G ! WICHTIGE SICHERHEITSINFORMATIONEN! Die Bedienungsanleitung sorgfältig lesen, damit die Sicherheit Ihres Kindes nicht beeinträchtigt wird. Für zukünftiges nachschlagen die Bedienungsanleitung aufbewahren. Das Kind könnte sich verletzen, wenn die Bedienungsanleitung nicht eingehalten wird. • Vor der Montage überprüfen, ob das Produkt und seine Teile während des Transportes nicht be- schädigt wurden. • Kontrollieren Sie regelmäßig den Abnutzungszustand des Produktes. • Im Fall einer Beschädigung darf das Produkt nicht mehr verwendet werden und muss für Kinder unzugänglich aufbewahrt werden. • WARNUNG: Vor Gebrauch evtl. vorhandene Polybeutel und alle Elemente, die Teil der Produktverpackung sind, abnehmen und entsorgen oder auf jeden Fall von Kindern fern halten - Erstickungsgefahr! • Die Montage des Produktes darf ausschließlich von einem Erwachsenen vorgenommen werden. • Vergewissern Sie sich stets vor Gebrauch, dass alle vier Seitenteile am Reisebett, sowie der Boden eingerastet sind. • Das Reisebett ist erst dann betriebsbereit, wenn der Feststellmechanismus des Klapp-systes an den Seitenteilen und am Boden eingerastet ist. • Keine Zubehör, Ersatz- oder Bestandteile am Reisebett anbringen, die nicht vom Hersteller geliefert oder zugelassen sind. • WARNUNG: Schieben Sie das Reisebett nicht, wenn sich Ihr Kind darin aufhält. • Verwenden Sie das Reisebett immer nur für ein Kind.
-
Page 7: Wartung Und Pflege
A C H T U N G ! WICHTIGE SICHERHEITSINFORMATIONEN! • WARNUNG: Die Länge und Breite einer zusätzlichen Matratze dürfen höchstens einen Zwischenraum von 3 cm zwischen der Matratze und den Seiten- und Endteilen zulassen. • WARNUNG: Zur Vermeidung von Stürzen soll das Kinderbett nicht mehr verwendet werden, wenn das Kind in der Lage ist, aus dem Bett herauszuklettern! • WARNUNG: Der Spielbügel darf nur von einem Erwachsenen montiert werden. Lassen Sie nichts im Bett liegen was das Kind zum Hochsteigen benutzen kann. • Wenn Ihr Kind groß genug ist, um über die Seiten zu klettern, sollte das Reisebett nicht mehr verwendet werden. • Empfohlende Verwendungsdauer für das Reisebett: Von der Geburt Ihres Kindes bis ca. zum 4. Lebensjahr. • WARNUNG: Der Spielbügel darf nur von einem Erwachsenen montiert werden. WARTUNG UND PFLEGE: • Pflegen Sie Ihr Reisebett immer regelmäßig. • Stellen Sie sicher, daß das Gestell stabil ist und die Schrauben fest angezogen sind. • Überprüfen Sie gelegentlich den Bezug, um sicherzustellen, daß die Nähte noch alle intakt sind und überprüfen Sie die Qualität der Plastikteile. • Gebrochene oder abgenutzte Verschleißteile sollten sofort ersetzt werden, sowie gerissene Teile. •... - Page 8 Travelling Cot Lucca Center Assembly – and instruction manual...
- Page 9 1 Setting up the Travelling Cot • Remove the travelling cot from the bag. Open the Velcro fasteners and remove the mattress (Fig.1). • Set up the travelling cot upright. Do not yet press the floor of the travelling cot down (Fig.2). • Pull the short sides apart until they engage audibly (Fig. 3a). Then pull the longer sides apart until they also engage audibly (Fig. 3b). Check all sides to ensure that each one has engaged safely. Now press the floor down until it also engages audibly (Fig. 4). • Place the mattress in the travelling cot (Fig. 5). • Fix the mattress by guiding the Velcro fasteners through the 2 holes on either side of the travelling cot floor and close them. Folding the Travelling Cot together • Remove the mattress from the cot (Fig. 6) • Pull the strap on the floor of the travelling cot until the floor is halfway up (fig. 7). • In order to unlock the lateral sides, look for the press buttons underneath the upper frame surface. Press the button upwards and push the relevant lateral side down. Repeat this process with the other three sides (Fig. 8a and 8b). • In order to fold the travelling cot together, pull the strap in the centre of the floor up towards the top and fold all four parts together (Fig. 9). • Wrap the mattress around the folded up travelling cot and hold it in place with Velcro fasteners (Fig. 10). •...
- Page 10 Assembling the Changing Mat • Before attaching the Changing Mat to the travelling cot, you must first fix the relevant supporting angles with a screw in the provided for holes underneath the Changing Mat. ATTENTION: The four supporting angles must be screwed to the frame of the Changing Mat with the provided screws in the prepared bores, otherwise the Changing Mat is not safely / stably fastened. Now fix the changing mat above the travelling cot by engaging the supporting angles (see Fig. 15). • In order to remove the Changing Mat from the travelling cot, gently pull the plastic fittings from the cot frame. Feature 1 - Playing Bow: Clip the two fittings over the cot frame in the desired position, where you want the playing bow to be. Remove the playing bow by pulling the fittings off the cot frame. ATTENTION: Do not remove the playing bow by pulling the toys. They are not suited for that and could be damaged or destroyed by the action. Feature 2 - Playing Tunnel: Open the zip to create an additional entrance / exit to the travelling cot. Feature 3 - Rollers: By using rollers the travelling cot can be moved easily. In order to move the cot, lift the side with fixed legs thereby moving the rollers. They are equipped with a brake. The child should not be inside the cot either sitting or lying down when the travelling cot is moved. Please observe the safety advice and the instructions for maintenance and care!
- Page 12 Feature 1 Feature 2 Feature 3...
-
Page 13: Important Safety Information
AT T E N T I O N ! IMPORTANT SAFETY INFORMATION! Read the instructions for use carefully in order not to compromise your child’s safety. Keep the instructions for use in a safe place for future reference. The child may be harmed, should the instructions not be observed properly. • Before starting the assembly check, whether the product and its parts have not been damaged during transport. • Check the degree of wear and tear of the product in regular intervals. • In case the product is damaged it must not be used anymore and be stored in a place inaccessible for children. • WARNING! Before using the product remove and dispose of any plastic bags and other items that are part of the packaging and keep away from children in any case - danger of suffocating! • The assembly should only be carried out by adults without exception. • Before use, always make sure that all four sides of the travelling cot as well as the floor have safely engaged. • The travelling cot is only then ready for use, when the fixing mechanism of the folding system at the sides and at the floor has safely engaged. • No not fix any accessories or spare parts or components to the travelling cot that have not been supplied or approved by the manufacturer. • WARNING! Do not move the travelling cot, as long as your child is in it. • Use the cot only for one child at a time. -
Page 14: Maintenance And Care
AT T E N T I O N ! IMPORTANT SAFETY INFORMATION! • WARNING: The length and width of an additional mattress may only leave a gap of a maximum of 3 cms between the mattress and the lateral- and end sides. • WARNING: To protect your child from injuries do not use the cot when your child is able to climb out of it! • WARNING: The playing bow may only be assembled by an adult. Do not leave any objects in the cot that your child may use as a climbing aid. • As soon as your child is big enough to climb over the sides, the travelling cot should not be used anymore. • Recommended period of use for the travelling cot: From birth of your child to approx. the 4th year. • WARNING: The playing bow may only be assembled by an adult. MAINTENANCE AND CARE: • Care for your travelling cot regularly • Make sure that the frame is stable and the screws tightened • Check occasionally, whether the cover seams are all right and also check the quality of the plastic parts. • Broken, worn or torn parts should be replaced at once. - Page 15 Lit Parapluie Lucca Center Notice de montage et d‘utilisation...
- Page 16 1 Installation du Lit Parapluie • Sortez le lit de son sac. Ouvrez les attaches Velcro et retirez le matelas (Fig. 1). • Installez le lit parapluie debout. Ne pressez pas tout de suite la surface de jeu vers le sol (Fig. 22). • Tirez les parties les plus courtes jusqu’à ce que leur enclenchement produise un clic (fig. 3a). Puis, tirez les parties longues vers le haut jusqu’à ce que leur enclenchement produise un clic (Fig. 3b). Vérifiez que chacun des côtés soit correctement enclenché. Appuyez à présent sur le sol du lit jusqu’à ce que son enclenchement se fasse retentir (Fig. 4). • Placez le matelas dans le lit parapluie (Fig. 5). • Fixez le matelas par les attaches velcro à travers les deux trous prévus à cet effet sur chaque côté du lit parapluie et fermez-les. Pliage du lit parapluie • Retirez le matelas du lit (Fig. 6). • Tirez la sangle du bas du lit parapluie vers le haut jusqu’à ce que le sol du lit soit à mi-hauteur (Fig. 7). • Afin de débloquer les côtés, cherchez les boutons sous la surface supérieure de l’armature. Pressez les boutons et tirez le côté correspondant vers le bas. Répétez cette étape sur les trois autres côtés (Fig. 8a and 8b). • Afin de plier le lit parapluie, tirez la sangle au centre du sol de lit et pliant les quatre parties ensemble (Fig. 9). • Enroulez le matelas autour du lit parapluie plié et maintenez-le en place avec les attaches Velcro (Fig. 10).
- Page 17 Montage du Matelas à Langer • Avant d’attacher le Matelas à Langer au lit parapluie, vous devez tout d’abord fixer les angles de support correspondants avec une vice dans les trous prévus à cet effet sous le Matelas à Langer. ATTENTION: Les quatre angles de support doivent être vissés à l’armature du Matelas à Langer avec les vices dans les trous prévus à cet effet. Sinon, le Matelas à Langer ne sera pas sûr/stable. À présent, fixez le matelas à langer sur le lit parapluie en enclenchant les angles de support (voire Fig. 15) • Afin de retirer le Matelas à Langer du lit parapluie, tirez délicatement les accessoires plastiques de l’armature du lit. Caractéristique 1 – Arche de jeu: Clipsez les accessoires à l’armature du lit dans la position désirée, à l’endroit où vous désirez que l’arche de jeu soit disposé. Retirez l’arche de jeu en tirant les accessoires de l’armature du lit. ATTENTION: Ne retirez pas l’arche de jeu en tirant les jouets. Ils n’ont pas été prévus à cet effet et pourrait par conséquent être endommagés ou détruits. Caractéristique 2 – Tunnel de jeu: Ouvrez la fermeture pour avoir accès à une entrée/sortie supplémentaire du lit parapluie. Caractéristique 3 – Roues: La présence de roues rend le déplacement du lit parapluie plus facile. Afin de déplacer le lit, soulevez-le sur le côté avec les pieds fixés et les roues bougent facilement. Les roues sont munies de freins. L’enfant ne doit pas s’assoir ou se coucher dans le lit alors qu’il est en mouvement Veuillez suivre les conseils de sécurité et instructions d’entretien!
- Page 19 Feature 2 Feature 3 Feature 1...
-
Page 20: Information De Sécurité
AT T E N T I O N ! INFORMATION DE SÉCURITÉ! Lisez contentieusement les instructions d’utilisation afin de le pas mettre votre enfant en danger. Conservez les instructions avec précaution afin de pouvoir les consulter ultérieurement si besoin. L’enfant risque d’être blessé si les instructions ne sont pas strictement suivies. • Avant de démarrer le montage, vérifiez que le produit et les pièces associées n’aient pas été endommagés pendant le transport. • Vérifiez régulièrement l’état d’usure et de détérioration du produit. • Si le produit vient à être endommagé, il ne doit plus être utilisé et doit être placé hors de la portée de l’enfant. • ATTENTION: Avant d’utiliser le produit, retirez le sac plastique et toute autre partie d’emballage et disposez-les hors de portée des enfants afin d’éviter tout risque de suffocation ! • Le montage doit être réalisé par un adulte. • Avant toute utilisation, veillez à toujours vous assurer que les quatre côtés ainsi que le sol du lit parapluie soient correctement enclenchés. • Le lit parapluie est prêt à l’utilisation lorsque le mécanisme de fixation du système de pliage des côtés et du sol est correctement enclenché. • Ne fixez aucun accessoire, pièce détaché ou composant du lit parapluie provenant d’un autre fabricant. • ATTENTION: Ne déplacez pas le lit parapluie alors que votre enfant est à l’intérieur. • Le lit ne doit être utilisé que par un seul enfant à la fois. -
Page 21: Entretien
AT T E N T I O N ! INFORMATION DE SÉCURITÉ! • ATTENTION: La longueur et la largeur du matelas doivent laisser un interstice de 3 cm maximum entre le matelas et les côtés du lit. • ATTENTION: Pour protéger votre enfant de toute blessure, n’utilisez pas le lit si votre enfant est capable de l’escalader! • ATTENTION: L’arche de jeu doit être montée par un adulte. Ne laissez aucun objet permettant à votre enfant d’escalader le lit à l’intérieur de celui-ci. • Dès que votre enfant est assez grand pour escalader les côtés, le lit parapluie ne doit plus être utilisé. • Il est recommandé d’utiliser le lit parapluie pour un enfant âgé de moins de 4 ans. • ATTENTION: L’arche de jeu doit être montée par un adulte. ENTRETIEN: • Entretenez régulièrement votre lit parapluie • Assurez-vous que l’armature soit stable et que les vices soient bien serrées • Vérifiez régulièrement que les coutures de la couverture ne présentent aucun défaut, et vérifiez également la qualité les parties plastiques. • Si certaines pièces sont cassées, usées ou déchirées, veillez à les remplacer. • N’utilisez que les pièces d’origine du fabricant •... - Page 22 Lettino da viaggio Lucca Center Istruzioni di montaggio e d’uso...
- Page 23 1 Montaggio del lettino da viaggio • Estrarre il lettino da viaggio dalla borsa. Aprire le chiusure a strappo ed estrarre il materasso (Fig. 1). • Posizionare il lettino da viaggio in posizione eretta. Non premere verso il basso il fondo del lettino da viaggio (Fig. 2). • Aprire i componenti laterali più corti fino a che si innestino con un rumore percettibile (Fig. 3a). Aprire poi verso l‘alto i componenti laterali più lunghi fino a che si innestino con un rumore percettibile (Fig. 3b). Controllare tutti i componenti laterali per accertarsi che ognuno di essi sia nnestato in sicurezza. Premere poi il fondo verso il basso fino a che si innesti con un rumore percettibile (Fig. 4). • Posizionare il materasso sul lettino da viaggio (Fig. 5). • Fissare il materasso facendo passare le chiusure a strappo attraverso i 2 fori su entrambi i lati del fondo del lettino da viaggio e poi chiuderle. Come ripiegare il lettino da viaggio • Togliere il materasso dal lettino da viaggio (Fig. 6). • Tirare verso l‘alto il passante posto sul fondo del lettino da viaggio, fino a che il fondo non sia sollevato a metà (Fig. 7). • Per sbloccare i componenti laterali superiori, cercare i pulsanti posti sul lato inferiore dei componenti laterali superiori. Premere il pulsante verso l‘alto e premere poi la relativa parte laterale verso il basso. Ripetere questo procedimento sulle tre altre parti laterali. (Fig. 8a e 8b) • Per ripiegare il lettino da viaggio, sollevare il passante posto al centro del fondo e ripiegare tutte le parti laterali (Fig. 9).
- Page 24 Montaggio del fasciatoio da lettino • Per fissare fasciatoio da lettino al lettino da viaggio occorre prima fissare gli angolari di supporto con una vite ai fori preforati sul lato inferiore del fasciatoio da lettino. ATTENZIONE: I quattro angolari di supporto devono essere avvitati al telaio del fasciatoio da lettino negli appositi fori e utilizzando le viti fornite in dotazione, altrimenti non è garantita la sicurezza/stabilità del fasciatoio da lettino. Successivamente fissare il fasciatoio da lettino premendo gli angolari di supporto sul bordo del lettino da viaggio (vedi 15). • Per rimuovere il fasciatoio da lettino dal lettino da viaggio, staccare con cautela il supporto in plasti- ca dal bordo del letto. Caratteristica 1 - Barra portagiochi: Piegare i due supporti sopra il bordo del letto, nel punto in cui si desidera fissare la barra portagiochi. Per rimuovere la barra portagiochi, staccare i supporti dal bordo del letto! ATTENZIONE: Non rimuovere mai la barra portagiochi tirando i pupazzetti, essi non sono prodotti per tale scopo e possono perciò danneggiarsi o rompersi. Caratteristica 2 - Tunnel da gioco: Aprire la chiusura lampo per arricchire il lettino da viaggio di un‘entrata/uscita aggiuntiva. Caratteristica 3 - Rotelle: Le rotelle permettono di spostare in tutta semplicità il lettino da viaggio. Per muovere il lettino da viaggio, sollevarlo sul lato con le gambe d‘appoggio fisse, in questo modo le rotelle possono muoversi. Le rotelle sono dotate di freno. Quando si muove il letto, il bambino non deve né sedere, né giacere al suo interno Rispettare le avvertenze di sicurezza e le istruzioni relative a manutenzione e cura!
- Page 26 Feature 2 Feature 3 Feature 1...
- Page 27 AT T E N Z I O N E ! INFORMAZIONI IMPORTANTI PER LA SICUREZZA Leggere attentamente le istruzioni per l‘uso per non mettere a rischio la sicurezza del proprio bambino. Conservare le istruzioni per l‘uso per l‘eventuale consultazione in futuro. Il bambino potrebbe ferirsi in caso di inosservanza delle presenti istruzioni per l‘uso. • Prima del montaggio controllare se il prodotto e i suoi componenti abbiano subito danni durante il trasporto. • Controllare regolarmente lo stato di usura del prodotto. • In caso di danneggiamento, il prodotto non deve più essere utilizzato e deve essere conservato in un luogo non accessibile ai bambini. • AVVISO: prima dell‘uso eliminare e smaltire eventuali sacchetti in polietilene e tutti gli elementi facenti parte dell‘imballaggio del prodotto, o comunque tenere lontani i bambini dai predetti elementi - pericolo di soffocamento! • Il montaggio del prodotto può essere eseguito esclusivamente da un adulto. • Prima dell‘uso accertarsi sempre che tutte le quattro parti laterali del lettino da viaggio e il fondo siano ben innestati. • Il lettino da viaggio è pronto all‘uso quando il meccanismo di regolazione del sistema di chiusura è inserito sulle parti laterali e sul fondo. • Non applicare al lettino da viaggio accessori, pezzi di ricambio o componenti che non sono forniti o autorizzati dal produttore.
-
Page 28: Manutenzione E Cura
AT T E N Z I O N E ! INFORMAZIONI IMPORTANTI PER LA SICUREZZA! • AVVISO: La lunghezza e la larghezza di un materasso aggiuntivo possono consentire al massimo uno spazio intermedio di 3 cm fra materasso e parti laterali e terminali. • AVVISO: Per evitare cadute, il letto per bambini non dovrebbe essere più usato se il bambino è in grado di arrampicarsi sul letto! • AVVISO: La barra portagiochi può essere montata solo da un adulto. Non lasciare nel letto tutto ciò che il bambino potrebbe usare per arrampicarsi. • Quando il bambino è abbastanza alto da potersi arrampicare sulle pareti, il lettino da viaggio non dovrebbe più essere usato. • Durata d‘uso consigliata per il lettino da viaggio: dalla nascita del bambino fino a ca. 4 anni di età • AVVISO: La barra portagiochi può essere montata solo da un adulto. MANUTENZIONE E CURA: • PCurare sempre regolarmente il lettino da viaggio. • Accertarsi che il telaio sia stabile e le viti siano ben serrate. • Controllare di tanto in tanto il rivestimento per accertarsi che le cuciture siano tutte intatte e cont rollare la qualità dei componenti in plastica.
Need help?
Do you have a question about the Lucca Center and is the answer not in the manual?
Questions and answers