
Summary of Contents for Aerservice Equipments AIR+
- Page 1 AIR+ Rev 00.00 Pag. 1 di 20 INSTRUCTION GUIDE FOR USE AND MAINTENANCE ©| Aerservice Equipments S.r.l. | 2020 all rights reserved é vietata la riproduzione del presente manuale, anche parziale.
-
Page 2: Table Of Contents
AIR+ Rev 00.00 Pag. 2 di 20 INDEX Description Use and maintenance manual index INDEX ..........................2 Use and maintenance manual index ..................2 INTRODUCTION ....................... 3 Scope of the operating and maintenance manual..............3 Storage of the instruction manual ..................4 Updating of the Instruction Manual .................. -
Page 3: Introduction
AIR+ Rev 00.00 Pag. 3 di 20 INTRODUCTION Description Scope of the operating and maintenance manual This instruction manual is an integral part of the machine and has the purpose of providing all the necessary information for the following purposes: •... -
Page 4: Storage Of The Instruction Manual
AIR+ Rev 00.00 Pag. 4 di 20 INTRODUCTION Description Storage of the instruction manual The instruction manual must be kept safely and must be handed over to new owners in case of sale throughout the lifecycle of the machine. To help preserve the manual in good condition it must be handled with care and with clean hands, and it must not be placed on dirty surfaces. -
Page 5: Glossary
AIR+ Rev 00.00 Pag. 5 di 20 INTRODUCTION Description Glossary This paragraph lists some terms which are not commonly used or with a meaning different from the common one. The meaning of the abbreviations and pictograms used is described below. The abbreviations and pictograms are used to indicate operator qualifications and state of the machine;... -
Page 6: Manufacturer's Identification Data
AIR+ Rev 00.00 Pag. 6 di 20 GENERAL INFORMATION Description Manufacturer’s identification data MANUFACTURER Aerservice Equipments S.r.l. REGISTERED OFFICE – ADMINISTRATIVE OFFICE Viale dell’industria, 24 Z.I. – 35020 – Legnaro – (PD) – Italy CONTACTS Tel. +39 049 641 200 E-mail: info@aerservice.com ©| Aerservice Equipments S.r.l. -
Page 7: Machine Identification And Data Plates (If Present)
AIR+ Rev 00.00 Pag. 7 di 20 GENERAL INFORMATION Description Machine identification and data plates (if present) Each machine is fitted with a CE plate with indelible identification data. All communications with the manufacturer or technical assistance centres must refer to the said data. Year of manufacture Article code... - Page 8 AIR+ Rev 00.00 Pag. 8 di 20 CE CONFORMITY DECLARATION (All. IIA DIR. 2006/42/CE) THE MANUFACTURER Aerservice Equipments S.r.l. Company Viale dell’industria, 24 Z.I. Address Legnaro, PD, Italy City DECLARES THAT THE UNIT Indoor environments sanitizer AIR+ Description Model 2020 Serial number Year of production AIR+...
-
Page 9: Product Introduction
AIR+ Rev 00.00 Pag. 9 di 20 PRODUCT INTRODUCTION BENEFITS THE AIR PURIFIER SYSTEM BRINGS THE MOST ADVANCED AIR PURIFICATION TECHNOLOGY INTO THE COMFORT OF YOUR SPACE Unlike other air purifiers, AIR+ does more than simply filter the air in your space. Incorporating technology like photo catalytic oxidation, high level negative ionization, scalable purification and electrostatic filtration allows the air purification system to provide tangible benefits to your home or workspace by: •... -
Page 10: Specifications / Warnings
AIR+ Rev 00.00 Pag. 10 di 20 SPECIFICATIONS / WARNINGS SPECIFICATIONS UNIT Size: H 305 mm x W 228 mm x D 273 mm Weight: 4.7 kg Coverage: from 23 m2 to 279 m2 (depending on variables such as the severity and frequency of pollution, flow of air in the environment, humidity and temperature) Input: 100-240 Vac - 50/60 Hz - 2.5 A PCO CELL... -
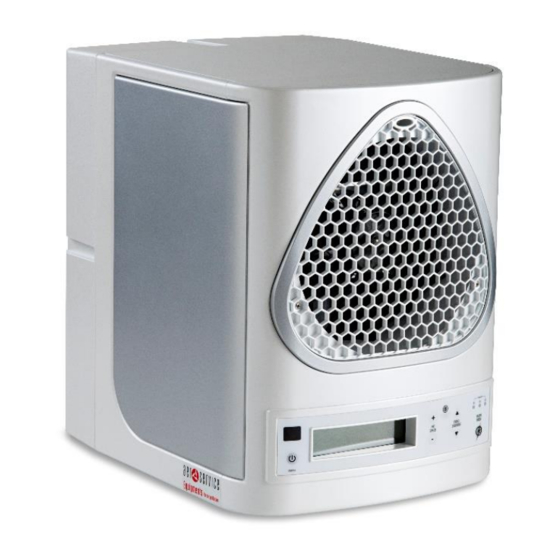
Page 11: Diagrams
AIR+ Rev 00.00 Pag. 11 di 20 DIAGRAMS FRONT OF UNIT REAR OF UNIT SIDE OF UNIT Ionization needlepoint Rear cover screw Rear cover Front grille Rear cover clasps Unit rear Control panel Power adapter inlet Unit front REAR OF UNIT REAR OF UNIT (rear cover removed) (filter assembly removed) -
Page 12: Setup
AIR+ Rev 00.00 Pag. 12 di 20 SETUP IDEAL PLACEMENT There are several important factors to consider when selecting a location for your air purifier: • Make sure the location you choose is as far away from the HVAC air return duct as possible. This will ensure that the purification produced by the air purifier is optimally circulated. -
Page 13: Controls
AIR+ Rev 00.00 Pag. 13 di 20 CONTROLS REMOTE CONTROL PANEL CONTROL PANEL Power control Mode / coverage setting “AWAY” mode – not for use in occupied room LCD screen “AWAY” mode time indicator – not for use in occupied Fan speed setting Maintenance reset room... -
Page 14: Operating The Unit
AIR+ Rev 00.00 Pag. 14 di 20 OPERATING THE UNIT TURNING THE UNIT ON / OFF Press the power button on the Control Panel or Remote to turn the unit on. The unit will initially be set to “NORMAL” Mode. Press the Power Button once more to turn the power off. USING “NORMAL”... -
Page 15: Disassembly / Assembly
AIR+ Rev 00.00 Pag. 15 di 20 DISASSEMBLY / ASSEMBLY TOOLS REQUIRED: You will need a #2 Phillips screwdriver. A countertop or flat surface is ideal for disassembling/assembling your unit. You will need 2 ft. x 3ft. of clean, accessible workspace. It is recommended to use a small bowl or cup to hold any screws so they are not lost during the disassembly / assembly process. - Page 16 AIR+ Rev 00.00 Pag. 16 di 20 INSTALLING THE FILTER ASSEMBLY Hold the Filter Assembly with the larger flat side facing the interior of the unit. A sticker reading, “Caution: Reinstall Filter After Cleaning,” is located on the opposite side of the Filter Assembly. This sticker should be visible when you install the Filter Assembly.
-
Page 17: Cleaning The Unit
AIR+ Rev 00.00 Pag. 17 di 20 CLEANING THE UNIT Your unit should be cleaned monthly to be kept running at peak performance, but depending upon the pollution or odor levels present during initial setup, it is advisable to clean the unit more frequently (weekly or bi-weekly) until the environment has been treated. -
Page 18: Troubleshotting
AIR+ Rev 00.00 Pag. 18 di 20 TROUBLESHOTTING THE UNIT FAILS TO TURN ON Verify that the Power Plug is plugged into an operational wall outlet. Ensure that the Power Adapter Plug is fully seated in the receptacle on the back of the unit. Verify the Power Button has been activated on the Control Panel. - Page 19 AIR+ Rev 00.00 Pag. 19 di 20 ©| Aerservice Equipments S.r.l. | 2020 all rights reserved é vietata la riproduzione del presente manuale, anche parziale.
- Page 20 AIR+ Rev 00.00 Pag. 20 di 20 Aerservice Equipments Srl Viale dell’industria, 24 35020 – Legnaro (PD) Tel. +39 049 641 200 Email: info@aerservice.com equipments.aerservice.com ©| Aerservice Equipments S.r.l. | 2020 all rights reserved é vietata la riproduzione del presente manuale, anche parziale.
Need help?
Do you have a question about the AIR+ and is the answer not in the manual?
Questions and answers