Table of Contents
Advertisement
Quick Links
Advertisement
Table of Contents

Summary of Contents for Vividia HM-250
- Page 1 ® Vividia HM-250 HDMI/LCD/USB/TV Portable Digital Measurement Microscope...
-
Page 2: Table Of Contents
Table of Contents 1. Precaution…………………………………………….…3 2. Preparation……………………………………………..5 ⚫ Package Contents……………………………..…6 ⚫ Part Names & Functions………………………..6 3. Specifications…………………….….………..………7 4. Use the Microscope………..……….………………..8 ⚫ Charge Battery…………………….…..…………8 ⚫ Insert Micro-SD Card……………..……….……9 ⚫ Display Icons & Meanings…….……….….…...10 ⚫ Turn on/off the Microscope…….………………11 ⚫ Capture………………..…..…………………….12 ⚫... - Page 3 ⚫ Language………………………………………..20 ⚫ Format SD………………………………………20 ⚫ Default Setting…………………………….…..21 6. Troubleshooting………………………………….……22 PC Software Introductions…………………...………...23 Install the software ………………….……………………23 Start Microscope………………………………………….24 Software functions………………………………..………25 ⚫ Capture Photo……...…………………………25 ⚫ Capture Video………………….………………..25 ⚫ Timer……………………………………………..26 Calibration and Measurement…………………..………..27 ⚫ Calibration……………………………………..27 ⚫ Measurement……………………………………31 ⚫ Change Calibration…………………..………..32 ⚫ Draw and text…………………………………35 Software Interface Instructions………………...……..36 ⚫...
-
Page 4: Precaution
Welcome Thank you for purchasing the Vividia® HM-250 HDMI/LCD/USB/TV Portable Digital Microscope. This digital microscope integrating LCD/HDMI/TV/USB functions is highly useful for students, teachers, collectors, hobbyists, and testers etc to explore the microscopic world. Please take a moment to read through this manual. Its contents will help you get the best use of the innovative microscope. - Page 5 ⚫ Sudden temperature change may form dew inside the Microscope like entering a warm room in cold winter. Put it inside a handbag or plastic bag to slow down temperature changes. ⚫ Do not point Microscope lens to the sun or strong light for a long time.
-
Page 6: Preparation
2. Preparation ■ Package Contents Microscope Stand AC adaptor Capture remote HDMI cable USB cable TV cable Micro-SD card Manual... -
Page 7: Part Names & Functions
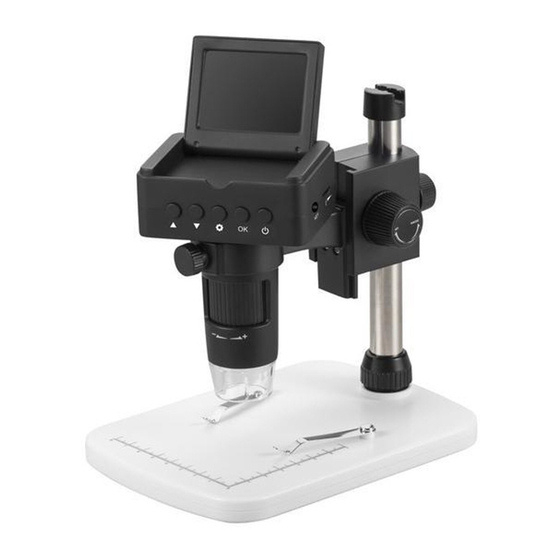
■ Parts Names & Functions Focus wheel Down HDMI-out Setup/Delete 1/4-inch screw OK (Confirm) TV-out DC: charge battery Power on/off USB: output to PC LED Dimmer Photo/Video switch Capture remote input Capture Charging indicator Playback Micro-SD slot Zoom in 2.4-inch LCD Zoom out... -
Page 8: Specifications
3. Specifications Display: 2.4-inch LCD Magnification Ratio: 10x to 220x Image sensor: 3 Mega Pixels Photo size: 3M, 5M, 8M, 12M Video size: 1080P, 720P, VGA Video output: HDMI/TV/USB Focus Range: Manual focus from 10mm to 50mm Storage: Micro-SD card, up to 32G Measurement: Yes, when working as a USB microscope Light source: LED (adjustable by dimmer) Power source: Built-in Li-ion Battery or 5V DC-in... -
Page 9: Use The Microscope
4. Use the Microscope 4.1 Charge the Built-in Battery Before using the microscope, you are suggested to charge the built-in battery by using the supplied power adaptor. -
Page 10: Insert Micro-Sd Card
4.2 Insert a Micro-SD Card 1) Turn off the microscope 2) Insert the Micro-SD card into the Micro-SD card slot; gently press in until card is latched. Note: Do not force the card into the slot; forcing may damage microscope and the Micro-SD memory card. Align Micro-SD card position (as marked) and try again. -
Page 11: Display Icons & Meanings
4.3 Display Icons & Meanings Icon Meaning Still image capture Video capture Exposure Total qty that could be captured (based on the current resolution) Micro-SD card inserted Current resolution Battery electricity indicator Note: The icon displays will be off when there is no key pressed for 5s. -
Page 12: Turn On/Off The Microscope
4.4 Turn On/Off the Microscope Press the On/Off button to power on the microscope. Press again to turn it off. -
Page 13: Capture
4.6 Capture Turn on the microscope, point its nozzle to the target object to be observed, rotate its focus wheel slightly until get a clear point, press button on the capture remote one time and a photo will be captured and saved on Micro-SD card. -
Page 14: Playback
4.7 Playback Press button on the capture remote, you can switch to playback mode, and then you can press to scroll the captured photos and videos. 4.8 Delete At playback status, press , you can choose to delete the current file or all files. 4.9 Zoom in/out At previewing status, you can push #19 or #20 on the capture remote to zoom in or out digitally. -
Page 15: Download Files To Computer
4.10 Download Files to Computer 1) Connect the microscope to computer by USB cable. 2) Choose Mass Storage and then you can view stored photos & videos. 4.11 Output Live Video to Computer 1) Take out Micro-SD card. 2) Connect the microscope to computer by USB cable. 3) Choose PC Camera mode 4) Start PortableCaptureHD software. -
Page 16: Output Live Video To Monitor By Hdmi/Tv
4.12 Output to Monitor by HDMI or TV... -
Page 17: Screen Menu Introductions
5. Screen Menu Introductions You can press to enter camera setup, with options as follows. 5.1 Photo Resolution You can select a resolution for photo taken among 12M/8M/5M/3M. 5.2 Video Resolution You can select a resolution for video recording among 1080P/720P/VGA. -
Page 18: Exposure
5.3 Exposure You can adjust the white balance as follows. 5.4 Date/Time Setup system date and time. -
Page 19: Date Stamp
5.5 Date Stamp Choose whether put date and time mark on capture photos and videos. 5.6 TV Out Select between NTSC and PAL for the TV output of the microscope, to make it compatible with that of your TV. -
Page 20: Loop Recording
5.7 Loop Recording Select length of each video clip. Off means not to turn on loop recording. 5.8 Auto Power Off Select a time for the microscope to power off automatically without key operation. -
Page 21: Language
5.9 Language Select OSD language. 5.10 Format SD Format the inserted Micro-SD card. -
Page 22: Default Setting
5.11 Default Setting Reset the microscope configuration to default setting. -
Page 23: Troubleshooting
6. Troubleshooting Problems Solution The unit does not turn on. Charge the battery. Ensure that the power is on. Charge the battery. The screen is blank. Verify that the item you want to magnify is Positioned correctly under the lens. There are smudges or Clean the screen and lens carefully with soft blemishes on the screen... -
Page 24: Pc Software Introductions
■ PC Software Introduction 1. Install the Software on PC (Win/Mac) Insert the driver CD into CD-ROM Drive and then open the CD. Double click to install PortableCaptureHD and the installation wizard will guide you through the whole process. -
Page 25: Start Microscope
2. Start Microscope Connect your Microscope to your PC USB port, start the software by clicking the icon generated on the desktop after installation and you will see the following screen pop up. When the Microscope is disconnected from your PC USB port, the following message will pop up. -
Page 26: Software Functions
3. Software Functions ■ Capture Photo a. Click ‘Photo’ shortcut icon in the main menu bar. b. Click ‘Capture > Photo’. ■ Capture Video a. Click ‘Video’ shortcut icon in the main menu bar. b. Click ‘Capture > Video’. -
Page 27: Timer
■ Timer (Photo / Video) Click ‘Timer’ shortcut icon in the main menu bar. * Under Timer photo, you can set the start time, interval time and total picture number. * Under Timer video, you can set the start time, interval time and total video number. -
Page 28: Calibration And Measurement
■ Calibration and Measurement Please make calibration before measurement. Calibration Display Crossing from ‘Options>Crossing’’. Microscope default at crossing “on” It’s used to check the dial on the calibration ruler. - Page 29 1. Focus microscope on the attached calibration ruler and then adjust the magnification till the picture is clear. Take a picture for the selected area when the dial is parallel to the crossing as below. 2. Double-click on the picture to enter into measurement interface as below.
- Page 30 3. Click Calibration icon , and then move mouse to the picture. Click on the beginning and ending points across a known value. Now a dialog will popup as below and you need to enter the exact value of the measurement sample into ‘Actual dimension’.
- Page 31 4. Now you can use ‘Any angle Line’ under Measurement icon to measure the value again. If the value you measure by software is nearly the same as the exact value of the dial means the calibration finish.
-
Page 32: Measurement
Measurement Double-click on the picture to enter into measurement interface. Under the ‘Measurement’ icon , you can choose any desired options to measure. 1. Any Angle Line Measurement Simply click from one point and drag to the next point, and then release the click. -
Page 33: Change Calibration
Change Calibration If you need to change the magnification rate and adjust focus capture picture, please calibrate magnification rate again. 1. Double click to open the picture, Click ‘ > Reset magnification > Reset picture magnification’ as below. And then start calibration again (Calibration details please refer to page18). - Page 34 2. Change the magnification rate and capture several pictures, click on the picture to enter into measurement interface. And click ‘ > Set magnification > Set picture magnification’, now a dialog will show up as below; enter the magnification rate into the dialog and click ‘OK’.
- Page 35 3. If you want to use the same magnification rate to capture pictures, just click ‘ > magnification >Set capture magnification’. Now all pictures will use the same magnification rate and you can start measurement directly.
-
Page 36: Draw And Text
Draw and Text You can draw or add a text on the picture and save for later analysis. 1. Click icon to choose any kinds of drawing under the pull-down manual as below. 2. Click icon and set the font for the text in the popup dialogue as below. -
Page 37: Software Interface Instructions
Software Interface Instructions Main Interface Icons Capture photo – It’s used to capture photo one by one. Start / Stop record video. Timer for photo / video – Set the start time, interval time and total photo/video number. Full screen mode, Press ESC or double-click to exit. -
Page 38: Main Menu
Main Menu File Photos Directory: set the directory to store photos taken; Videos Directory: set the directory to store video taken;... -
Page 39: Options
Options Resolution: change preview size Date/Time: set to display system date/time on preview window Language: choose different OSD language Crossing: display cross on preview window Full-screen mode: enter into full screen. Click ESC or double click to exit... -
Page 40: Capture
Capture Photo: take a photo Video: record a video clip... -
Page 41: Measurement Interface Instructions
Measurement Interface Instructions Save as Redo Copy to Draw clipboard Copy file Text note Previous Measurement Next Calibration Undo... - Page 42 There are separate collection systems for recycling in the EU. more information, please contact the local authority or your retailer where you purchased the product. Vividia Technologies 3110 Wade Hampton Blvd. Suite 18 Taylors, SC 29687 www.vivdia-tech.com info@vividia0tech.com...
Need help?
Do you have a question about the HM-250 and is the answer not in the manual?
Questions and answers