Table of Contents
Advertisement
Quick Links
Advertisement
Table of Contents

Summary of Contents for TMB ProPlex IQ One+ Mini
- Page 2 Specifications are subject to change without notice. The information in this document supersedes all previously supplied information before the effective date listed above. TMB has confidence in the accuracy of the document information herein but assumes no responsibility or liability for any loss occurring as a direct or indirect result of errors or exclusions whether by accident or any other cause.
-
Page 3: Table Of Contents
—16 PORT SETUP —16 UNIVERSE SET —17 PORT DIRECTION —18 —18 PRIORITY —19 PROTOCOL SETUP —19 PROTOCOL —20 EASY PRIORITY —20 ACTION ON SOURCE LOSS —21 DMX RATE —21 UNIVERSE FORMAT ProPlex IQ One+ Mini User Manual v1.1 – 30112020... - Page 4 PORT ROUTING —33 PROTOCOL SETUP —34 CONFIGURATIONS —35 FIRMWARE UPGRADE PROPLEX SOFTWARE —36 FRONT PANEL LED INDICATORS —37 REAR PANEL LED INDICATORS —38 TECHNICAL SPECIFICATION —39 RETURN PROCEDURE —40 CONTACT INFORMATION —41 ProPlex IQ One+ Mini User Manual v1.1 – 30112020...
-
Page 5: Limited Warranty
(2) years from the date of original sale by TMB. TMB’s warranty shall be restricted to the repair or replacement of any part that proves to be defective and for which a claim is submitted to TMB before the expiration of the applicable warranty periods. -
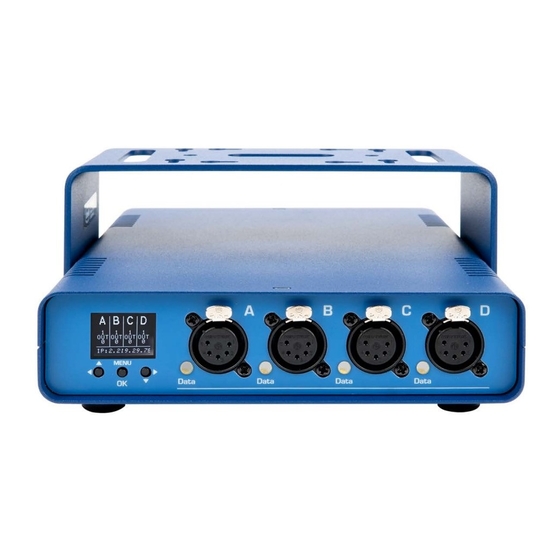
Page 6: Product Overview
Bi-directional RDM functionality - input or output on any DMX port Compact, tour-ready “Blue Box” enclosure with removable yoke for truss mounting or desktop use RackMount kits available, for single or double units ProPlex IQ One+ Mini User Manual v1.1 – 30112020... - Page 7 DIAGRAMS ProPlex IQ One+ Mini User Manual v1.1 – 30112020...
-
Page 8: Setup -8
Caution! There are no user serviceable parts inside the unit. Do not open the housing or attempt any repairs yourself. In the unlikely event your unit may require service, please contact your distributor. ProPlex IQ One+ Mini User Manual v1.1 – 30112020... -
Page 9: Rigging Proplex Enclosures -9
• Always use safety cables! • When selecting installation location, consider routine maintenance. • Never mount Mini enclosure where it will be exposed to moisture, high humidity, extreme temperatures, or restricted ventilation. ProPlex IQ One+ Mini User Manual v1.1 – 30112020... -
Page 10: Rackmount Kits -10
To fasten the rack ears or joiners to the ProPlex PortableMount chassis, remove the two chassis screws on each side at the front or rear of the chassis. These same screws are used to securely fasten the RackMount ears and joiners to the chassis. ProPlex IQ One+ Mini User Manual v1.1 – 30112020... -
Page 11: Installing The Dual Joiners
Each link piece is identical. Simply rotate the joining link and line up the installation holes to install on either the left or right side of the corresponding unit. ProPlex IQ One+ Mini User Manual v1.1 – 30112020... -
Page 12: Mounting In The Rack
Single or Dual Mounting configurations. RACKMOUNT KIT ORDERING CODES When ordering ProPlex RackMount Kits, Single or Dual, be sure and specify “Small” for the ProPlex IQ One+ Mini. PP1RMKITSS - ProPlex 1U RackMount Kit, Small, Single PP1RMKITSD - ProPlex 1U RackMount Kit, Small, Dual... -
Page 13: Connection Scheme-13
3— Connect the second etherCON port to another IQ One+ Mini. To complete a ring topology connection, begin and end the network chain with a RSTP enabled switch like ProPlex GBS or EZ-LAN. ProPlex IQ One+ Mini User Manual v1.1 – 30112020... -
Page 14: Operation -14
UP and DOWN selection. BACK — Located on each menu page, allows exiting to the previous menu level when is selected. ProPlex IQ One+ Mini User Manual v1.1 – 30112020... -
Page 15: Menu Map
MENU MAP ProPlex IQ One+ Mini User Manual v1.1 – 30112020... -
Page 16: Home Screen
Navigate to any of the four ports with the UP and DOWN buttons to and press MENU/OK to access the desired port’s settings. Select the back arrow to return to the Main Menu. —UNIVERSE SET ProPlex IQ One+ Mini User Manual v1.1 – 30112020... -
Page 17: Port Direction
OK. The asterisk symbol indicates which option is active. Press UP or DOWN to navigate between the two options (OUT/ IN) and OK to assign the direction of the port. After setting the port direction, Select the back arrow to return to the previous menu. ProPlex IQ One+ Mini User Manual v1.1 – 30112020... -
Page 18: Rdm -18
When the desired Priority value is set, highlight the Save button and press OK to save. Highlight the Back button and press OK to return to the previous menu. ProPlex IQ One+ Mini User Manual v1.1 – 30112020... -
Page 19: Protocol Setup
OK. The asterisk symbol indicates which option is active. Press UP or DOWN to navigate between the options and OK to assign the desired Protocol of IQ One+ MIni After setting the Protocol, select the back arrow to return to the previous menu. ProPlex IQ One+ Mini User Manual v1.1 – 30112020... -
Page 20: Easy Priority
“Stop DMX” completely stops the sending of DMX signal in the event of source loss. After setting the Source Loss action, select the back arrow to return to the previous menu ProPlex IQ One+ Mini User Manual v1.1 – 30112020... -
Page 21: Dmx Rate
OK. The asterisk symbol indicates which option is active. Press UP or DOWN to navigate between the options and OK to select a format. After setting the DMX universe format, select the back arrow to return to the previous menu. ProPlex IQ One+ Mini User Manual v1.1 – 30112020... - Page 22 When the desired IP Address is set, highlight the Save button and press OK to save. Highlight the Back button and press OK to return to the previous menu. ProPlex IQ One+ Mini User Manual v1.1 – 30112020...
- Page 23 When desired value is selected, press OK to stop the blinking arrow and repeat for other decimal values. When the desired IP Mask is set, highlight the Save button and press OK to save. Highlight the Back button and press OK to return to the previous menu. ProPlex IQ One+ Mini User Manual v1.1 – 30112020...
-
Page 24: Device Setup
In the Main Menu, press UP and DOWN buttons to navigate to the Device menu and press the MENU/OK button to enter Device Setup. Select the back arrow to return to the home screen ProPlex IQ One+ Mini User Manual v1.1 – 30112020... -
Page 25: Label -25
OK. The asterisk symbol indicates which option is active. Press UP or DOWN to navigate between the options and OK to select. After setting the LED & Screen brightness, select the back arrow to return to the previous menu ProPlex IQ One+ Mini User Manual v1.1 – 30112020... -
Page 26: Device Info
The Device Info menu shows the model name, firmware version and MAC address of the unit. Visit our website www.tmb.com to check the latest operating firmware for the IQ One+ Mini and access change log notes for all our products. -
Page 27: User Configuration 1 And User Configuration
If YES is selected, all current Network and Port settings will be saved to internal memory location for that User Configuration. After selection, the screen will return to the previous menu. ProPlex IQ One+ Mini User Manual v1.1 – 30112020... -
Page 28: Loading A User Configuration
A selection box will display on screen to verify the reset action. Using the UP or DOWN buttons, highlight the either YES or NO and press the OK button to confirm. After selection, the screen will return to the previous menu. ProPlex IQ One+ Mini User Manual v1.1 – 30112020... -
Page 29: Factory Reset
A selection box will display on screen to verify the reset action. Using the UP or DOWN buttons, highlight the either YES or NO and press the OK button to confirm. After selection, the screen will return to the previous menu. ProPlex IQ One+ Mini User Manual v1.1 – 30112020... -
Page 30: Browser Interface
The right side of the screen displays information from the currently chosen menu and will change depending on the menu selection. ProPlex IQ One+ Mini User Manual v1.1 – 30112020... -
Page 31: Status -31
IP range. EASY IP is enabled with a dropdown menu. LED BRIGHTNESS — Control the brightness of status LEDs at three levels: Off, Dimmed and Full. LED BRIGHTNESS settings are enabled with a dropdown menu. ProPlex IQ One+ Mini User Manual v1.1 – 30112020... -
Page 32: Port Routing
Zero “0” is the lowest priority and “200” is the highest. UNIVERSE VIEW FORMAT — Changes the way ProPlex Software displays universe information. Choose from the following options in the dropdown menu: DECIMAL, HEX, BASE 16 or ALPHANUMERIC. ProPlex IQ One+ Mini User Manual v1.1 – 30112020... -
Page 33: Protocol Setup
DMX over Ethernet at a higher rate than typical, for the purposes of having DMX Fixtures (LEDs) behave like low- resolution video. Note: Some devices may not work with this setting. ProPlex IQ One+ Mini User Manual v1.1 – 30112020... -
Page 34: Configurations -34
UPLOAD CONFIG FILE — Browse your computer for a previously saved file location. Once uploaded, the settings will automatically apply to the unit, at which point you will have the option of recording into the internal user configuration memory. ProPlex IQ One+ Mini User Manual v1.1 – 30112020... -
Page 35: Firmware Upgrade
Bootloader Mode and upgrading via the Browser Interface. You can visit our website to check the current operating firmware and change log notes for all our products at www.tmb.com. First, hold the UP and OK buttons simultaneously while plugging in the powerCON connector. Hold for 3 seconds until the device screen indicates you have entered the Bootloader Mode Using the IP address displayed on the screen, type it into the internet address bar of your browser and press enter. -
Page 36: Proplex Software
ProPlex Software v2 includes a full suite of configuration and monitoring features and simplifies managing multiple nodes on a network. The software is available for free on our website. Visit www.tmb.com for more information. ProPlex IQ One+ Mini User Manual v1.1 – 30112020... -
Page 37: Front Panel Led Indicators -37
FRONT PANEL LED INDICATORS PORT STATUS The IQ One+ Mini has multicolor activity LEDs for each output port on the front of the unit ProPlex IQ One+ Mini User Manual v1.1 – 30112020... -
Page 38: Rear Panel Led Indicators -38
REAR PANEL LED INDICATORS NETWORK STATUS ProPlex IQ One+ Mini User Manual v1.1 – 30112020... -
Page 39: Technical Specification
Unit Dimensions (WxHxD) [190 x 92.3 x 222.3 mm] 9.75 x 4.75 x 13.75 in Shipping Dimensions (WxHxD) [247.65 x 120.65 x 349.25mm] Unit Weight 5.3 lbs Shipping Weight 5.9 lbs ProPlex IQ One+ Mini User Manual v1.1 – 30112020... -
Page 40: Return Procedure
Please send returned merchandise prepaid and in the original packing. Freight call tags will not be issued for shipping the product to TMB, but TMB will pay the freight for return to the customer. Clearly label package with a Return Merchandise Authorization Number (RMA #). Products returned without an RMA # will delay service. -
Page 41: Contact Information
Providing products and services for the industrial, entertainment, installation, defense, broadcast, research, telecommunications, and signage industries. Servicing the global market from offices in Los Angeles, London, New York, Toronto, and Beijing. ProPlex IQ One+ Mini User Manual v1.1 – 30112020... - Page 42 ProPlex IQ One+ Mini User Manual v1.1 – 30112020...
Need help?
Do you have a question about the ProPlex IQ One+ Mini and is the answer not in the manual?
Questions and answers