
Related Manuals for Mach Power Prisma EB-3DP16-016

Summary of Contents for Mach Power Prisma EB-3DP16-016
- Page 2 REV 020817...
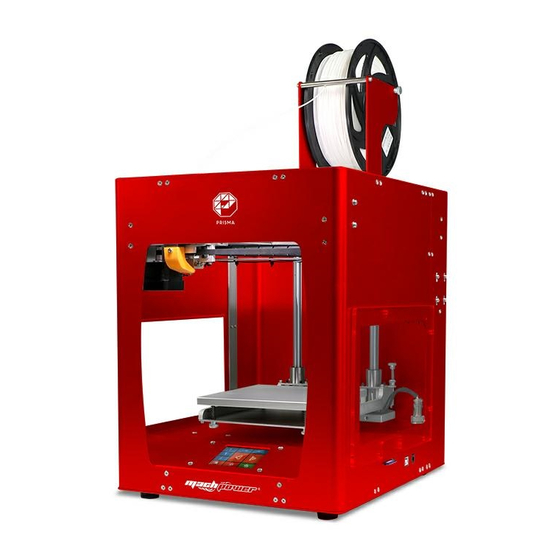
- Page 3 Thanks For choosing our product PRISMA Series Desktop 3D Printers inheriting the design concept of the simple to the extreme. Use it can build parts quickly and easily, even if you’ve never used a 3D Printer. The printer use the ABS or PLA to produce the model, so the parts are strong and durable. ABS or PLA material also ensures that you can model for drilling, tapping, grinding and painting.
- Page 4 USER-GUIDE INSTRUCTIONS This user guide has been carefully choreographed, divided into “Setup”, “operations”, “Maintenance” and “Troubleshooting” sections, so that the readers can read in order. Please be sure to carefully read each part, in order to enjoy the best performance of the system. LEARN MORE INFORMATION SD card provides the electronic user guide.
- Page 5 CHAPTER1 OVERVIEW Overview PRISMA Series Desktop 3D Printers through the stl file into gcode document production model. The printer make part in the following ways: through computer-controlled printing nozzle, squeeze ABS or PLA material that can be used to produce high-quality parts. PRISMA Series Desktop 3D Printers product dimensions and sizes can be made as follows.
- Page 6 CHAPTER2 INSTALLATION Install Machinery Take Out the Machine,can not pull the optical axis inside the machine, otherwise it will cause deformation of the optical axis. Install the Material Shelf Step 1: Use the M3 screw, which attached in the accessory box Step 2: Plugged in.
- Page 7 Paste the Masking Tape Tear the broken tape and paste a new one, pay attention not to overlap and too large clearance.(If the tape is not broken, it can be reused). Install the Material (for example, PLA materials) 1. Click Control Panel from “Unload” to “ head preheat”, adjust the extrusion nozzle temperature to 205°C. Turn “ON” ( left), extrusion nozzle temperature is automatically heated to 205°C.
- Page 8 Manual Calibration NOTE. BEFORE CALIBRATION, YOU NEED TO DISMANTLE THE MODEL AND PUT A NEW TAPE. 2.6.1 Preparation for Calibrating 1. Click “Application” on the display panel, Enter the Manual control. 2. Click on the Z axis reset icon, the hot bed will rose to the maximum height. 3.
- Page 9 Printing the Test Files Click on the SD card icon, chose a gcode file which you want to print. Click on print icon, the machine will automatically start to print. ,When printing bottom layer, Observe the print nozzle. If the material can not pasted on the hotbed, you need to Adjusting nut coun- ter clockwise.
- Page 10 Temperature monitoring curve Extruder Head “T0” Manually enter the temperature Extrusion Turn on or off the heating Return Back Material retraction ( Be careful) *Only if the nozzle is heated to preset temperature can you extrude the material. Using retraction may cause nozzle clogged. 3.2.2 Value input 1.
- Page 11 3.2.3.1 Manual XYZ means X/Y/Z axis. “X/Y”which control Extruder Head move Left and right, Front and Back. “Z” means build plate Up and Down. is move “X/Y/Z” move distance and speed. is Direction: move toward Original Point, move away from Original point. (The Original Point located at the Left Front corner).
- Page 12 Printing Display During printing, it shows printing position, Head/ build plate temperature, File name, printing time and its printing bar. In addition, you can click “Printing head””Heating bed” to adjust the real temperature. Cancel Printing and Return X/Y axis to the Original Position. Pause Printing, Printing head will move away.
- Page 13 CHAPTER6 POWER OUTAGES If want to cut off the printer power, please press the power button again. You could do it at anytime, it will not damage the printer. And there is no need to operate any other steps. If you do it when printer is making parts, it will not finish the current printing task. Note: After turning off the power switch, the system cooling fan and indicator light will continue to work for a few seconds.
- Page 14 CHAPTER8 TROUBLE REMOVAL Without power 1. Verify whether the power cord is firmly inserted. 2. Turn on the power switch, whether the power switch is on or not. 3. Verify whether the AC wall socket is provided or not. Not extruded material Materials may be stuck in the nozzle, please refer to 500 hours maintenance.
Need help?
Do you have a question about the Prisma EB-3DP16-016 and is the answer not in the manual?
Questions and answers