
Summary of Contents for PDi GO-GO PDI-GO24
- Page 1 ASSEMBLY INSTRUCTIONS Document Number: PD196-410R2 GO-GO™ Gamer Cart System Games-On-the-GO™ Portable Patient Gamer System PDI-GO24, Gamer Cart with 24" Hospital TV Display PDI-GO32, Gamer Cart with 32" Hospital TV Display mymedTV.com...
-
Page 2: Safety Information
CAUTION: To avoid damage to the surface of the television, do not use abrasive or chemical cleaning agents. www.pdiarm.com www.mymedTV.com PDi Communication Systems, Inc. ▪ 40 Greenwood Ln ▪ Springboro, Ohio 45066 USA ▪ ▪ Phone 800.628.9870... -
Page 3: Safety Instructions
When a cart is used, use caution when moving the cart/apparatus combination to avoid injury from tip-over. www.pdiarm.com www.mymedTV.com PDi Communication Systems, Inc. ▪ 40 Greenwood Ln ▪ Springboro, Ohio 45066 USA ▪ ▪ Phone 800.628.9870... -
Page 4: Safety Instructions (French)
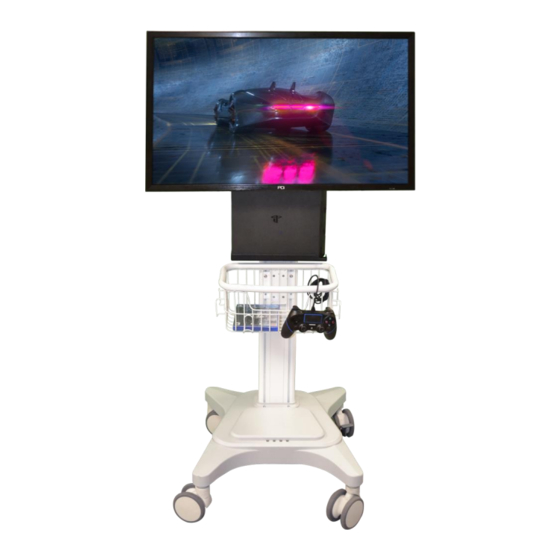
12. Utiliser uniquement avec un chariot, stand, trépied, support ou table recommandé par le fabricant ou vendu avec l'appareil. www.pdiarm.com www.mymedTV.com PDi Communication Systems, Inc. ▪ 40 Greenwood Ln ▪ Springboro, Ohio 45066 USA ▪ ▪ Phone 800.628.9870... - Page 5 24” PDi hospital TV flush mounted to the GO-GO Gamer Cart with a wire basket to store the game controllers; b) a 32” PDi hospital TV flush mounted to the GO-GO Gamer Cart with a wire basket to store the game controllers; c) the optional short arm installation on a 24”...
- Page 6 Re-position the plate and re-install the cover plate that was removed in step 3. Tighten the screws to 6 in-lbs. torque. 10. Attach the Trim Collar to the Base with the (4) Self- Threading screws, PD151-003-13, as shown here. www.pdiarm.com www.mymedTV.com PDi Communication Systems, Inc. ▪ 40 Greenwood Ln ▪ Springboro, Ohio 45066 USA ▪ ▪ Phone 800.628.9870...
- Page 7 Using the 4mm hex wrench, insert the two (2) M6 x 10 Button Head Socket Cap Screws. The maximum tightening torque is 6in-lbs. www.pdiarm.com www.mymedTV.com PDi Communication Systems, Inc. ▪ 40 Greenwood Ln ▪ Springboro, Ohio 45066 USA ▪ ▪ Phone 800.628.9870...
- Page 8 Plug in the other end of the HDMI cable into the HDMI1 port on the TV. Plug in the power cable for the TV. www.pdiarm.com www.mymedTV.com PDi Communication Systems, Inc. ▪ 40 Greenwood Ln ▪ Springboro, Ohio 45066 USA ▪ ▪ Phone 800.628.9870...
- Page 9 PDi Communication Systems Inc., (“PDi”) standard warranty information is found at pdiarm.com. For information regarding authorized servicing and all other information pertaining to this warranty, please contact PDi COMMUNICATION SYSTEMS, INC. at 40 Greenwood Ln, Springboro, Ohio 45066 or phone 800-628-9870 and ask for the PDi ProServices team.
Need help?
Do you have a question about the GO-GO PDI-GO24 and is the answer not in the manual?
Questions and answers