
Subscribe to Our Youtube Channel
Summary of Contents for Silent Gliss SG 11429
- Page 1 Installation and User Manual March 2020 Single Channel Timer Remote SG 11429 Page 1 of 12...
-
Page 2: Table Of Contents
Contents Features ..............................3 Screen Display & Button Functions ......................4 Technical Data............................5 General Operation ............................5 Installation ..............................6 Timer Set-up ..............................7 Step 1 Timer unit activation ........................7 Step 2 Addressing Timer Unit to Motor .....................8 Changing Direction.............................8 Step 3 Setting the Clock (time of Day) .......................9 Step 4 Setting the Timer –... -
Page 3: Features
Features Radio control Battery operated LCD display Manual click buttons Timer function – one single open / close time applied to every day Manual override function CR2450 battery (Lithium Cell) Surface mounted back box with magnetic holder Page 3 of 12... -
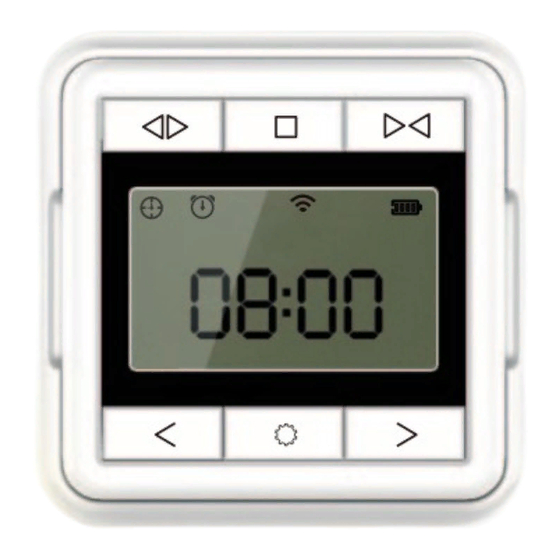
Page 4: Screen Display & Button Functions
Screen Display & Button Functions Stop Open Close Clock Battery Status Timer Signal Status Time Shift Left Shift Right Setting Rear View On / Off button Page 4 of 12... -
Page 5: Technical Data
The SG 11429 can be used in either a timer mode - 1 open operation and 1 close operation can be programmed per day / 24 hour cycle, the timer function can be turned on or turned off and in either mode still operated as a manual wall switch. -
Page 6: Installation
Installation A) Installation with adhesive – available for glass and smooth tile. 3M adhesive 3M adhesive 1 ) Remove cover from adhesive strips 2 ) Position on tile or glass and apply pressure B) Installation with screw – available for wall. Wall 1) Position and Insert fixings into the wall 2) Fix surface mounted back box –... -
Page 7: Timer Set-Up
Timer Set-up Step 1 Timer unit activation Remove from surface holder, turn over to view the rear of the unit. Open battery cover and activate unit by pressing on / off button – LCD display screen on front will activate. Rear View Press to turn on Page 7 of 12... -
Page 8: Step 2 Addressing Timer Unit To Motor
Step 2 Addressing Timer Unit to Motor 1. — Push PROGRAMMING button on motor with a pin for 1s 2. — LED on motor blinks red 3. — Press OPEN button on timer within the next 10s 4. — Blue light on motor flashes 3 times Warning If at this point the operation of the track is in reverse to the button direction, follow the instructions below. -
Page 9: Step 3 Setting The Clock (Time Of Day)
Step 3 Setting the Clock (time of Day) Note: i) When setting the clock – press OPEN to increase the hours / minutes, press CLOSE to decrease the hours / minutes. If you hold either the OPEN or CLOSE buttons for longer than 2 seconds and the digits will scroll rapidly whilst held. -
Page 10: Step 4 Setting The Timer - (Open And Close)
Step 4 Setting the Timer – (open and close) 1. — Press SETTING button for 1 second and release – the clock symbol appears on screen top left. 2. — Press SHIFT RIGHT – the clock will disappear, and the timer symbol will flash. 3. -
Page 11: Turn Off Timer Function
Turn Off Timer Function 1). With the timer function symbol on screen and timer function on - to now turn off Press and hold both SHIFT left and SHIFT right together and hold for 3 seconds - the timer symbol will dissappear and the timer function is now switched off. - Page 12 www.silentgliss.co.uk Page 12 of 12...
Need help?
Do you have a question about the SG 11429 and is the answer not in the manual?
Questions and answers