Table of Contents
Advertisement
Quick Links
Advertisement
Table of Contents

Summary of Contents for SCHUMANN Momo
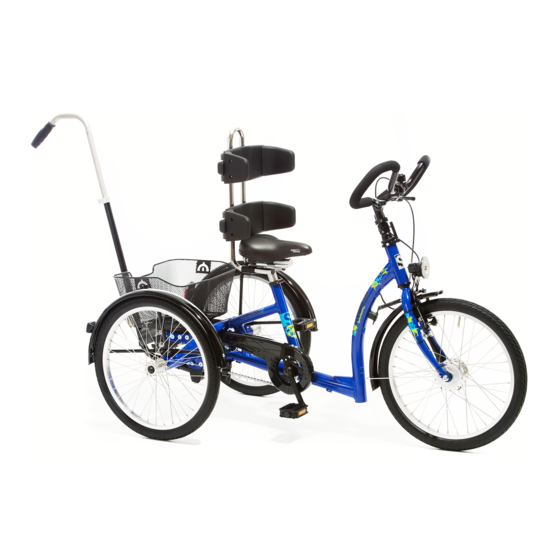
- Page 1 Instructions for use. momo tricycle. The tricycle as therapy aid.
- Page 2 Many thanks. Dear Customer At this point we would like to thank you for placing your trust in our company and for purchasing our product. We ask you to read through the Instructions for use carefully prior to initial commissioning of the product, and to observe them. Please note that gui- delines and representations in these Instructions for use may deviate from your product due to differing equipment.
-
Page 3: Table Of Contents
2. Product description. Contents. 1. Preparation................... 05 1.1 Delivery ..........................05 1.2 Safety measures prior to use ................05 1.3 Safe disposal .......................05 1.3.1 Packaging ......................05 1.3.2 Product ........................05 1.4 Where to store the Instructions for use ............05 2. Product description............... 06 2.1 General information ....................06 2.2 Handling and transport ..................06 2.3 Application areas, use according to the intended purpose .....06... - Page 4 Contents. 4.10 Crank shortener ...................... 25 4.11 Special crank for knee contracture..............26 4.12 Removable axle stabilisers ................26 4.13 Exercise bike pedals ....................26 4.14 Foot positioning pedals ..................27 4.15 Foot pans ........................27 4.16 Foot pans with leg guidance ................28 4.17 Foot pans with dynamic leg guidance ............
-
Page 5: Preparation
1. Preparation. 1.1 Delivery On receiving the product, please check it for completeness, lack of faults and any transport damage. Inspect the goods in the presence of your forwarder. Should transport damage have occurred, please arrange for an inventory (determination of the faults) to be made in the presence of the forwarder. -
Page 6: Product Description
2.3 Application areas, use according to the intended purpose The momo tricycle. is a medical product of risk class 1 and was designed for children, youths and adults for outdoors. This tricycle permits users with disabilities (see indications) to move independently. The physiotherapeutic treatment is supported and the support and balance reactions as well as movement coordination are trained. -
Page 7: Contraindications
2. Product description. 2.3.2 Contraindications In general, the indication should be accompanied by a doctor/orthopae- dist. It should therefore be clarified prior to procurement whether contrain- dications exist for the patient. Any danger to the user or others through the use of a tricycle should be excluded. -
Page 8: Equipment In Accordance With Stvzo
2. Product description. • The tricycle basket may only bear loads of up to 20 kg. • When adjusting the tricycle there is the risk of trapping or crushing limbs. • Users who have difficulty reading must have someone read these Instructions for use aloud so that they understand how to use the product. -
Page 9: Equipment For Basic Model
2. Product description. 2.6 Equipment for basic model • Handlebar damper for stabilisati- • Aluminium frame with extra-low on when moving straight on access point • Drum brake in front wheel • Rim brake with separate parking (16" - 26") brake •... -
Page 10: Overview Of Equipment / Accessories
2. Product description. 2.8 Overview of equipment / accessories Saddle Art. No. Saddle Width Length 37 01 001 Standard saddle Size 1 15 cm 21 cm 37 02 001 Standard saddle Size 2 15 cm 24 cm 37 03 001 Standard saddle Size 3 18 cm 26 cm... - Page 11 2. Product description. Headrest Art. No. Headrest Width Height 37 01 029 Headrest Size 1 20 cm 15 cm 37 02 029 Headrest Size 2 23 cm 18 cm Handlebars Art. No. Classic handlebars – black Width 37 01 011 Classic handlebars for 12"...
- Page 12 2. Product description. Foot pans Foot Min. Max. Min. Max. Min. Max. pans with height height Art. No. width at width at width at width at Length dynamic leg of leg Leg gui- front front rear rear guidance guidance dance 37 01 035 Size 1 8.7 cm...
- Page 13 2. Product description. Positioning Art. No. Hand positioning - for all handlebars Front width 37 00 054 Hand positioning size 0 8.5 cm 37 01 054 Hand positioning size 1 10 cm 37 02 054 Hand positioning size 2 12 cm 37 03 054 Hand positioning size 3 14 cm...
- Page 14 2. Product description. Light system Art. No. Light system Retrofitting of the lights system for 12" side dynamos and reflectors acc. German 37 03 021 Road Traffic Regulations Retrofitting of a light system for 16“ + 20“ with side dynamos and reflectors 37 02 021 acc.
-
Page 15: Drive Possibilities
2. Product description. 2.9 Drive possibilities The momo tricycle. can be equipped with the following drives: Rigid sprocket During active pedaling, the rigid spro- cket supports the user in overcoming the "dead"/apex point of the crank. A passive user is assisted in pedalling constantly;... -
Page 16: The Initial Riding Attempts
2. Product description. 3 or 7-gear freewheel brake hub (with backpedal brake) Using the 3 or 7-gear freewheel brake hub, the user can stop and start pedalling at will. They can brake by pedalling backwards. The user-friendly 3 or 7-gear hub gear system permits switching of gears when the tricycle is at a standstill. -
Page 17: Settings
Please ensure that none of the user's extremities are in the respective area when making adjustments of any kind to minimise the risk of injury. 3.1 Presettings The momo tricycle. is supplied completely as- sembled. Prior to initial use, however, the fol- lowing pre-settings must be made. 3.1.1 Handlebar adjustment You can find our scope of delivery for hand- lebars on page 11 of these Instructions for use. -
Page 18: Saddle Adjustment
3. Settings. 3.1.2 Saddle adjustment You can find our selection of saddle forms on page 10 of these Instructions for use. Saddle height The height of the saddle can be adjus- ted on the frame saddle tube (A) by pulling the saddle post in or out. -
Page 19: Brakes
3. Settings. 3.2 Brakes For the momo tricycle. different brakes are available, depending on the user's individual requirements. 3.2.1 Parking brake The parking brake supports the use when climbing on and off the tricycle and secures it against inadvertently rolling away. To activate the parking brake, press the lever (A) on the hand- lebar stem (B) downwards. -
Page 20: Round Handlebars With Brake Lever Ring
3. Settings. 3.2.2 Round handlebars with brake lever ring Braking with round handlebars with brake le- ver ring is done by gently pushing down the ring (A) and is therefore suitable for users with limited strength in arms and hands who re- quire the round handlebars as support point at the same time. -
Page 21: Tyres And Hoses
3. Settings. 3.3 Tyres and hoses The tyres on the tricycle must always have sufficient air pressure, otherwise the tyres may puncture and the rims may be da- maged, or the riding characteristics ne- gatively influenced. The minimum and maximum tyre pressure is indicated on the casing (A). If the tyre tread only depresses slightly on being pressed forcefully with the thumbs, the tyre pressure is correct. -
Page 22: Accessories
4. Accessories. 4.1 Dynamic back and pelvic guide pelotte pads All back and pelvic guide pelotte pads can only be used in connection with a holding bracket (see Point 4.7). For depth adjustment of the pelotte pad holding bracket, please loosen the screws (A) on the right and left- hand sides of the support under the saddle, and bring the holding bracket into the requi-... -
Page 23: Push Bar
Through the steering unit, the ground clearan- ce under the rear axles is reduced on the momo tricycle. in 12" to approx. 6 cm. -
Page 24: Handlebar Lock Limiter
4. Accessories. 4.6 Handlebar lock limiter The handlebar lock limiter can be adjusted to determine the direction of travel. In order to adjust the handlebar lock limiter, please loo- sen all grub screws (A) and bring the limiter (B) into the required position. You can determine the direction by moving both limiters (B) to- wards the handlebar stop (C) and tightening them. -
Page 25: Universal Adapter
4. Accessories. 4.8 Universal adapter The universal adapter is mounted onto the holding bracket and is used to mount the strap set available for the tricycle. The uni- versal adapter is adjustable in height. To do this, simply loosen the screw (A) at the rear on the adapter and bring the universal adapter into the required position. -
Page 26: Special Crank For Knee Contracture
4. Accessories. 4.11 Special crank for knee contracture The special crank for knee contractures is suitable for 20" - 26" tricycles, and can either be mounted on the left or right-hand side. 4.12 Removable axle stabilisers To achieve more compact dimensions during transport, the nut must be removed and the quick-release clamp released. -
Page 27: Foot Positioning Pedals
4. Accessories. 4.14 Foot positioning pedals The foot positioning pedals are charac- terised through the integrated balancing weight, whereby the treads are automati- cally horizontally balanced. This permits the rider to step onto them independently. The strap (A) is adjustable in length, and at the same time provides easy side guidance. -
Page 28: Foot Pans With Leg Guidance
4. Accessories. 4.16 Foot pans with leg guidance See Point 5.3 for the function and set- tings of foot pans. The leg guidance also stabilises the foot joint and re- duces internal rotation of the leg. The adjustment of the leg guidance is to be undertaken through loosening of the screws (A) and moving them in the slotted hole. -
Page 29: Chest Strap
4. Accessories. 4.18 Chest strap The chest strap is attached to the width adjustable back pelotte pad, and, if required, ensures secure posi- tioning of the user. The strap is moun- ted with the aid of the plug lock to the back pelotte pad and threaded th- rough the strap guidance on the click buckle. -
Page 30: Groin Harness, T-Shaped
4. Accessories. 4.20 Groin harness, T-shaped The T-shaped groin harness is moun- ted onto the width adjustable pelvic pelotte pad. The strap is mounted onto the pelvic pelotte pad with the aid of the plug lock and threaded th- rough the strap guidance on the click buckle. -
Page 31: Cleaning And Servicing
5. Cleaning and servicing. 5.1 Cleaning and disinfecting 5.1.1 Cleaning In order to retain the functional safety and the appearance of the tricycle, it must be regularly maintained. Please observe the following guidelines: • Never allow dirt to dry onto the bicycle, but always remove it with water and a soft cloth or sponge. -
Page 32: Chain Maintenance
5. Cleaning and maintaining. 5.1.3 Chain maintenance Drive chains must be regularly cared for. This is in particular the case after riding in rain. The chain must be lubricated with a com- mercially available chain oil. Due to the ex- pansion of the chain which is a natural result of use, regular inspection of the chain ten- sion is required. -
Page 33: Maintenance Specifications
5. Cleaning and servicing. 5.3.1 Maintenance specifications • Check the chain and chain tension, adjust if necessary, clean and oil (see Point 5.1.3). • Check rear wheel track, adjust if necessary. • Check bottom bracket and lubricate if necessary. • Lubricate pedal bearing, check bearing clearance and if necessary adjust or replace. -
Page 34: Repairs
5. Cleaning and servicing. 5.4 Repairs Tricycle repairs that are not performed by your specialist dealer are at the user’s own risk and discretion. 5.5 Controls Controls to be performed by the user of the bicycle if necessary: • Check the chain and chain tension, adjust if necessary, clean and oil. •... -
Page 35: Duration Of Use And Re-Use
5. Cleaning and maintaining. 5.8 Duration of use and re-use The expected duration of use of our product, dependent on the usage intensity and amount of re-use, totals up to "8" years, if the usage takes place in accordance with the information in these instructions for use. It may be possible to use the product over and above this time period if it is in a safe condition. -
Page 36: Technical Data
6. Technical data. 6.1 Dimensions 12“ 16“ 20“ 24“ 26“ 26“ (XL) Pedal to top 30 - 38 42 - 57.5 50 - 64.5 56.5 - 66.5 - 83 74 - 90.5 edge of saddle 73.5 cm min. Pedal to top 33 - 41 45 - 60 52 - 68... -
Page 37: Tyre Pressure
6. Technical data. 6.3 Tyre pressure The minimum and maximum tyre pressure is indicated on the casing (A). 7. Guarantee. The two-year statutory guarantee period shall apply for all products. This begins with the delivery or handover of the goods. Should a verifiable ma- terial or manufacturing fault occur within this time period, we shall, after carriage paid return to us, view the indicated damage and, if applicable, either repair or deliver a new product at our discretion. -
Page 38: Identification
DIN EN 60601-1:2013 Medizinische elektrische Geräte Teil 1 – Allgemeine Festlegungen für die Sicherheit einschließlich der wesentlichen Leistungsmerkmale Medical elctrical equipment Part 1 – General requirements for basic safety and essential performance Datei: Konformitätserklärung momo dreirad Stand: Rev. 3.0 Seite: 1... - Page 39 This declaration of conformity applies only for products with above-named Item-numbers and is valid until 31.12.2023. Date: Datum / 01.04.2020 Sign: Unterschrift / Name: Name / Torsten Schuchmann Funktion / Function: Sicherheitsbeauftragter für Medizinprodukte / Safety officer for medical devices Datei: Konformitätserklärung momo dreirad Stand: Rev. 3.0 Seite: 2...
-
Page 40: Serial Number / Date Of Manufacture
Product labelling in accordance with MDR 8.3 Product version The momo tricycle. is available in six sizes (12“ - 26“ XL) and can be supple- mented through a diverse range of accessories (see Point 4). 8.4 Issue of the document Instructions for use momo tricycle.
Need help?
Do you have a question about the Momo and is the answer not in the manual?
Questions and answers