Dwyer Instruments Air Hood SAH SMART Series Installation And Operating Instructions Manual
Balancing instrument; predictair application software
Hide thumbs
Also See for Air Hood SAH SMART Series:
Table of Contents
Advertisement
Quick Links
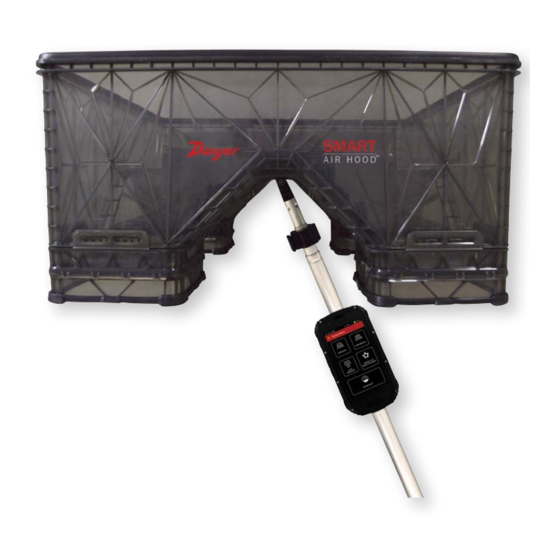
Series SAH SMART Air Hood
PredictAir
Specifications - Installation and Operating Instructions
The SERIES SAH SMART Air Hood
™
easy to operate air flow hood on the market. By using the included hood stand and
wireless communications to the handheld, a single operator can balance a branch in
less time than traditional balancing teams. Besides being lighter than most traditional
capture hoods, the ergonomic design makes the Series SAH easy to maneuver, with
less physical stress. The rugged polypropylene base hood features patented Quad
Flow Design Technology for controlling air flow and minimizing back pressure, which
yields superior measurement accuracy. The Wi-Fi direct communication gives reliable
communication with a distance of up to 200 yards between the hood and the handheld
test instrument. The SMART Air Hood
Application Software which reduces the number of steps in the air flow balancing
process using Predictive Balancing's Express Balance mode. Predictive Balancing
is a method of predicting the optimal flow set point for each register and the order in
which they should be adjusted.
Please see Bulletin TE-SAH for general installation instructions.
DWYER INSTRUMENTS, INC.
P.O. BOX 373 • MICHIGAN CITY, INDIANA 46360, U.S.A.
Application Software
™
Balancing Instrument is the most accurate and
Balancing Instrument includes the PredictAir
™
Balancing Instrument -
™
TABLE OF CONTENTS
Setup . . . . . . . . . . . . . . . . . . . . . . . . . . . . . . . . . . . . . . . . . . . . . . . . . . . . . . . . . . . .2
Connecting to a Wi-Fi Network. . . . . . . . . . . . . . . . . . . . . . . . . . . . . . . . . . . . . .2
Setting up a Google Account . . . . . . . . . . . . . . . . . . . . . . . . . . . . . . . . . . . . . . .3
Application Software. . . . . . . . . . . . . . . . . . . . . . . . . .4
™
Application Preferences . . . . . . . . . . . . . . . . . . . . . . . . . . . . . . . . . . . . . . . . . . .4
Connecting to the Hood . . . . . . . . . . . . . . . . . . . . . . . . . . . . . . . . . . . . . . . . . . .4
Importing a Diffuser . . . . . . . . . . . . . . . . . . . . . . . . . . . . . . . . . . . . . . . . . . . . . .6
Meter Mode . . . . . . . . . . . . . . . . . . . . . . . . . . . . . . . . . . . . . . . . . . . . . . . . . . . . . . .7
™
Zeroing the Hood . . . . . . . . . . . . . . . . . . . . . . . . . . . . . . . . . . . . . . . . . . . . . . . .7
Selecting the Diffuser . . . . . . . . . . . . . . . . . . . . . . . . . . . . . . . . . . . . . . . . . . . . .8
Manual K-Factor . . . . . . . . . . . . . . . . . . . . . . . . . . . . . . . . . . . . . . . . . . . . . .8
Preferences . . . . . . . . . . . . . . . . . . . . . . . . . . . . . . . . . . . . . . . . . . . . . . . . . . . .9
Logging Preferences . . . . . . . . . . . . . . . . . . . . . . . . . . . . . . . . . . . . . . . . . .9
Hood Information Preferences . . . . . . . . . . . . . . . . . . . . . . . . . . . . . . . . . . .9
Volume Airflow Preferences . . . . . . . . . . . . . . . . . . . . . . . . . . . . . . . . . . . . .9
Temperature Preferences . . . . . . . . . . . . . . . . . . . . . . . . . . . . . . . . . . . . . . .9
Humidity Preferences . . . . . . . . . . . . . . . . . . . . . . . . . . . . . . . . . . . . . . . . .10
Barometer Preferences . . . . . . . . . . . . . . . . . . . . . . . . . . . . . . . . . . . . . . .10
Overall Preferences . . . . . . . . . . . . . . . . . . . . . . . . . . . . . . . . . . . . . . . . . .10
Logging. . . . . . . . . . . . . . . . . . . . . . . . . . . . . . . . . . . . . . . . . . . . . . . . . . . . . . .10
Predictive Balancing . . . . . . . . . . . . . . . . . . . . . . . . . . . . . . . . . . . . . . . . . . . . . . . .12
Branches . . . . . . . . . . . . . . . . . . . . . . . . . . . . . . . . . . . . . . . . . . . . . . . . . . . . .12
Branches Menu . . . . . . . . . . . . . . . . . . . . . . . . . . . . . . . . . . . . . . . . . . . . .13
Add Registers . . . . . . . . . . . . . . . . . . . . . . . . . . . . . . . . . . . . . . . . . . . . . . . . . .14
Balancing Procedure . . . . . . . . . . . . . . . . . . . . . . . . . . . . . . . . . . . . . . . . . . . .16
Final Results Menu. . . . . . . . . . . . . . . . . . . . . . . . . . . . . . . . . . . . . . . . . . .18
FCC/Industry Canada Notice . . . . . . . . . . . . . . . . . . . . . . . . . . . . . . . . . . . . . . . . .19
1
Phone: 219/879-8000
Fax: 219/872-9057
Bulletin TE-SAH-SW
www.dwyer-inst.com
e-mail: info@dwyermail.com
Advertisement
Table of Contents

Subscribe to Our Youtube Channel
Related Manuals for Dwyer Instruments Air Hood SAH SMART Series


Summary of Contents for Dwyer Instruments Air Hood SAH SMART Series
-
Page 1: Table Of Contents
FCC/Industry Canada Notice .........19 DWYER INSTRUMENTS, INC. -
Page 2: Setup
I. SETUP Next, choose a local Wi-Fi network to connect to. To be able to update the PredictAir Application Software, a Google account must be ™ created so that the application can be updated from Google Play store. To properly ™... -
Page 3: Setting Up A Google Account
SETTING UP A GOOGLE ACCOUNT If you have a Google account select “Existing” and enter in your account information to First, go back to main Settings screen and choose the “Add account” option. register your Google account to the device. If you do not have a Google account follow the guide below to add one. -
Page 4: Updating The Predictair Application Software
If the account was created correctly the following screen will show your new account. APPLICATION PREFERENCES When the application is first opened, the following screen will be shown. Touch to edit the default units of these fields Touch to save the preferences and go to the app’s main page UPDATING THE PREDICTAIR APPLICATION SOFTWARE... - Page 5 As the app discovers hoods, they will be added to the list under “Found SMART Airflow Press “CONNECT” to start the process of establishing the link between the handheld Hoods”. device and the hood. This will bring up a dialog box while the process of establishing the connection is performed.
-
Page 6: Importing A Diffuser
Diffusers can be imported to the application by the following instructions. Load the diffuser into a directory on the device. This has to be a zipped file obtained from the Dwyer Instruments, Inc. website. Select the diffuser list to import. -
Page 7: Meter Mode
If the diffuser list was set up correctly, and the version is current, then the app will give If a hood has not previously been connected or by pressing “Settings”, then see the the below message. If there isn’t a diffuser list loaded, then the app will generate a previous Connecting The Hood section. -
Page 8: Selecting The Diffuser
Press the ZERO button. This will begin the zeroing process. When complete, it will Press on the diffuser to bring up the list of diffusers and select the diffuser that will be show the following screen. used. If there is too much air flow for the hood to be zeroed, then the following screen will be Manual K-Factor displayed. -
Page 9: Preferences
Define it as a Register for supply flow or Return for return flow. Hood Information Preferences To view the hood information, press the hood icon. Press on the K-Factor field to enter the K-factor of the diffuser, then press “Done” to return to the Meter Mode screen. -
Page 10: Humidity Preferences
Humidity Preferences LOGGING To view the humidity information, press the drops icon. Log files can be generated from the Meter Mode screen. To start logging, slide up the bottom tab to display the logging tile. Touch to change unit type Touch to change units Barometer Preferences... - Page 11 Pressing the “Open Log” button will display the following screen. The VIEW CONFIGURATION DATA button will switch to a screen that displays the hood information. This provides the hood’s version information, name, type, serial number, and all the sensor’s information. This screen displays all the sensors raw data and display data.
-
Page 12: Predictive Balancing
Press on the drop down menu to change which sensor is being displayed in the chart. Next, press the desired branch. This will bring up a dialog with the available actions for that branch. If the branch has been previously started, then the following menu will be shown. -
Page 13: Branches Menu
“Export Branch” will bring up a file dialog. “View Branch” will open a dialog box containing the information for the branch in a non-editable form. Press the “File Name” field to enter the file name associated with this branch. This field can’t be blank or the below error message will appear. -
Page 14: Add Registers
Pressing the branch name loads that branch and adds it to the list of branches. Once Pressing “Start”, “Restart”, or if the process was paused while still loading registers, complete, the app will return to the Branches main page with the new branch added the Load Registers screen will be brought up. - Page 15 “Add Register” will bring up the Add Edit Register screen with nothing filled in except “Clear Registers” will erase all the registers in the list for the selected branch. for the default diffuser. As in Meter Mode, if the desired diffuser is not shown, press the manual diffuser to create a diffuser with a known K-Factor.
-
Page 16: Balancing Procedure
BALANCING PROCEDURE Press the register button again to store the reading, at which point it will change from The START button will start the balancing process. The START button will only be white to green, indicating that a value has been stored for that register. enabled if there are two or more registers in the register list. - Page 17 To enter data for a register that cannot be measured by the hood use the “Manually Pressing on the EXPRESS button starts the Express balancing method, which starts Enter Data” in the slide out menu. A register needs to be selected to enter data with the Place the Smart Hood dialog box.
-
Page 18: Final Results Menu
“Manual Data” will bring up the Manual Data screen similar to the initial sweep manual The options and controls of the Final Reading screen are the same as in the Initial entry dialog. After the manual data is entered, another dialog will appear. This manual Readings screen. -
Page 19: Fcc/Industry Canada Notice
Pursuant to FCC 15.21 of the FCC rules, changes or modifications CAUTION not expressly approved by Dwyer Instruments, Inc. may void the user’s authority to operate the equipment. RF NOTICE This product complies with FCC OED Bulletin 65 and Industry NOTICE Canada’s RSS-102 radiation exposure limits set forth for an... - Page 20 ©Copyright 2016 Dwyer Instruments, Inc. Printed in U.S.A. 7/16 FR# 444357-10 Rev. 1 DWYER INSTRUMENTS, INC. Phone: 219/879-8000 www.dwyer-inst.com P.O. BOX 373 • MICHIGAN CITY, INDIANA 46360, U.S.A. Fax: 219/872-9057 e-mail: info@dwyermail.com...
Need help?
Do you have a question about the Air Hood SAH SMART Series and is the answer not in the manual?
Questions and answers